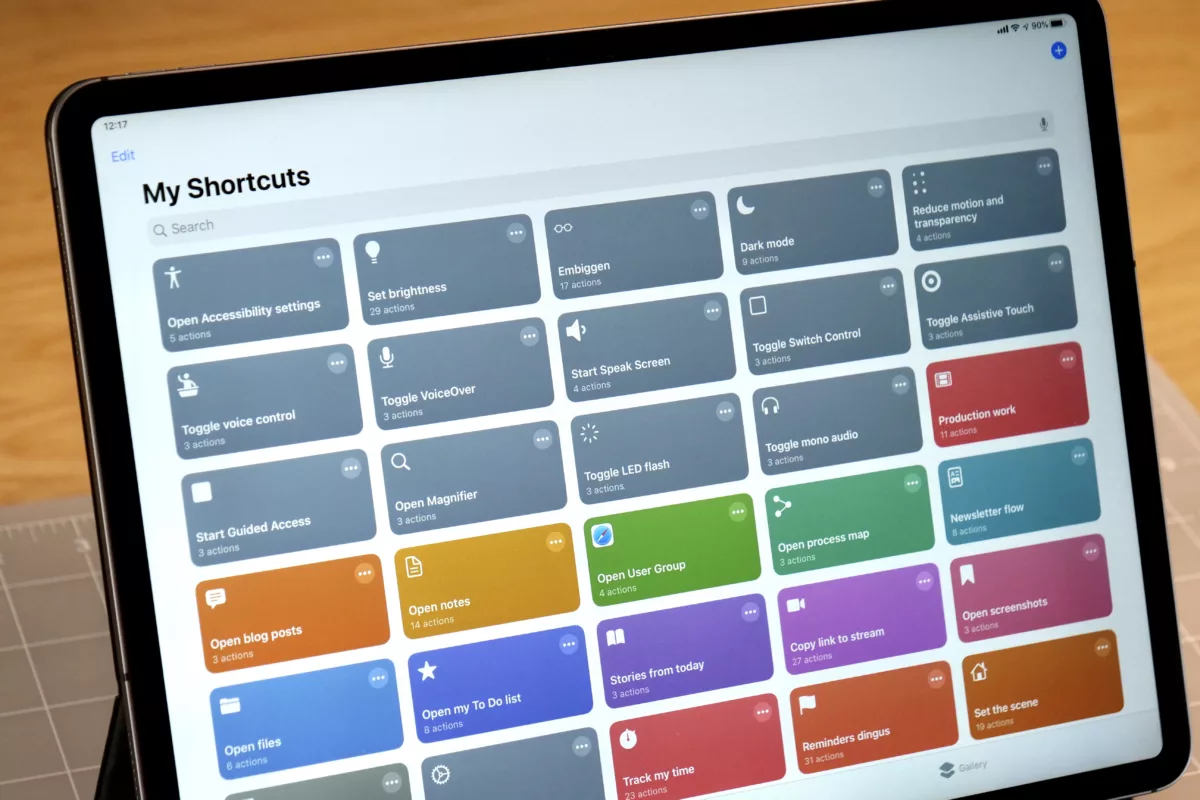
On episode 30 of Smart Tech Today, I spent about 10 minutes describing a series of shortcuts I put together that take advantage of the accessibility actions found in the Shortcuts app ahead of today, May 21, which is Global Accessibility Awareness Day (GAAD).
Accessibility features are incredibly important for modern technology to provide, making it possible for everyone to utilize their hardware & software regardless of their personal situation – you either have direct accessibility needs that require specific use of your technology, you’ll one day need them yourself, or you benefit from those features anyway (think Dark mode).
The Shortcuts app has always been an Accessibility priority for Apple, with them declaring as much in their confirmation story when they acquisition of the Workflow app before it became Shortcuts1:
“The Workflow app was selected for an Apple Design Award in 2015 because of its outstanding use of iOS accessibility features, in particular an outstanding implementation for VoiceOver with clearly labeled items, thoughtful hints, and drag/drop announcements, making the app usable and quickly accessible to those who are blind or low-vision.”
In iOS 13, Apple went further and added a set of actions to Shortcuts for controlling Accessibility features, available to use inside the shortcut editor in Apps > Settings.
These actions enable remote control over the state of many useful Accessibility settings, letting you create shortcuts to toggle them that can be run from the Shortcuts app, but also by:
– running from the Shortcuts widget
– typing in Spotlight search
– asking Siri,
– making Home screen icons, or even
– tapping your iPhone to an NFC tag.
Here’s the clip where I talk through my shortcuts:
And here is the full set you can add to your collection2:
- Open Accessibility settings: Opens a deep link directly into the Settings > Accessibility page. Run this shortcut to explore the Accessibility features available on every iPhone and iPad that help you customize your device for your individual needs.
-
Set brightness: Presents a menu with options for how to set the current device’s brightness using a combination of actual brightness levels and the “White Point” accessibility feature that can be used to reduce the intensity of bright colors. Run this shortcut to change how bright your screen appears throughout the day – plus you can mix and match the levels according to your needs.
-
Embiggen: Presents a menu for choosing how things appear on your device – “Easier” changes the Text Size to “extra extra extra large” and turns on Reduce Motion, Reduce Transparency, and Increase Contrast, while “Defaults” lets you quickly change it all back. Run this shortcut if you want to temporarily make your device easier to use or hand off to anyone with Accessibility needs, and then be able to quickly change it back.
-
Dark mode: Presents a menu for changing your screen’s appearance to Light mode or Dark mode. Keep this in your Shortcuts widget if you want to quickly change the appearance (rather than diving into Control Center or Settings to change it).
-
Reduce motion and transparency: Toggles the Reduce Motion and Reduce Transparency features of iOS that can help avoid fatigue in users sensitive to those types of effects. Run this shortcut if you want to temporarily reduce eye strain, or just to explore how Motion and Transparency affect your experience on iPhone and iPad. Run this again to switch them off (or back on later).
-
Toggle voice control: Toggles the Voice Control feature in Accessibility that enables voice input to select and operate system features without direct physical interaction; also uses Face ID to check for attention and avoid listening when you’re not using the device. Run this shortcut to run Voice Control on/off as needed – if you like Siri Shortcuts, you might like controlling your whole device with just your voice!
-
Toggle VoiceOver: Turns the VoiceOver feature of iOS on and off again as needed, enabling the device to speak out elements of the screen that are tapped or selected and allowing blind or low-vision users to understand what’s happening on screen. Run this shortcut to toggle VoiceOver as needed – this is the best way to understand how Accessibility features enable everyone to use technology, regardless of whether you can even see the screen.
-
Start Speak Screen: Activates the “Speak Screen” popover that prompts the device to dictate elements on the screen one-by-one, letting users hear what’s visible without manually tapping through everything. Once you’re done, tap the X on the screen to end it. Run this shortcut when you want your device to read aloud anything on screen, from an article you’re reading to the user interface of an application.
-
Toggle Switch Control: Turns the “Switch Control” feature on/off, which allows for physically-attached switches to be used for navigating the iOS interface without reaching around the screen or using a trackpad. Run this shortcut if you have limited mobility and want to use Switch Control-enabled external gear to take advantage of iPhones and iPads.
-
Toggle Assistive Touch: Turns the AssistiveTouch feature on/off, enabling an on-screen touch target and menu to appear that provides additional access to Accessibility features while using iOS. Run this shortcut to quickly access the AssistiveTouch menu and its additional features, plus quickly turn it off when needed. Can also be used for specific pointer devices that require AssistiveTouch to be activated to map actions to additional buttons.
-
Start Guided Access: Enables the “Guided Access” feature of iOS that prevents closing or navigating from the current app (requires Guided Access first be turned “On” in Accessibility > Guided Access). Run this whenever you need to activate Guided Access – if someone with tremors is using the device, it can help them stay within the app their using and avoid accidentally triggering multitouch gestures that swipe away to another app.
-
Open Magnifier: Opens the “Magnifier” feature of iOS that uses the camera and a simple zoom control that allows users to see things that are far away as if they were up close; plus, it allows for different color filters for anyone who might be colorblind or have other difficulty visually distinguishing things. Run this shortcut whenever you want to read something far away (or even take a quick screenshot of the text), or if you want to filter whatever you’re looking at for visual clarity depending on your needs.
-
Toggle LED flash: Turns the “LED flash” feature of iOS on/off, which blinks the camera flash whenever there’s a new notification or alert. Run this if you need high awareness of incoming notifications on your iPhone and iPad using a visual flash of light instead of features like audible alerts or silent (and subtle) vibrations.
-
Toggle mono audio: Changes iOS’ sound output from stereo to mono, piping exactly the same sound into both ears instead of creating audio separation. Use this shortcut if you have limited hearing in one or both ears and want to hear all parts of a song with stereo separation – or if you can only listen to one headphone cup at a time (DJs?).
You can learn more about Apple’s accessibility efforts on their website, they’re sharing lots about GAAD across their social channels, and there’s also a brand-new Accessibility category in the Shortcuts Gallery:
Also did you know there's a Shortcuts for Accessibility Gallery live now? There's some great new Shortcuts there to check out including Medication Counter. Accessibility features w/ Toggle collections, including VoiceOver, Voice Control, AssistiveTouch, Closed Captions etc. pic.twitter.com/PQrupssYXV
— Janette Barrios (@jbarpr) May 21, 2020
Apple’s new collection includes an impressive array of shortcuts, from simple toggles like mine to a 90-action “Pain Report” tool for tracking your health over time – I highly suggest you check it out. If you’re on iOS, tap here to open the Shortcuts Gallery.
If you have any suggestions for Accessibility-related shortcuts, please let me know on Twitter.
(Story updated with details about new Accessibility section in Gallery.)
- I was part of the Workflow team and left Apple shortly after the acquisition. ↩
- If you’re having trouble adding these shortcuts, be sure to go into the Settings app \> Shortcuts and toggle “Allow Untrusted Shortcuts.” Plus, you need to have run at least one shortcut in the Shortcuts app before this setting becomes available – grab one from the Gallery and try it out if you haven’t run any yet. ↩


