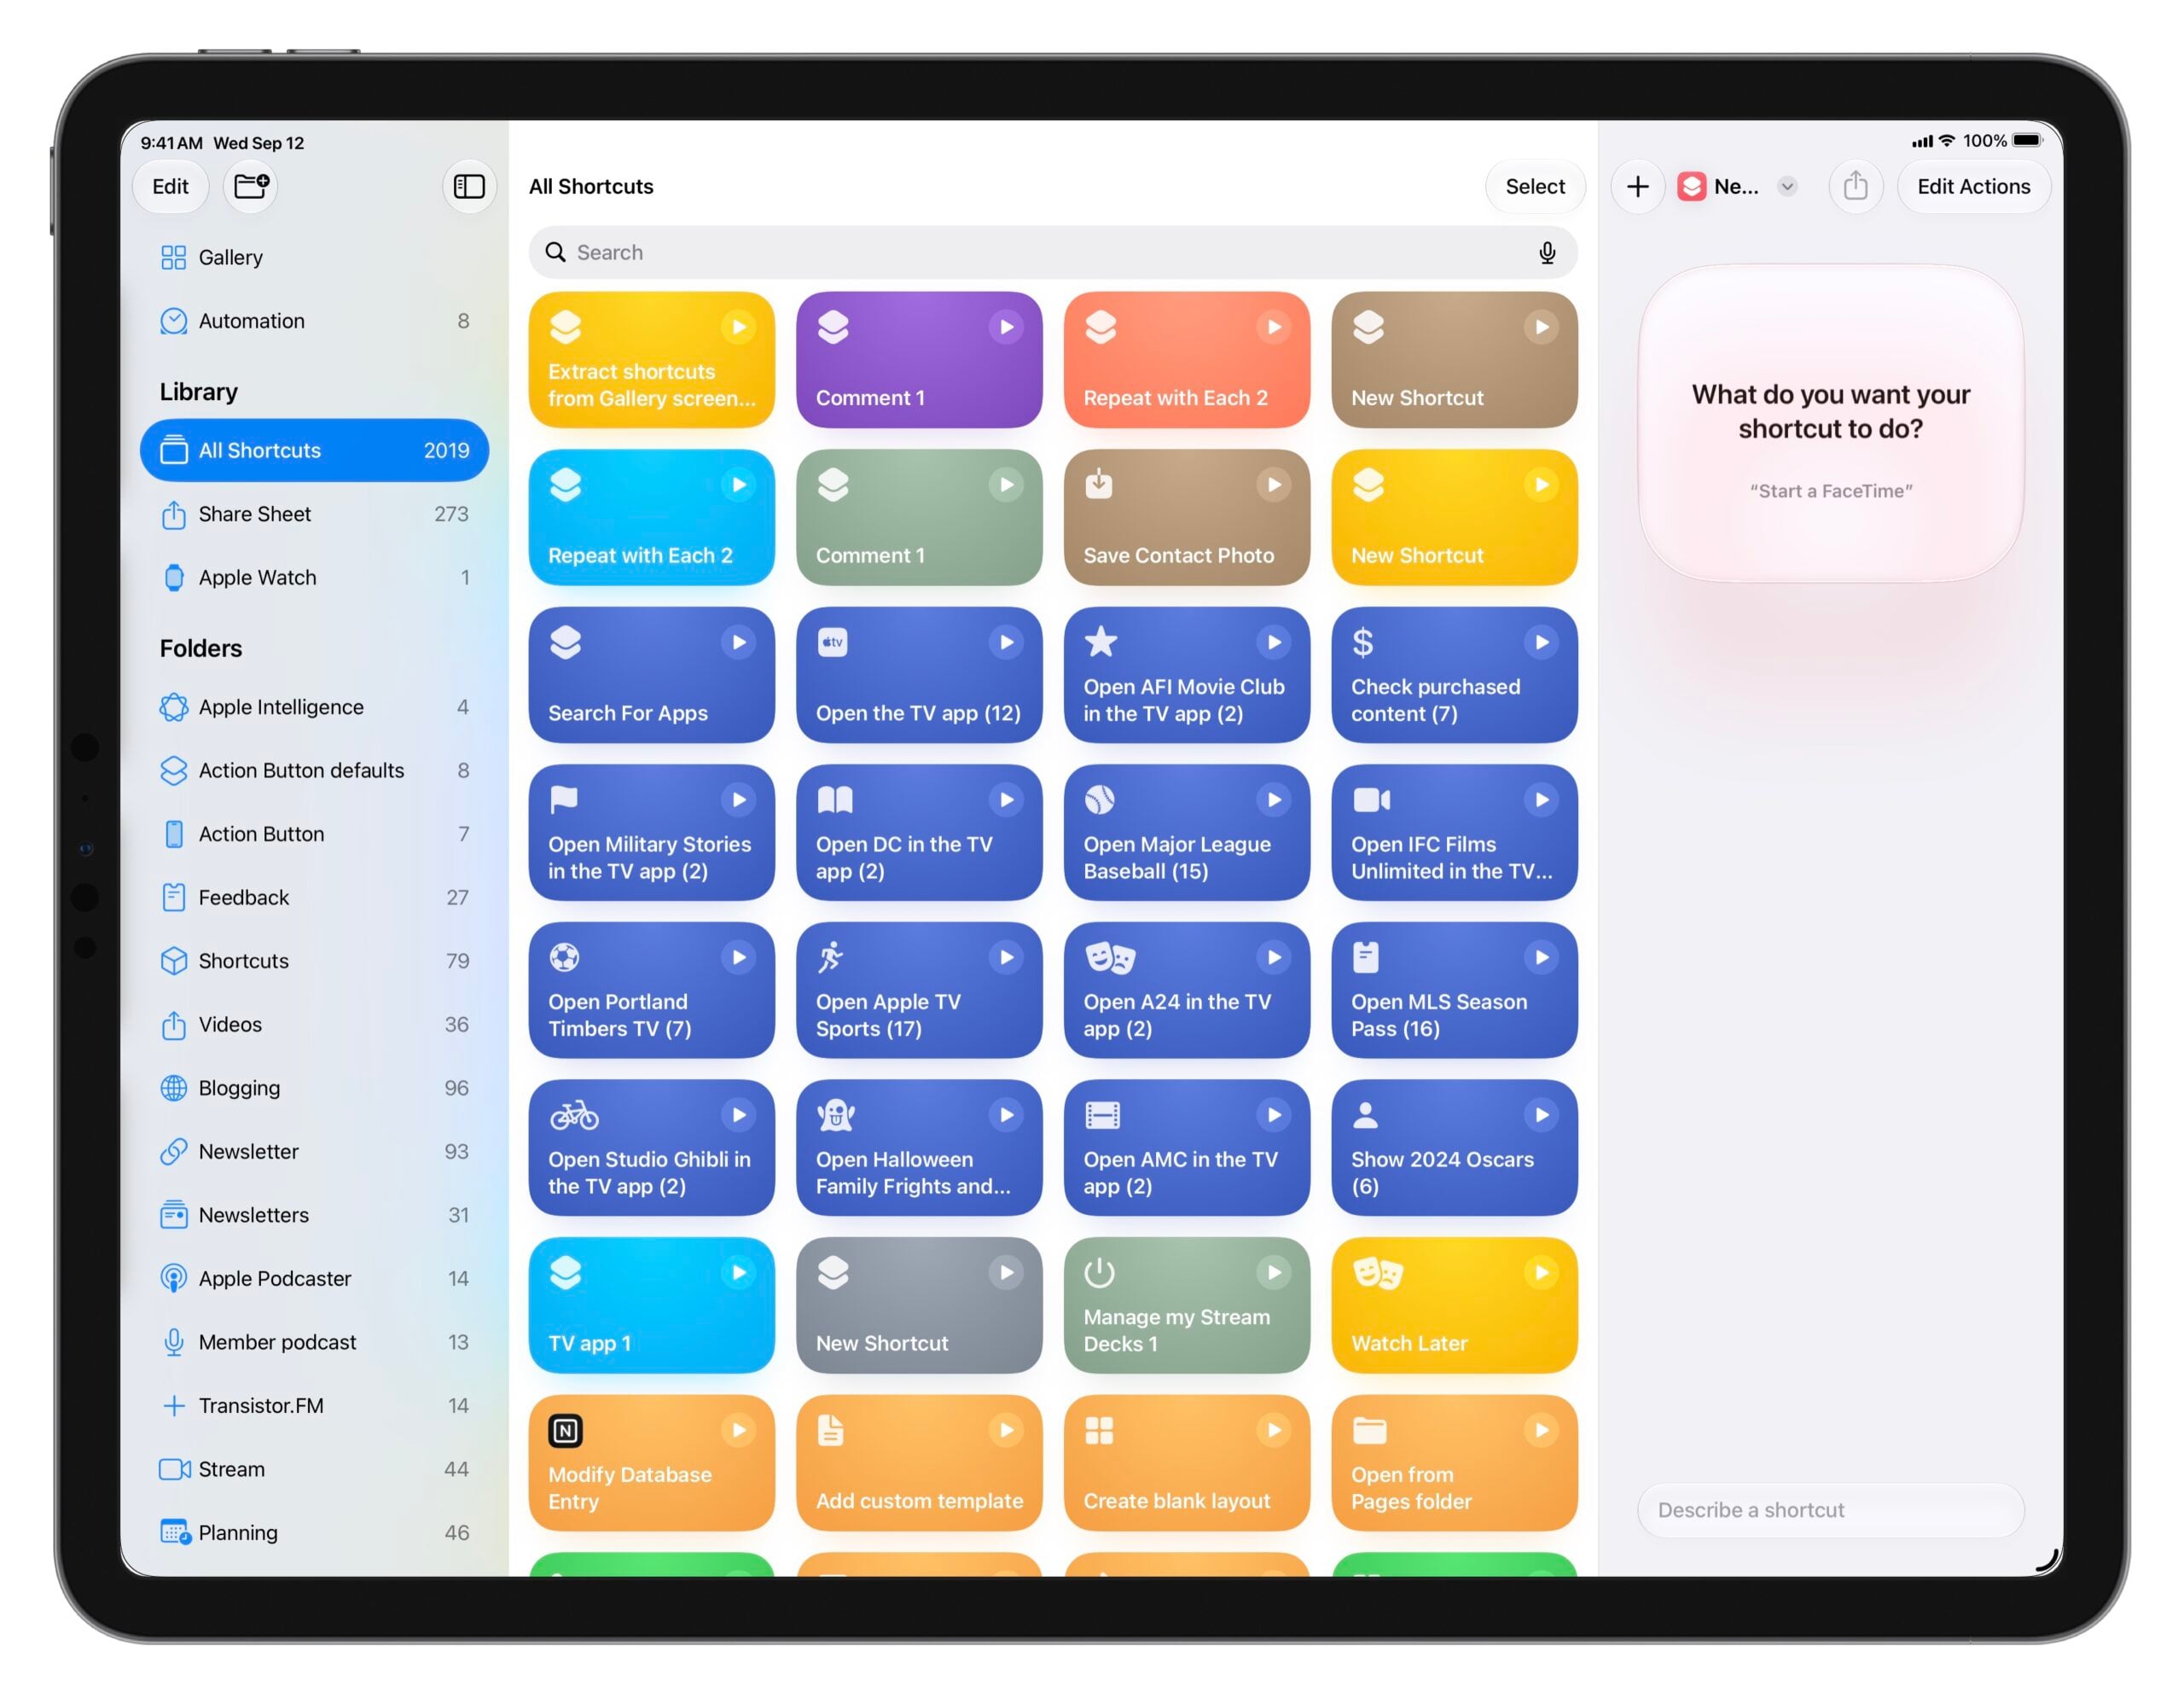
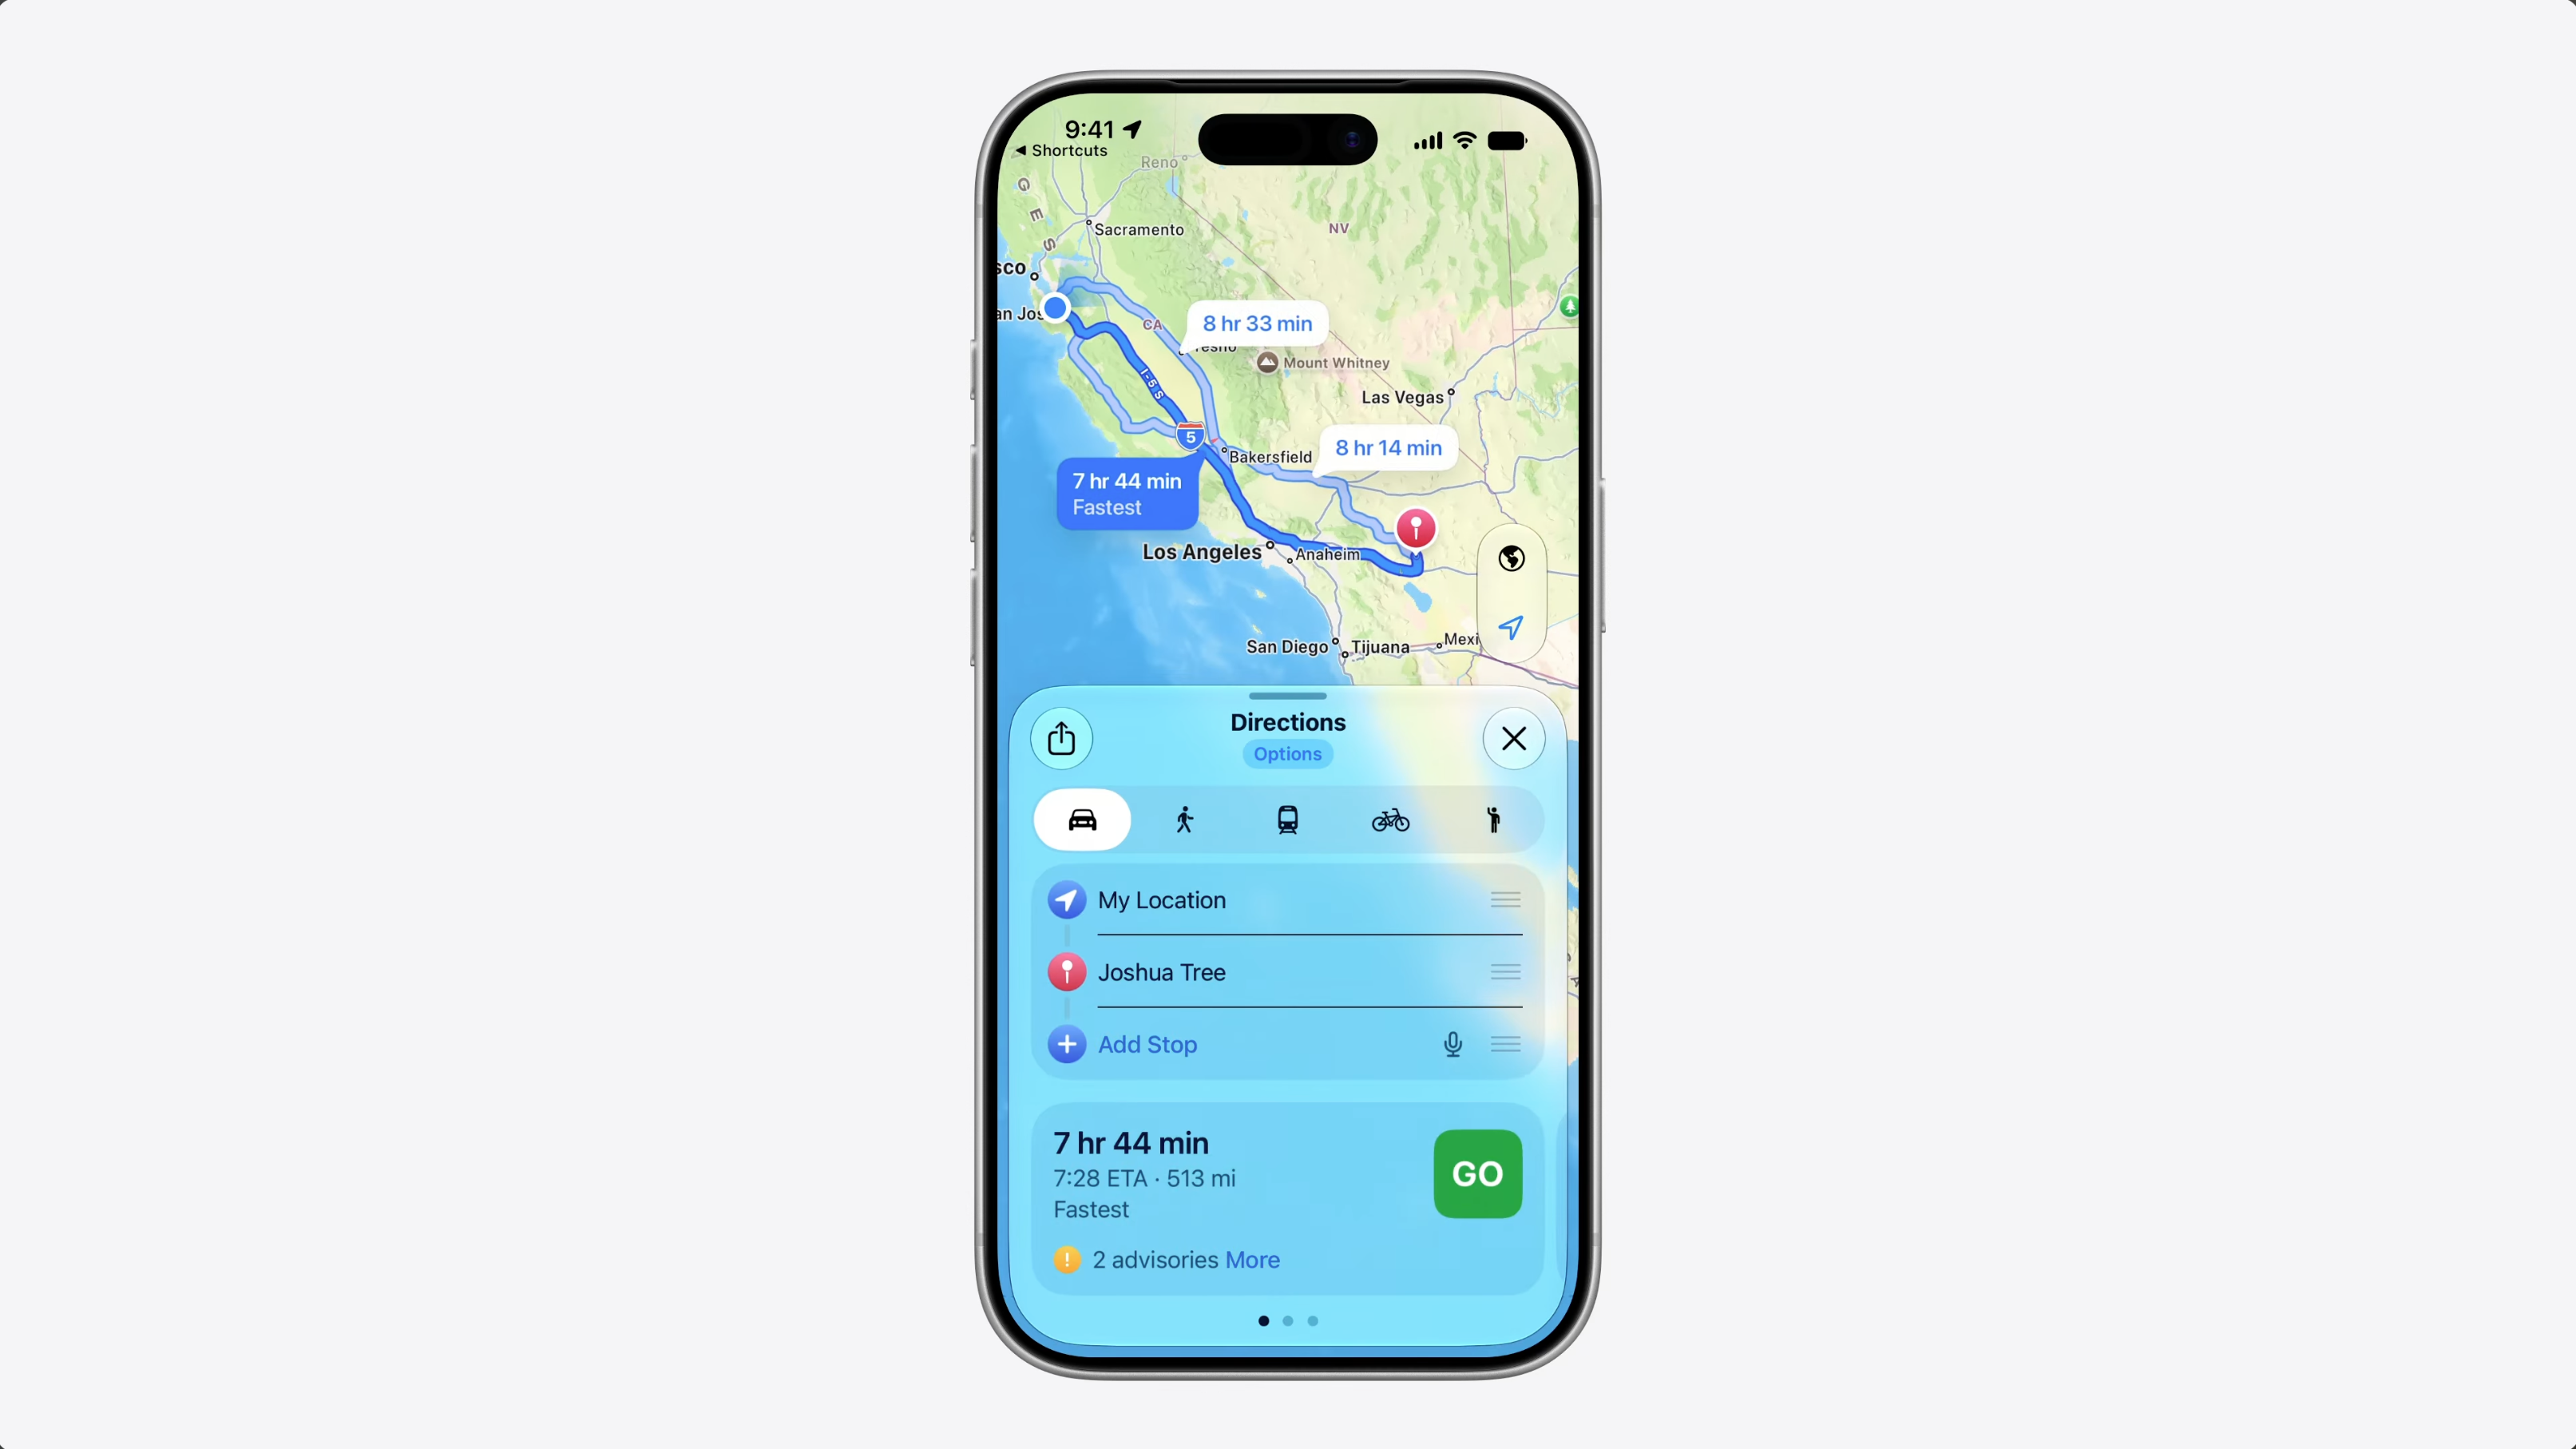
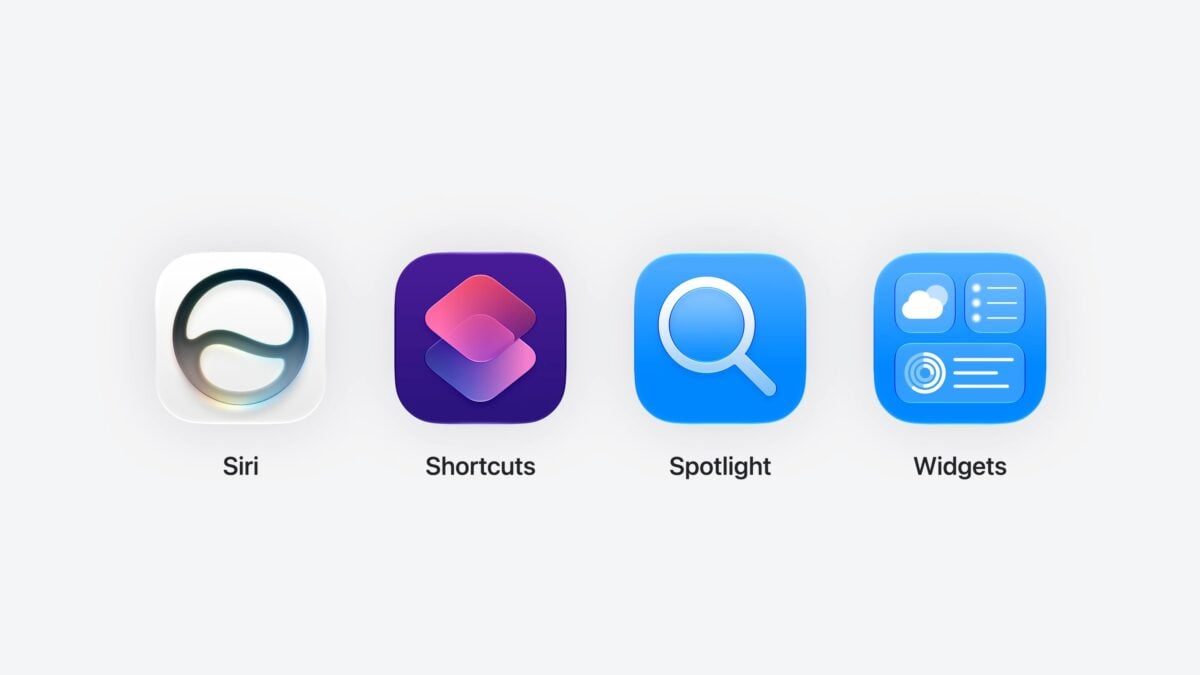
I’ve just added a new folder to the Shortcuts Library — my set of Waveform shortcuts. Use these to follow the show, listen to episodes, and pull directly from the RSS feeds for the Clips and MKBHD channels:
Watch the Waveform podcast on YouTube: Opens the deep link to the YouTube playlist for the WVFRM podcast – bookmark it to add it your Podcasts collection in YouTube Music. On iPad, waits 30 seconds for you to start a video and then goes to the Home Screen to activate Picture-in-Picture.
Open a clip from Waveform: Gets the Waveform Clips YouTube channel ID, extracts the RSS feed, presents a list of 15 recent videos, and opens the URL into YouTube.
Play a video from MKBHD: Gets the MKBHD YouTube channel ID, extracts the RSS feed, presents a list of 15 recent videos, and opens the URL into YouTube.
Follow Waveform: Opens the MKBHD Linktree website where you can follow the Waveform podcast on any channel.
Open Waveform on X: Deep links into the @WVFRM profile so you can see recent posts and follow the show.
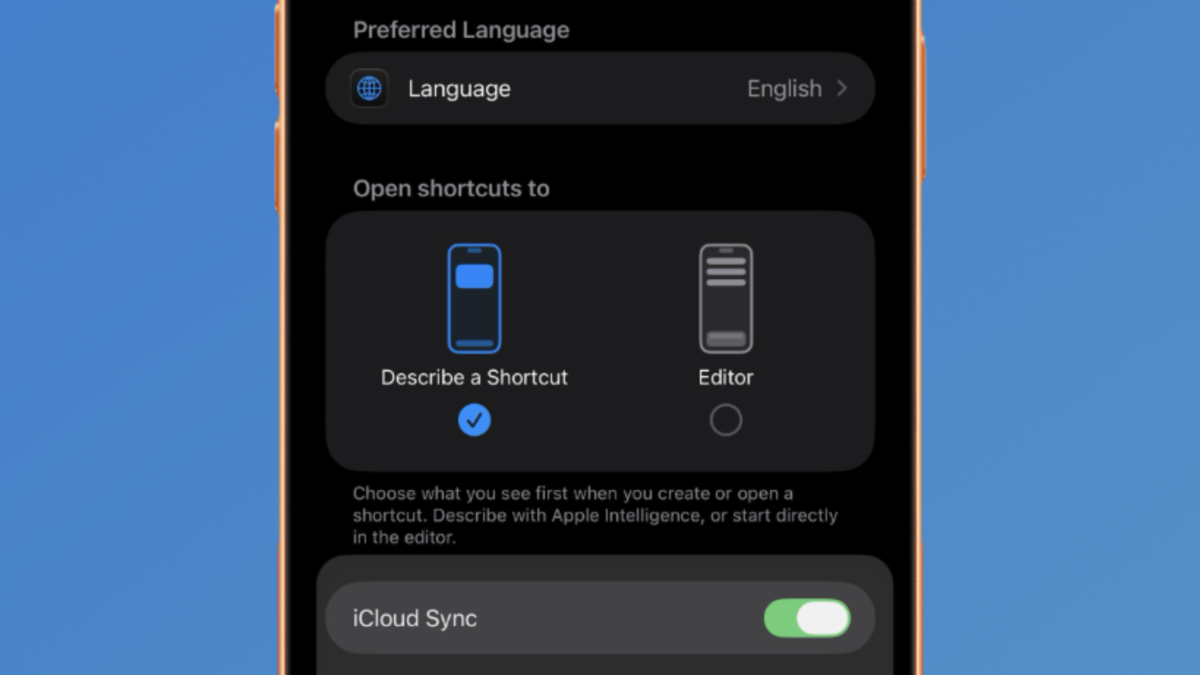
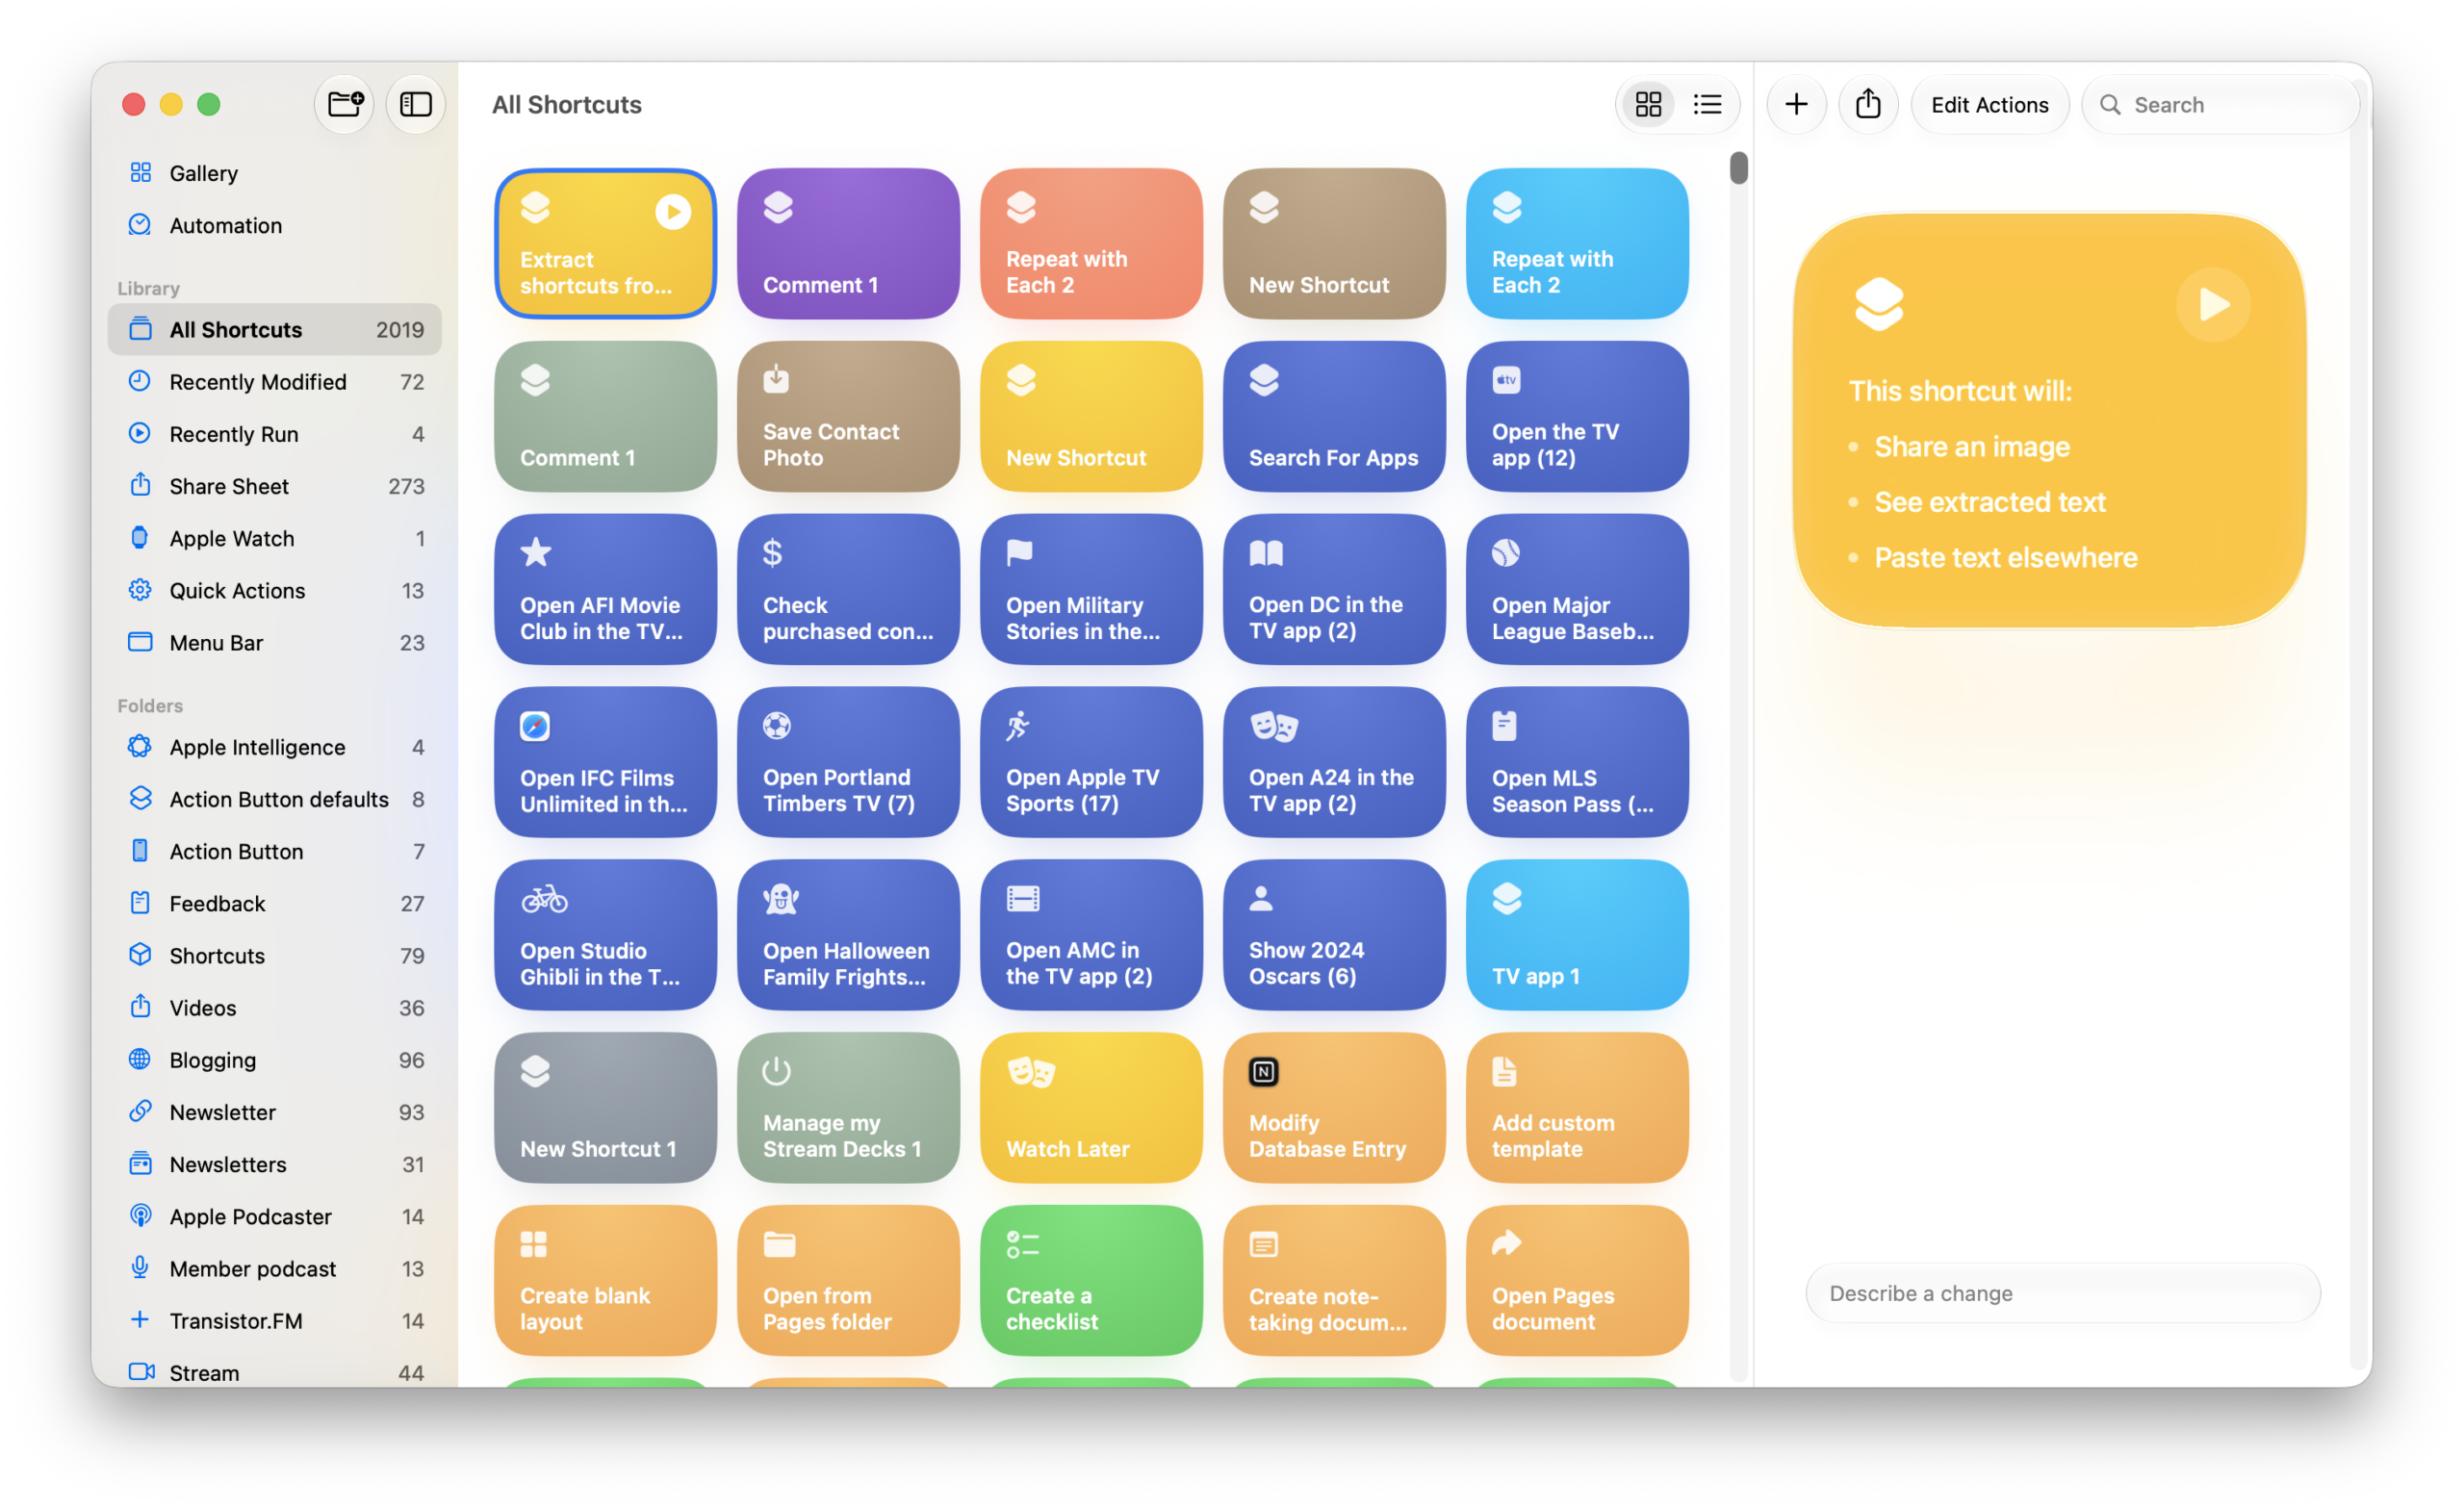
New in iOS 27, Apple has a setting for the Shortcuts app called “Open shortcuts to” that lets you pick between “Describe a Shortcut” (by default) or the Editor.
“Choose what you see first when you create or open a shortcut. Describe with Apple Intelligence, or start directly in the editor.”
For long-time Shortcuts users like me, it was already common to skip past Describe a Shortcut and press the button with three lines to open to the Editor to find actions for the shortcut one already has in mind.
Plus, the Apple Intelligence logo in the corner can be tapped to go back into Describe a Shortcut at a moment’s notice.
Further, when returning to the Describe a Shortcut view, Apple Intelligence will summarize the actions and create a new bulleted description. I’ve long been asking for a Description field, so an automatic description is a great step.
On iPad, enabling this setting also restore the full-screen Library and Folder views, making Describe a Shortcut a toggle inside a shortcut view rather than attached on the side of the library.
On MacOS, there is currently no setting for this, and Shortcuts always shows the Describe a Shortcut view on the right side of the Library (with the Editor as a pop-out window for each new shortcut).
I’ll probably use the Editor view for now until Describe a Shortcut works better with actions from third-party apps, since I was skipping it every time. Plus, I’m happy it restores a more library-like view on iPadOS – even if only so I can take full-screen screenshots 🙂 I hope all brings the setting to macOS as well, and enables the full-screen library view when toggled.
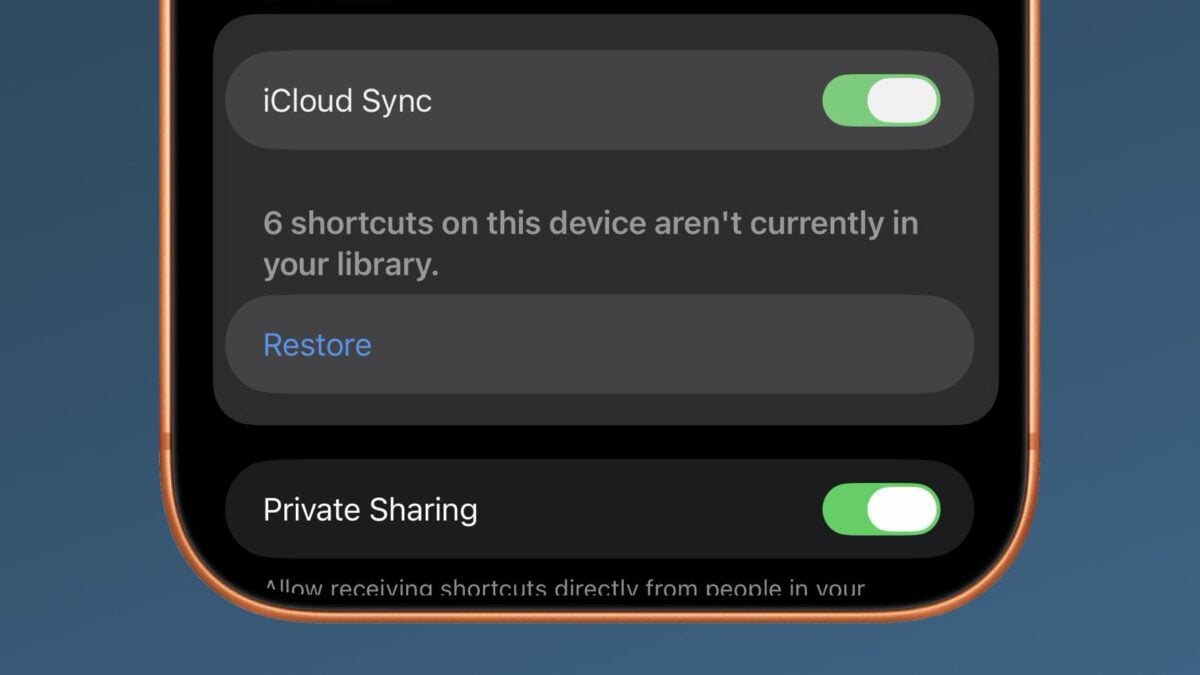
New in iOS 27 developer beta 4, Apple has added a Restore button in the Settings for the Shortcuts app, as shown in Reddit user u/iBanks3’s post.
Located in Settings > Apps > Shortcuts, the caption reads:
“[X] shortcuts on this device aren’t currently in your library.”
Pressing the Restore button will open into the Shortcuts app and immediately add all the shortcuts available to be restored, placing them in your All Shortcuts view unsorted.
I personally had over 200 shortcuts to restore from iCloud, but it’s not clear to me when they were lost or why some are duplicates (indicated by a 1 at the end). That being said, I’ve recently deleted, re-added, and then re-deleted up to 4,000 shortcuts from my collection, so it’d be easy to slip through the cracks during that process.
Regardless, having an OS-level function to restore your shortcuts collection, should anything go wrong, will be a welcome peace-of-mind.
These updates help developers represent unique data as known values, tell Siri what data is relevant, improve performance with large collections, and make sure data inside Siri conversations stays in sync across devices.
Now, what happens when the same entity needs to work on multiple devices?
With our 2027 releases, Siri can continue conversations across devices – and your entities can be part of those conversations.
If your app runs on multiple devices, people might start a conversation on one device and continue on another. But there’s a challenge.
If I ask Siri on my iPhone to add a photo to an album…
…then switch to my other device and ask Siri to tag that photo – Siri might not be able to find that photo.
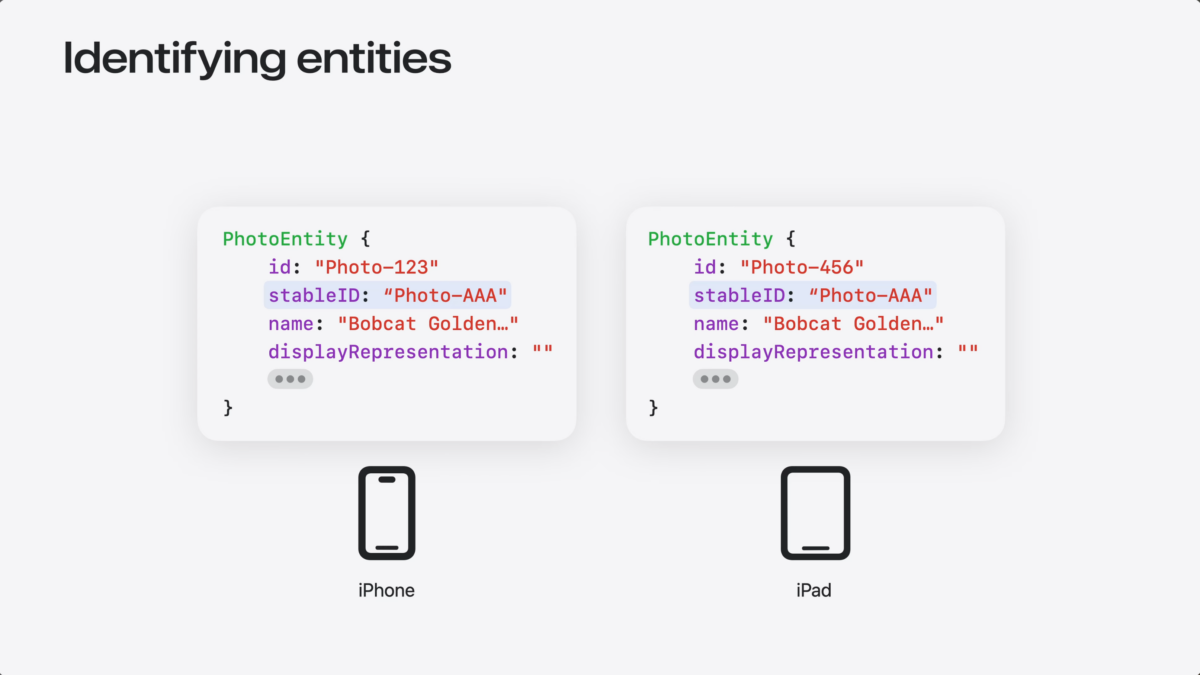
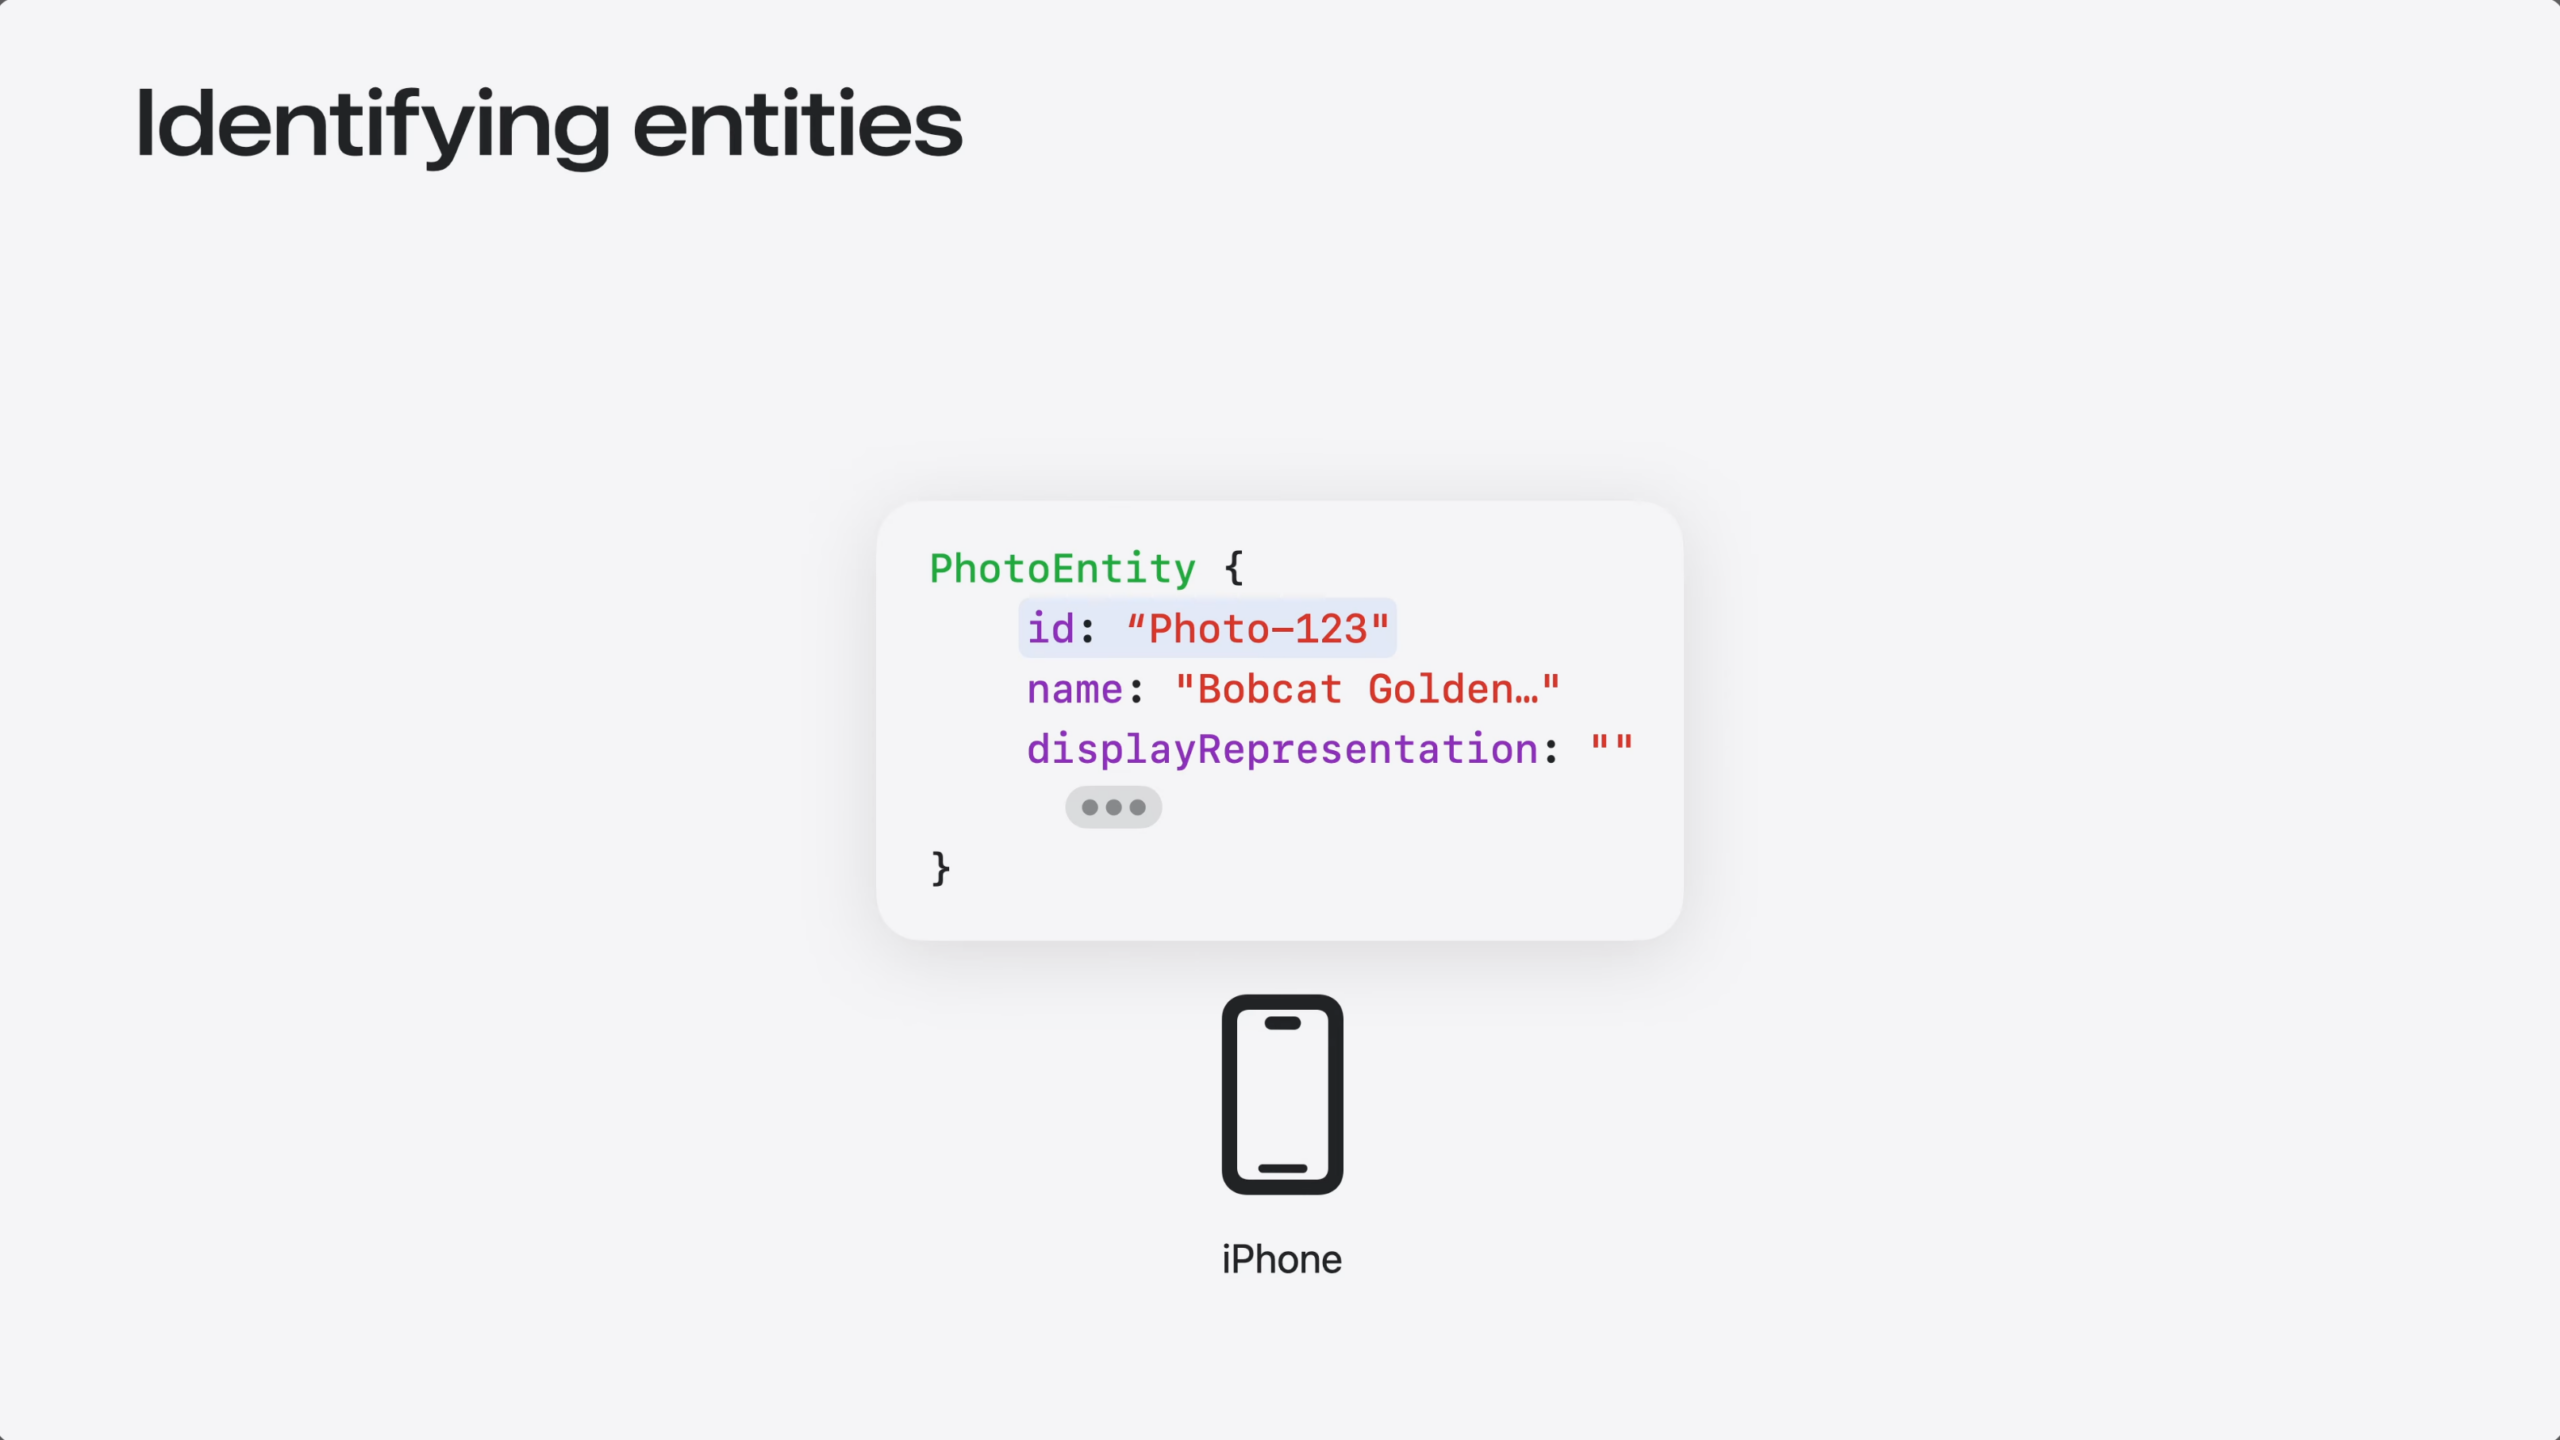
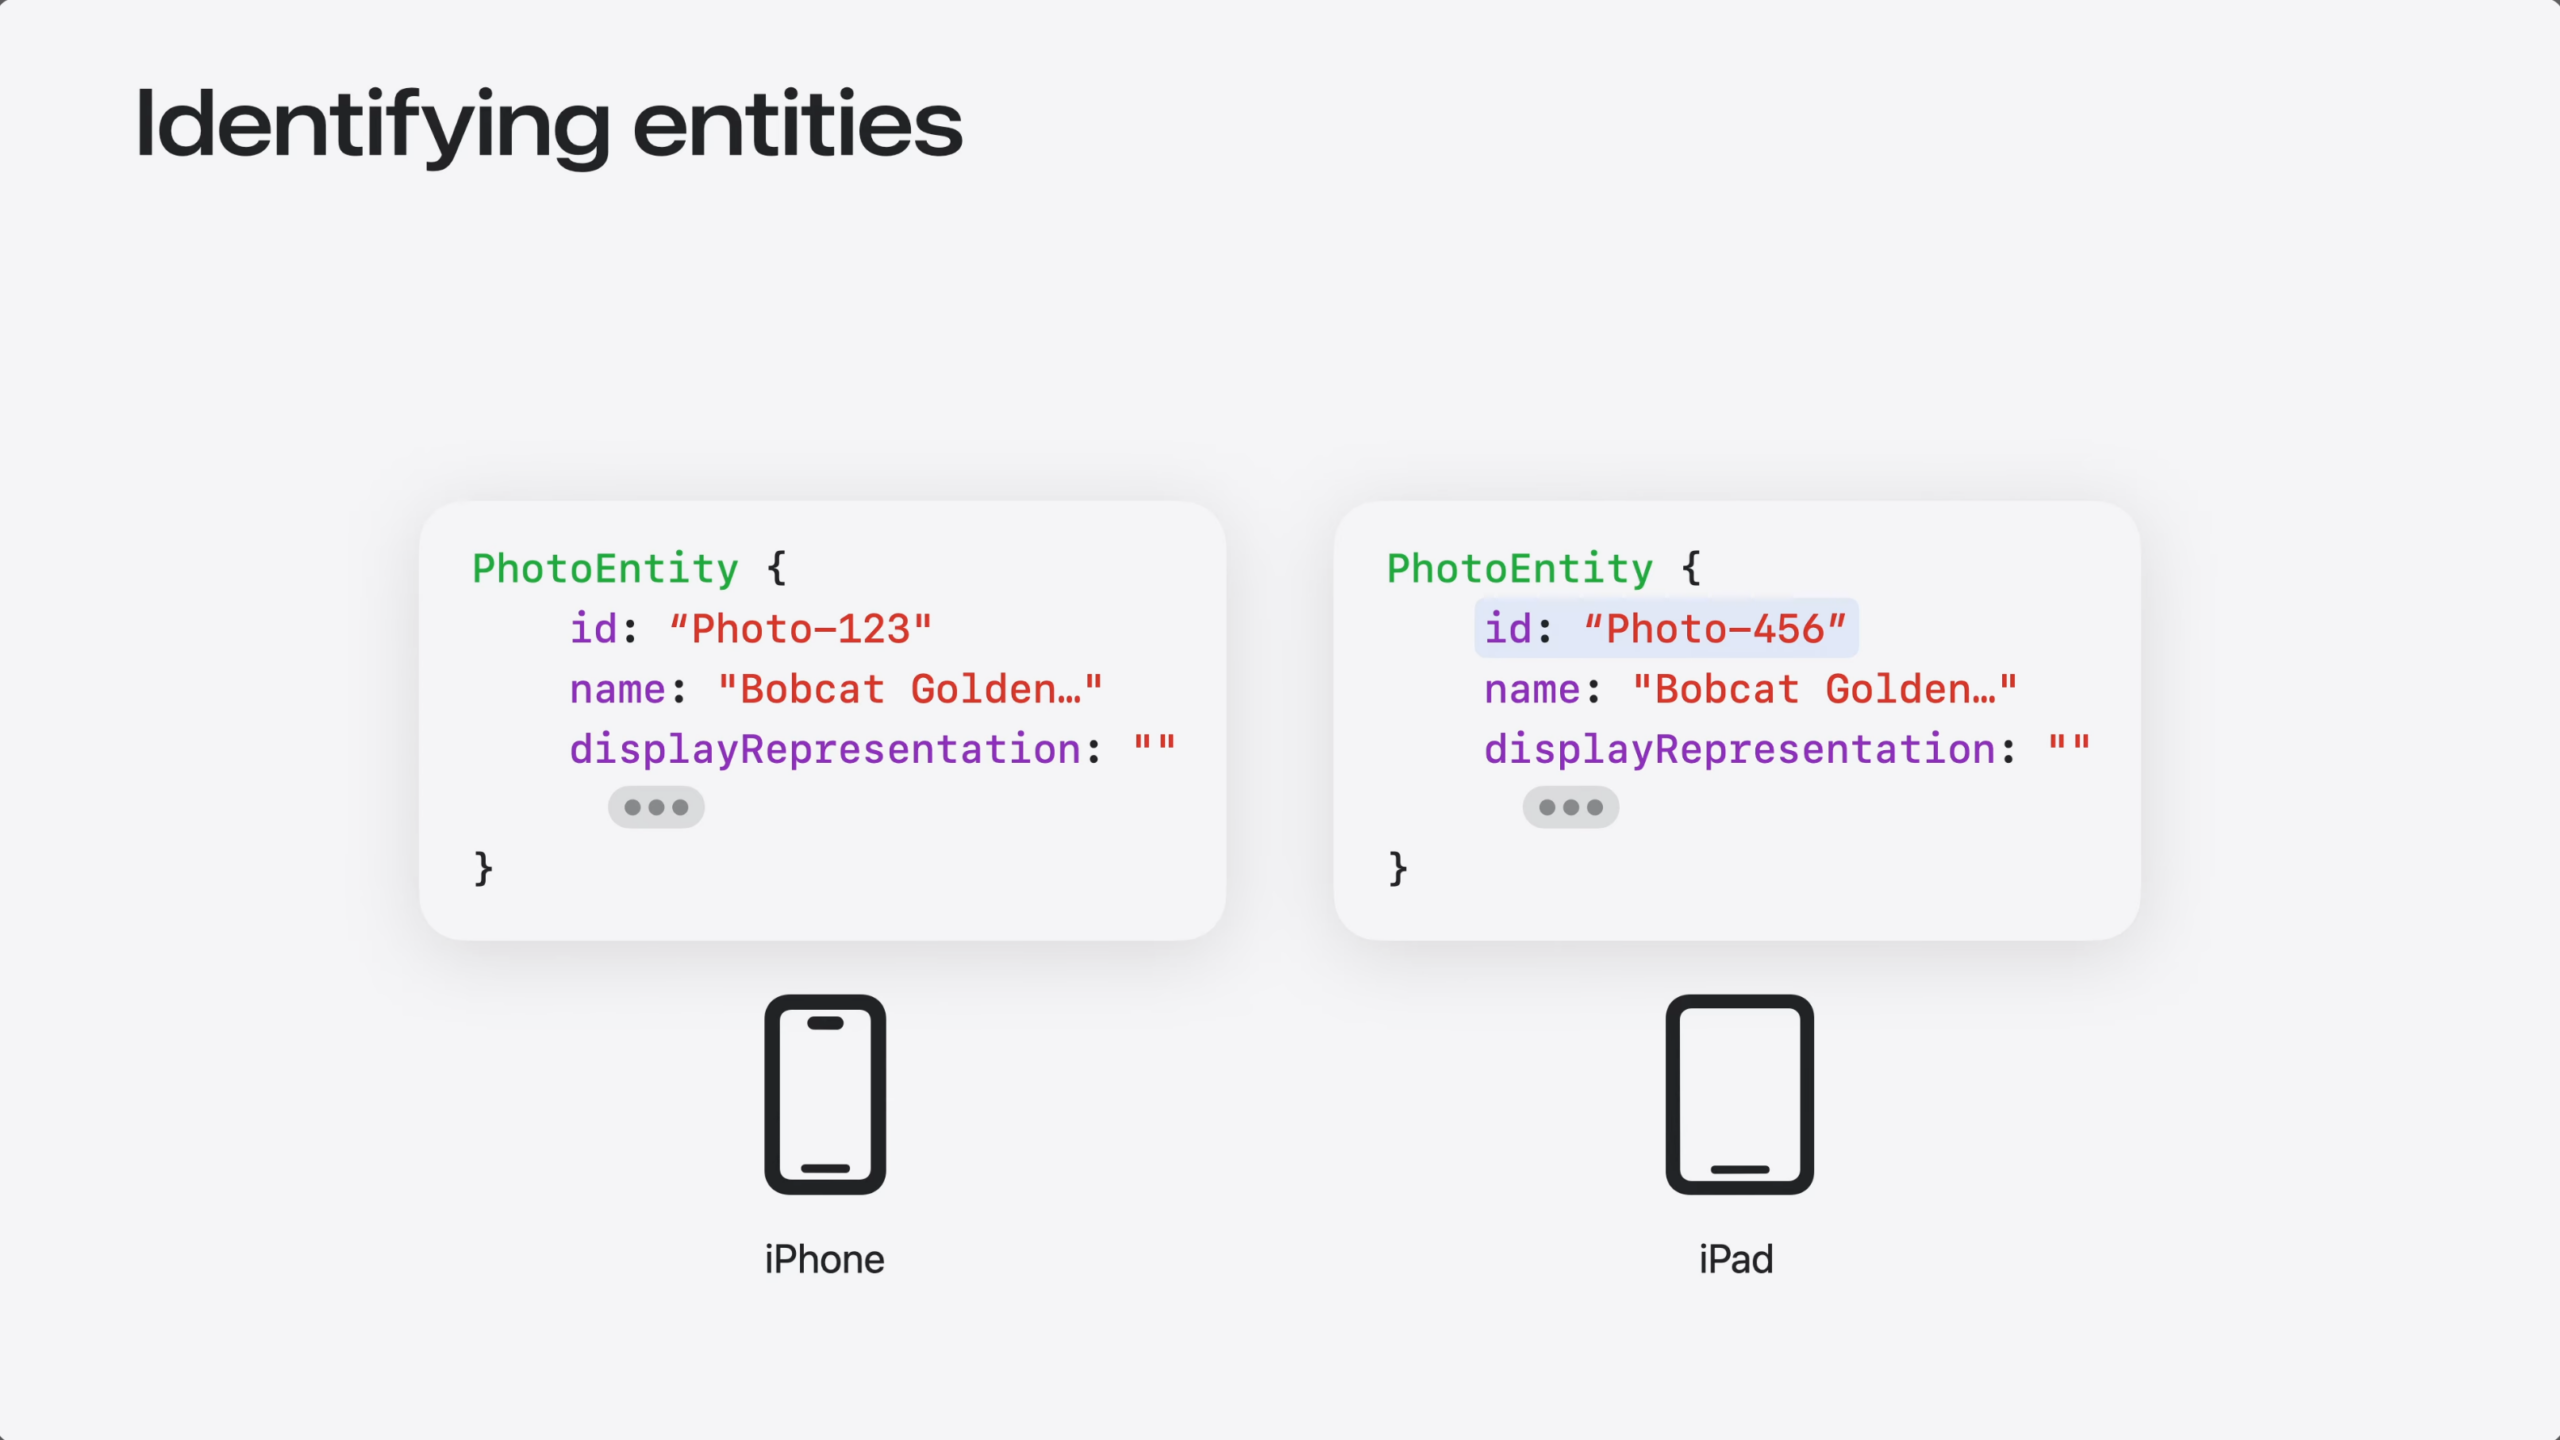
To understand why, let’s think about how entities are identified.
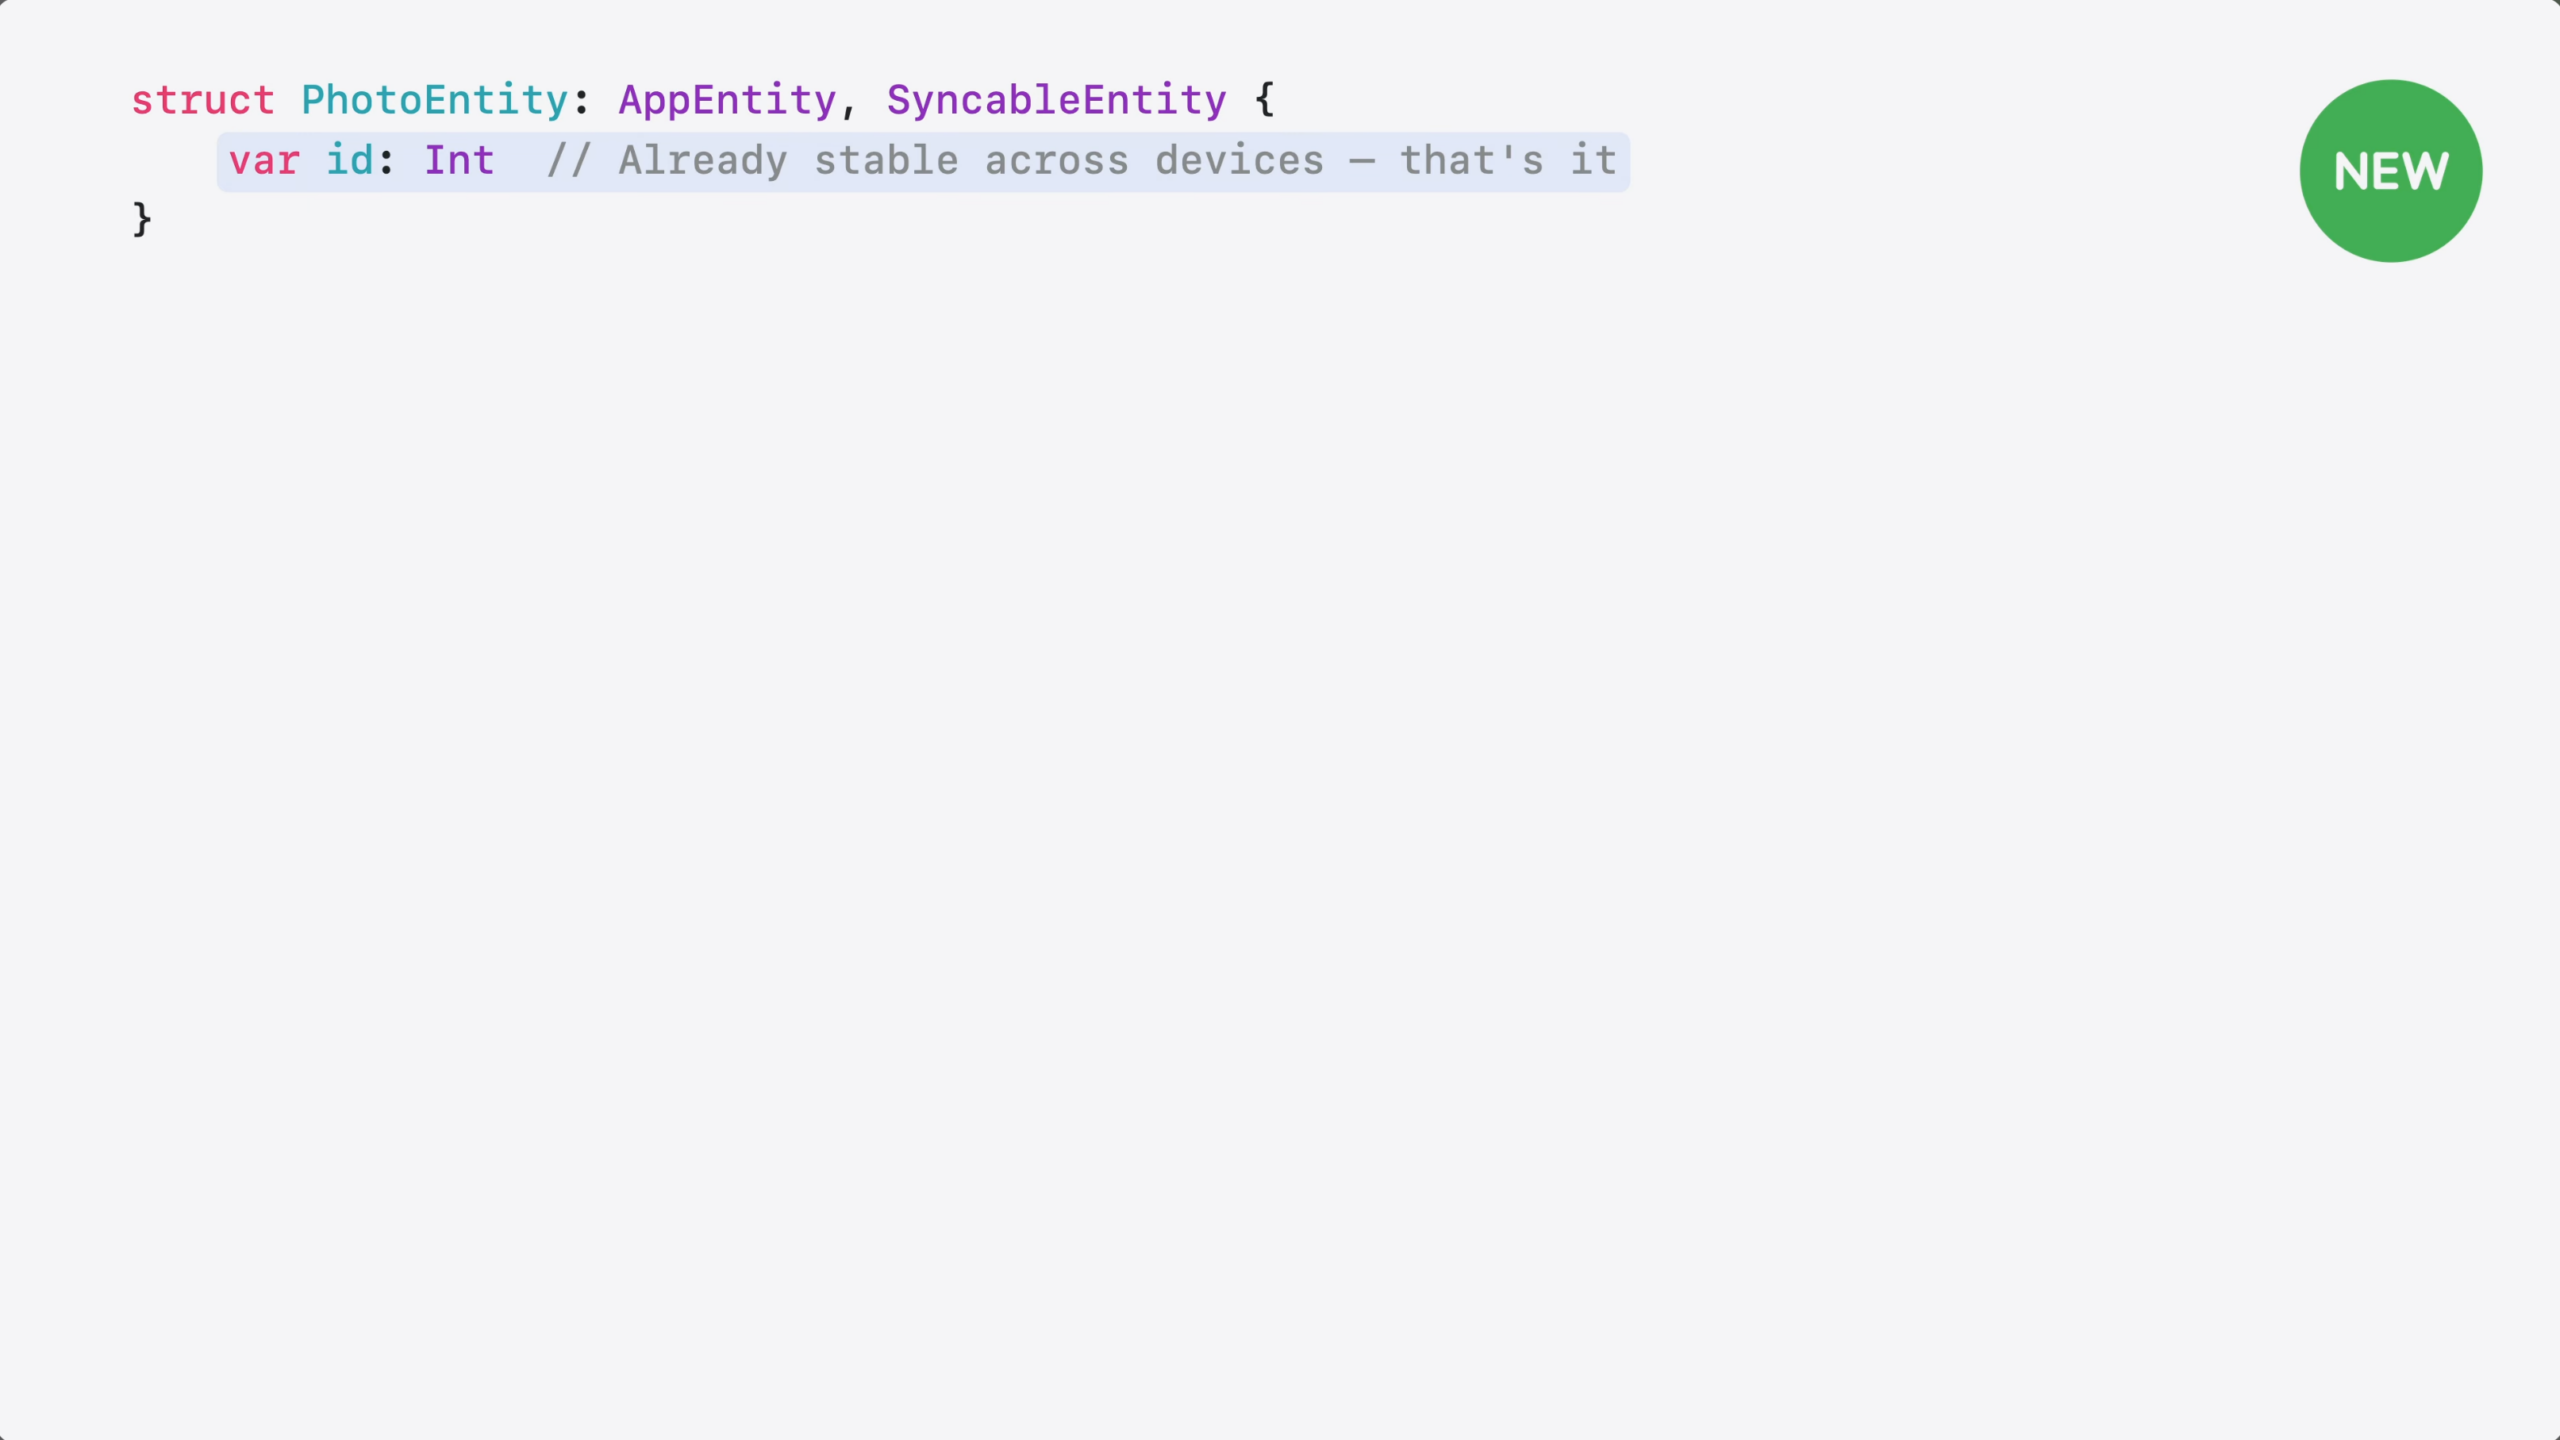
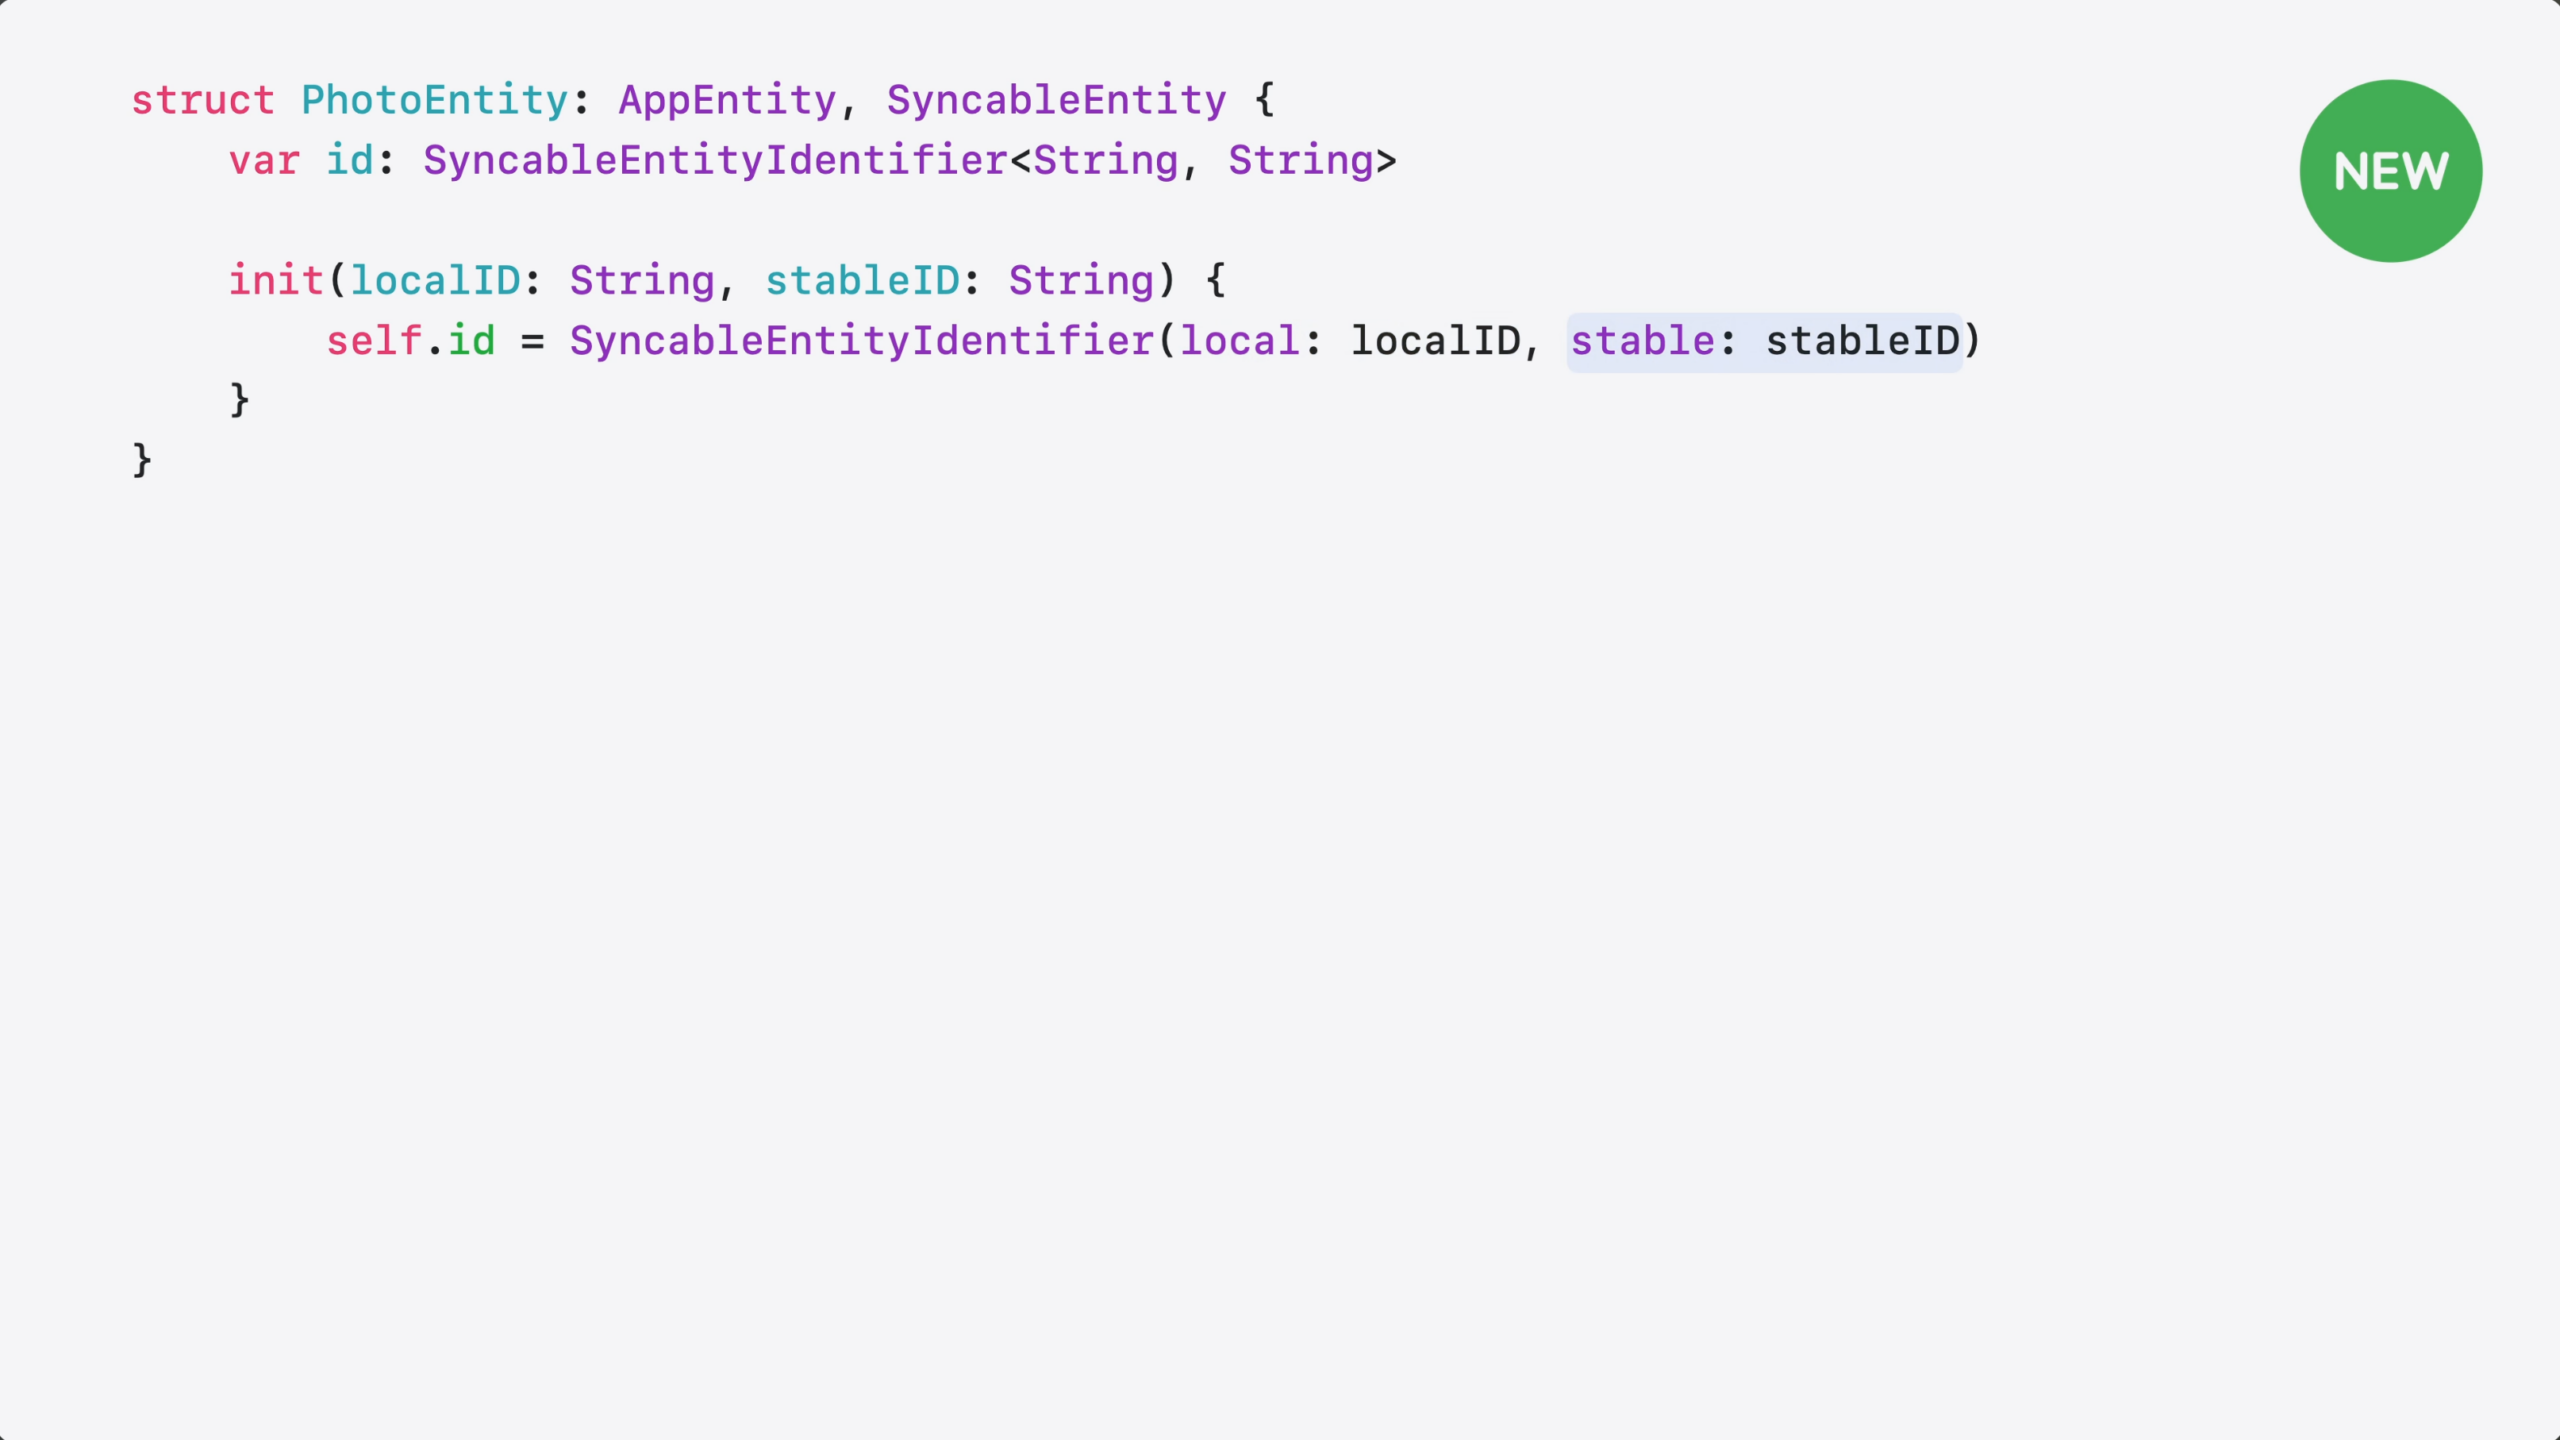
Every entity needs an ID – that’s how the system finds it. Your entity’s ID might be generated locally on each device. Local IDs work great eon the device they were created on.
But each device generates its own local IDs. So the same entity can end up with a different ID on each device.
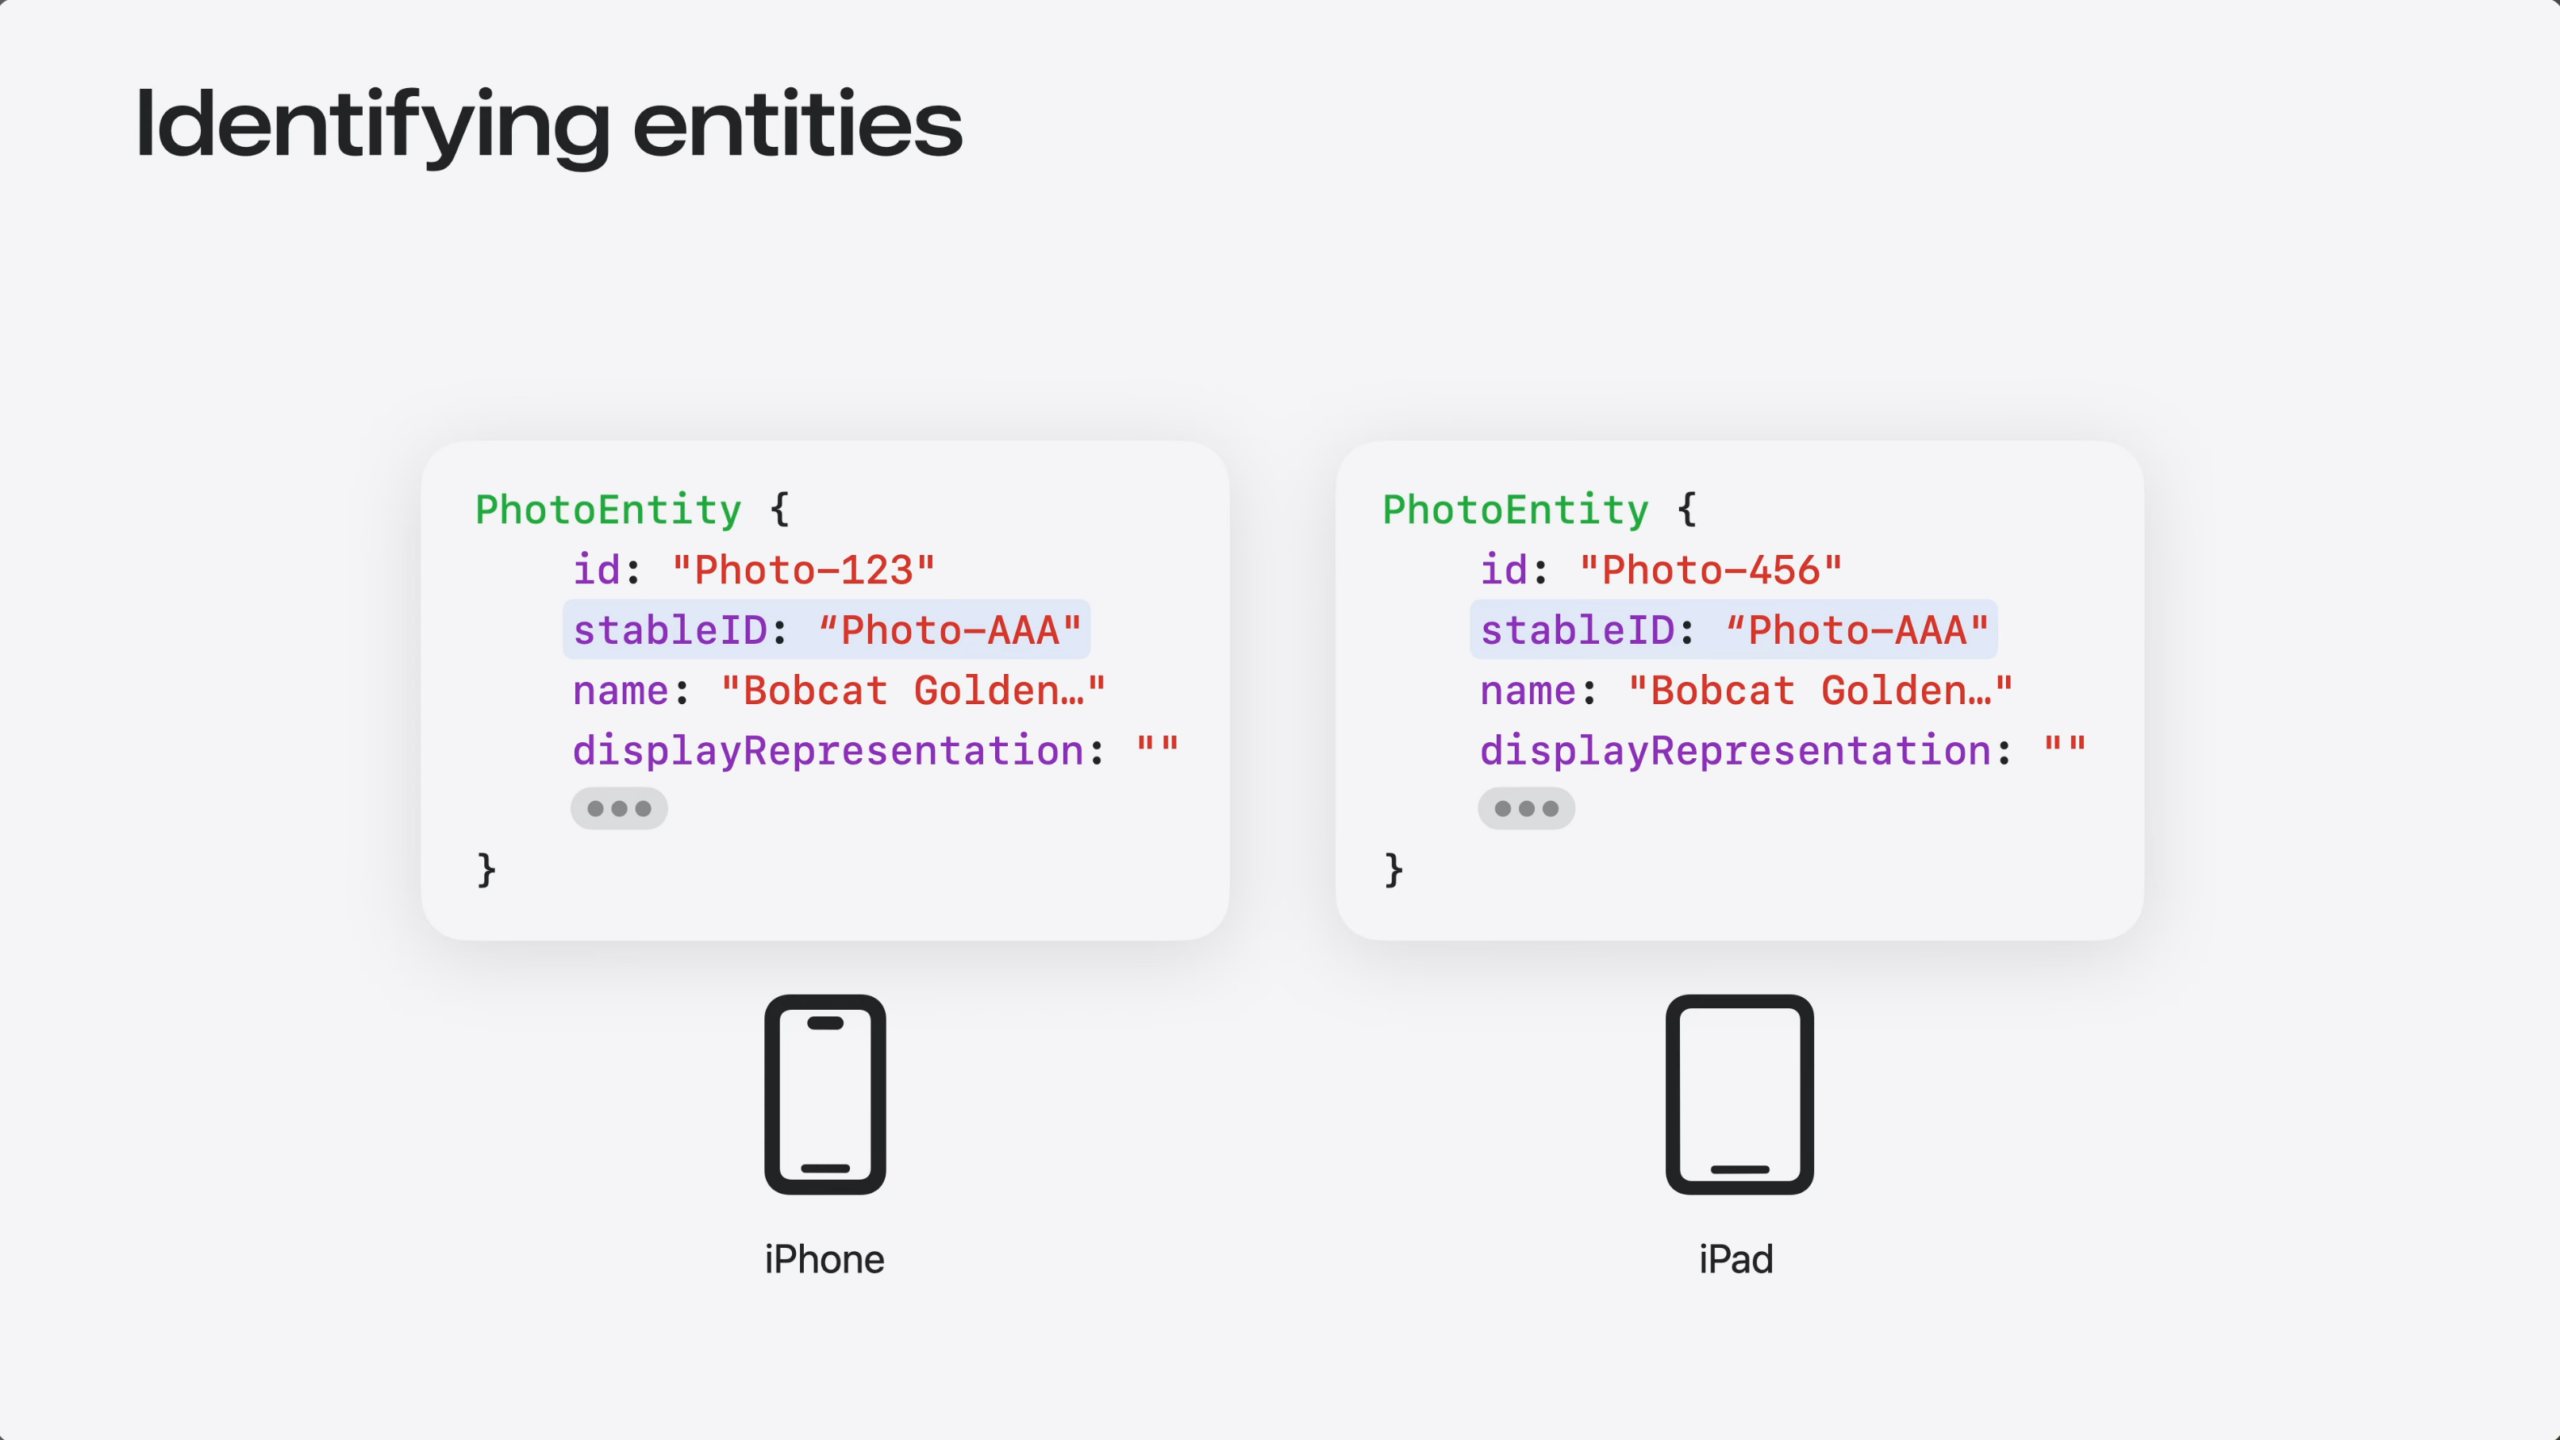
For Siri to reference your entities across devices, it needs a stableID that’s the same everywhere. That could come from your server, or from CloudKit record IDs.
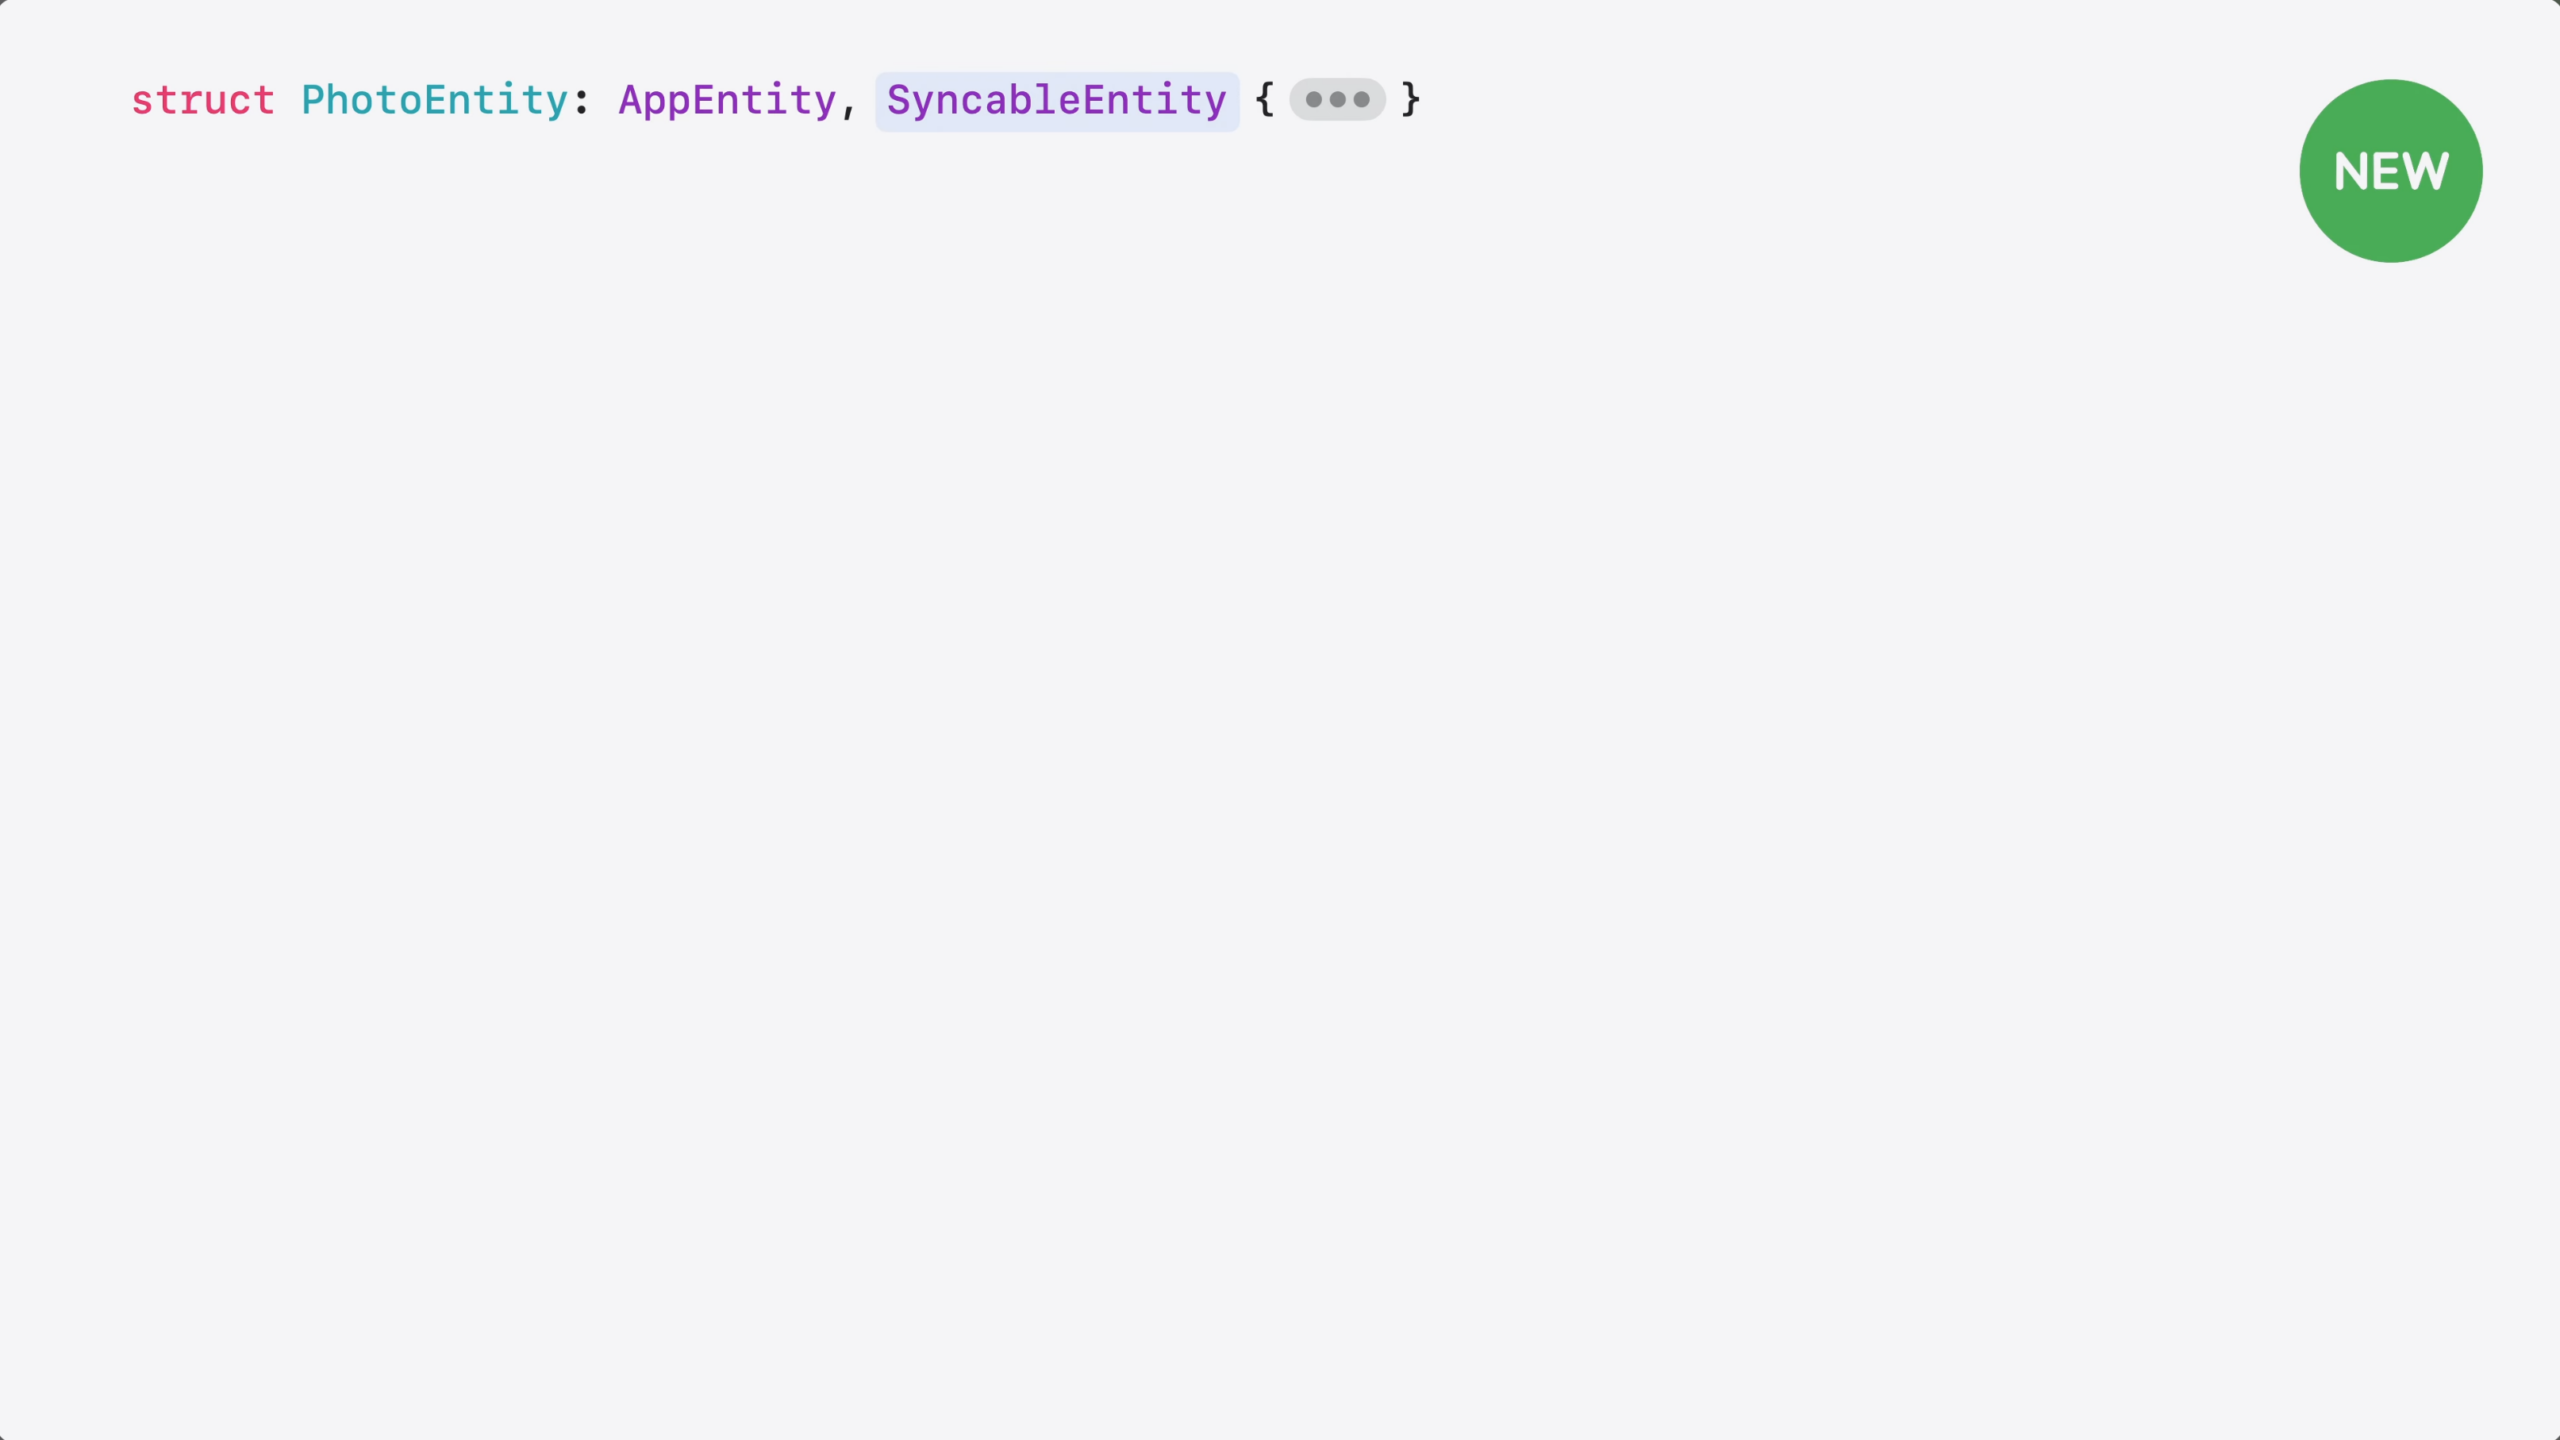
Then, you need a way to tell the system your entity’s ID is stable. That’s what SyncableEntity does – it declares to the system that your entity’s ID is stable and can be used across devices. Here’s how to adopt it.
I start by adding the SyncableEntity protocol to my entity.
Then, I need to provide the stable ID.
If your entity already uses an ID that’s the same across all devices, like a server-assigned UUID or a CloudKit record ID – no more changes needed.
c
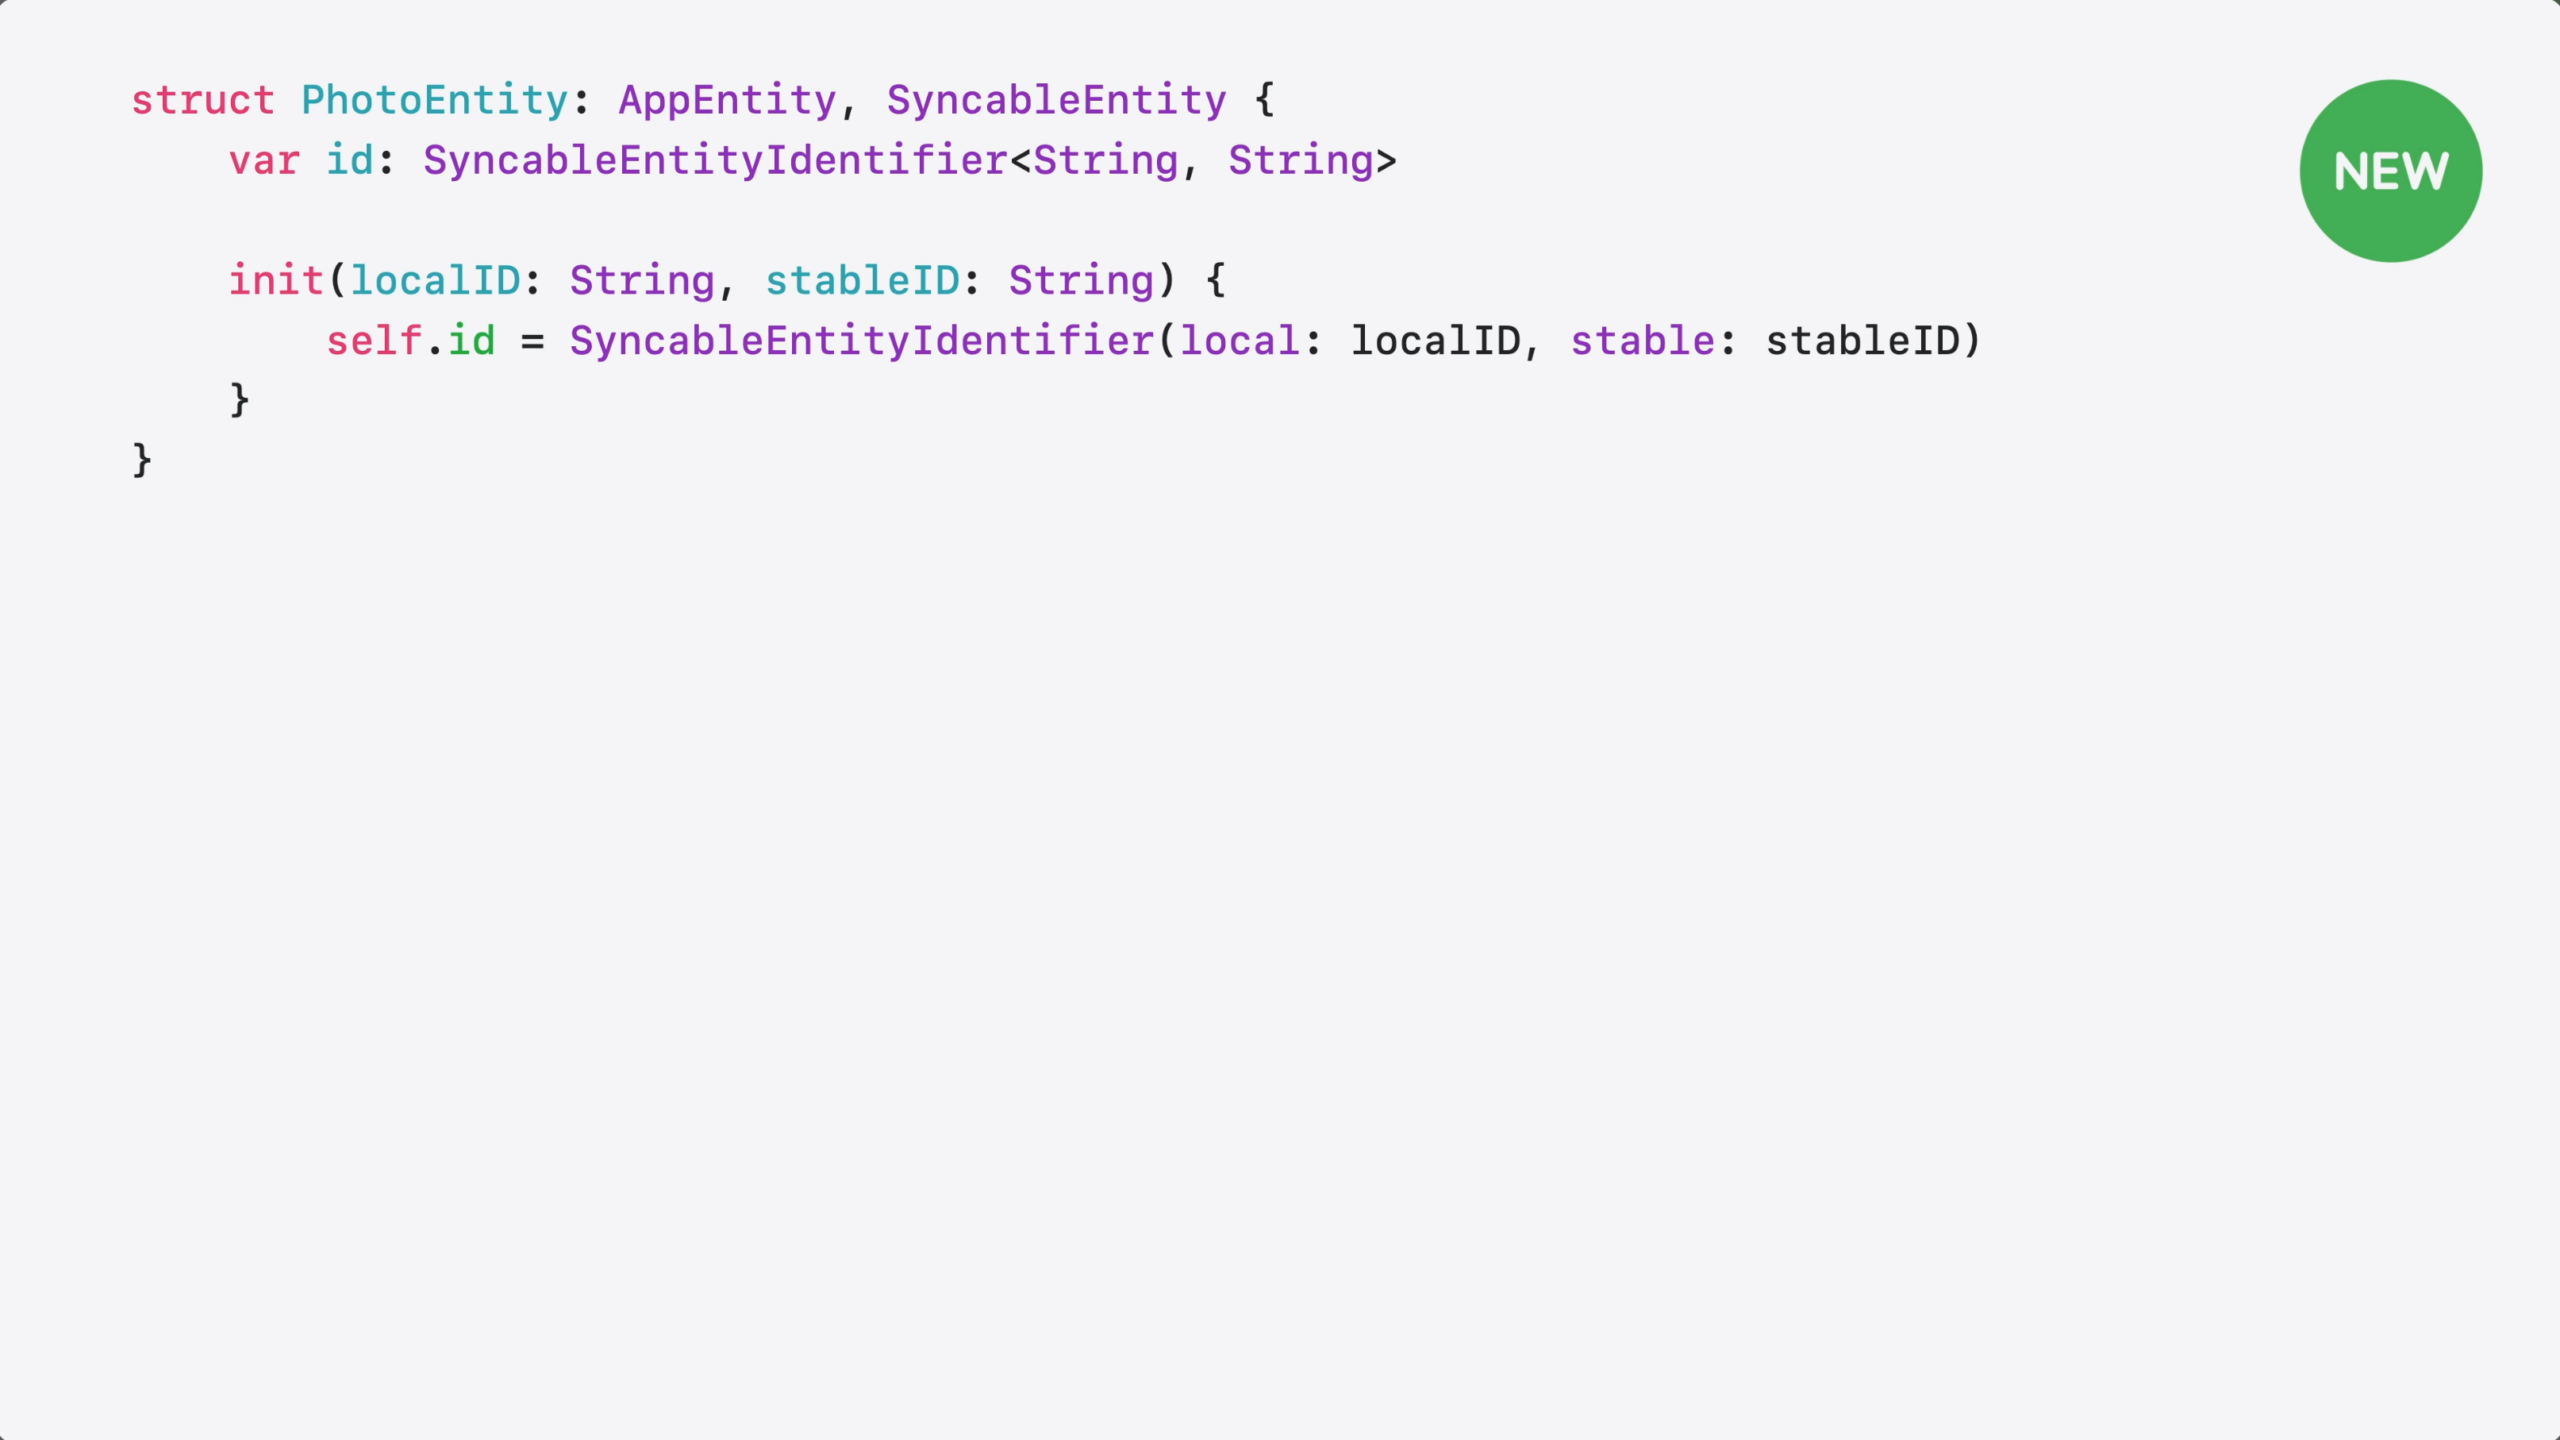
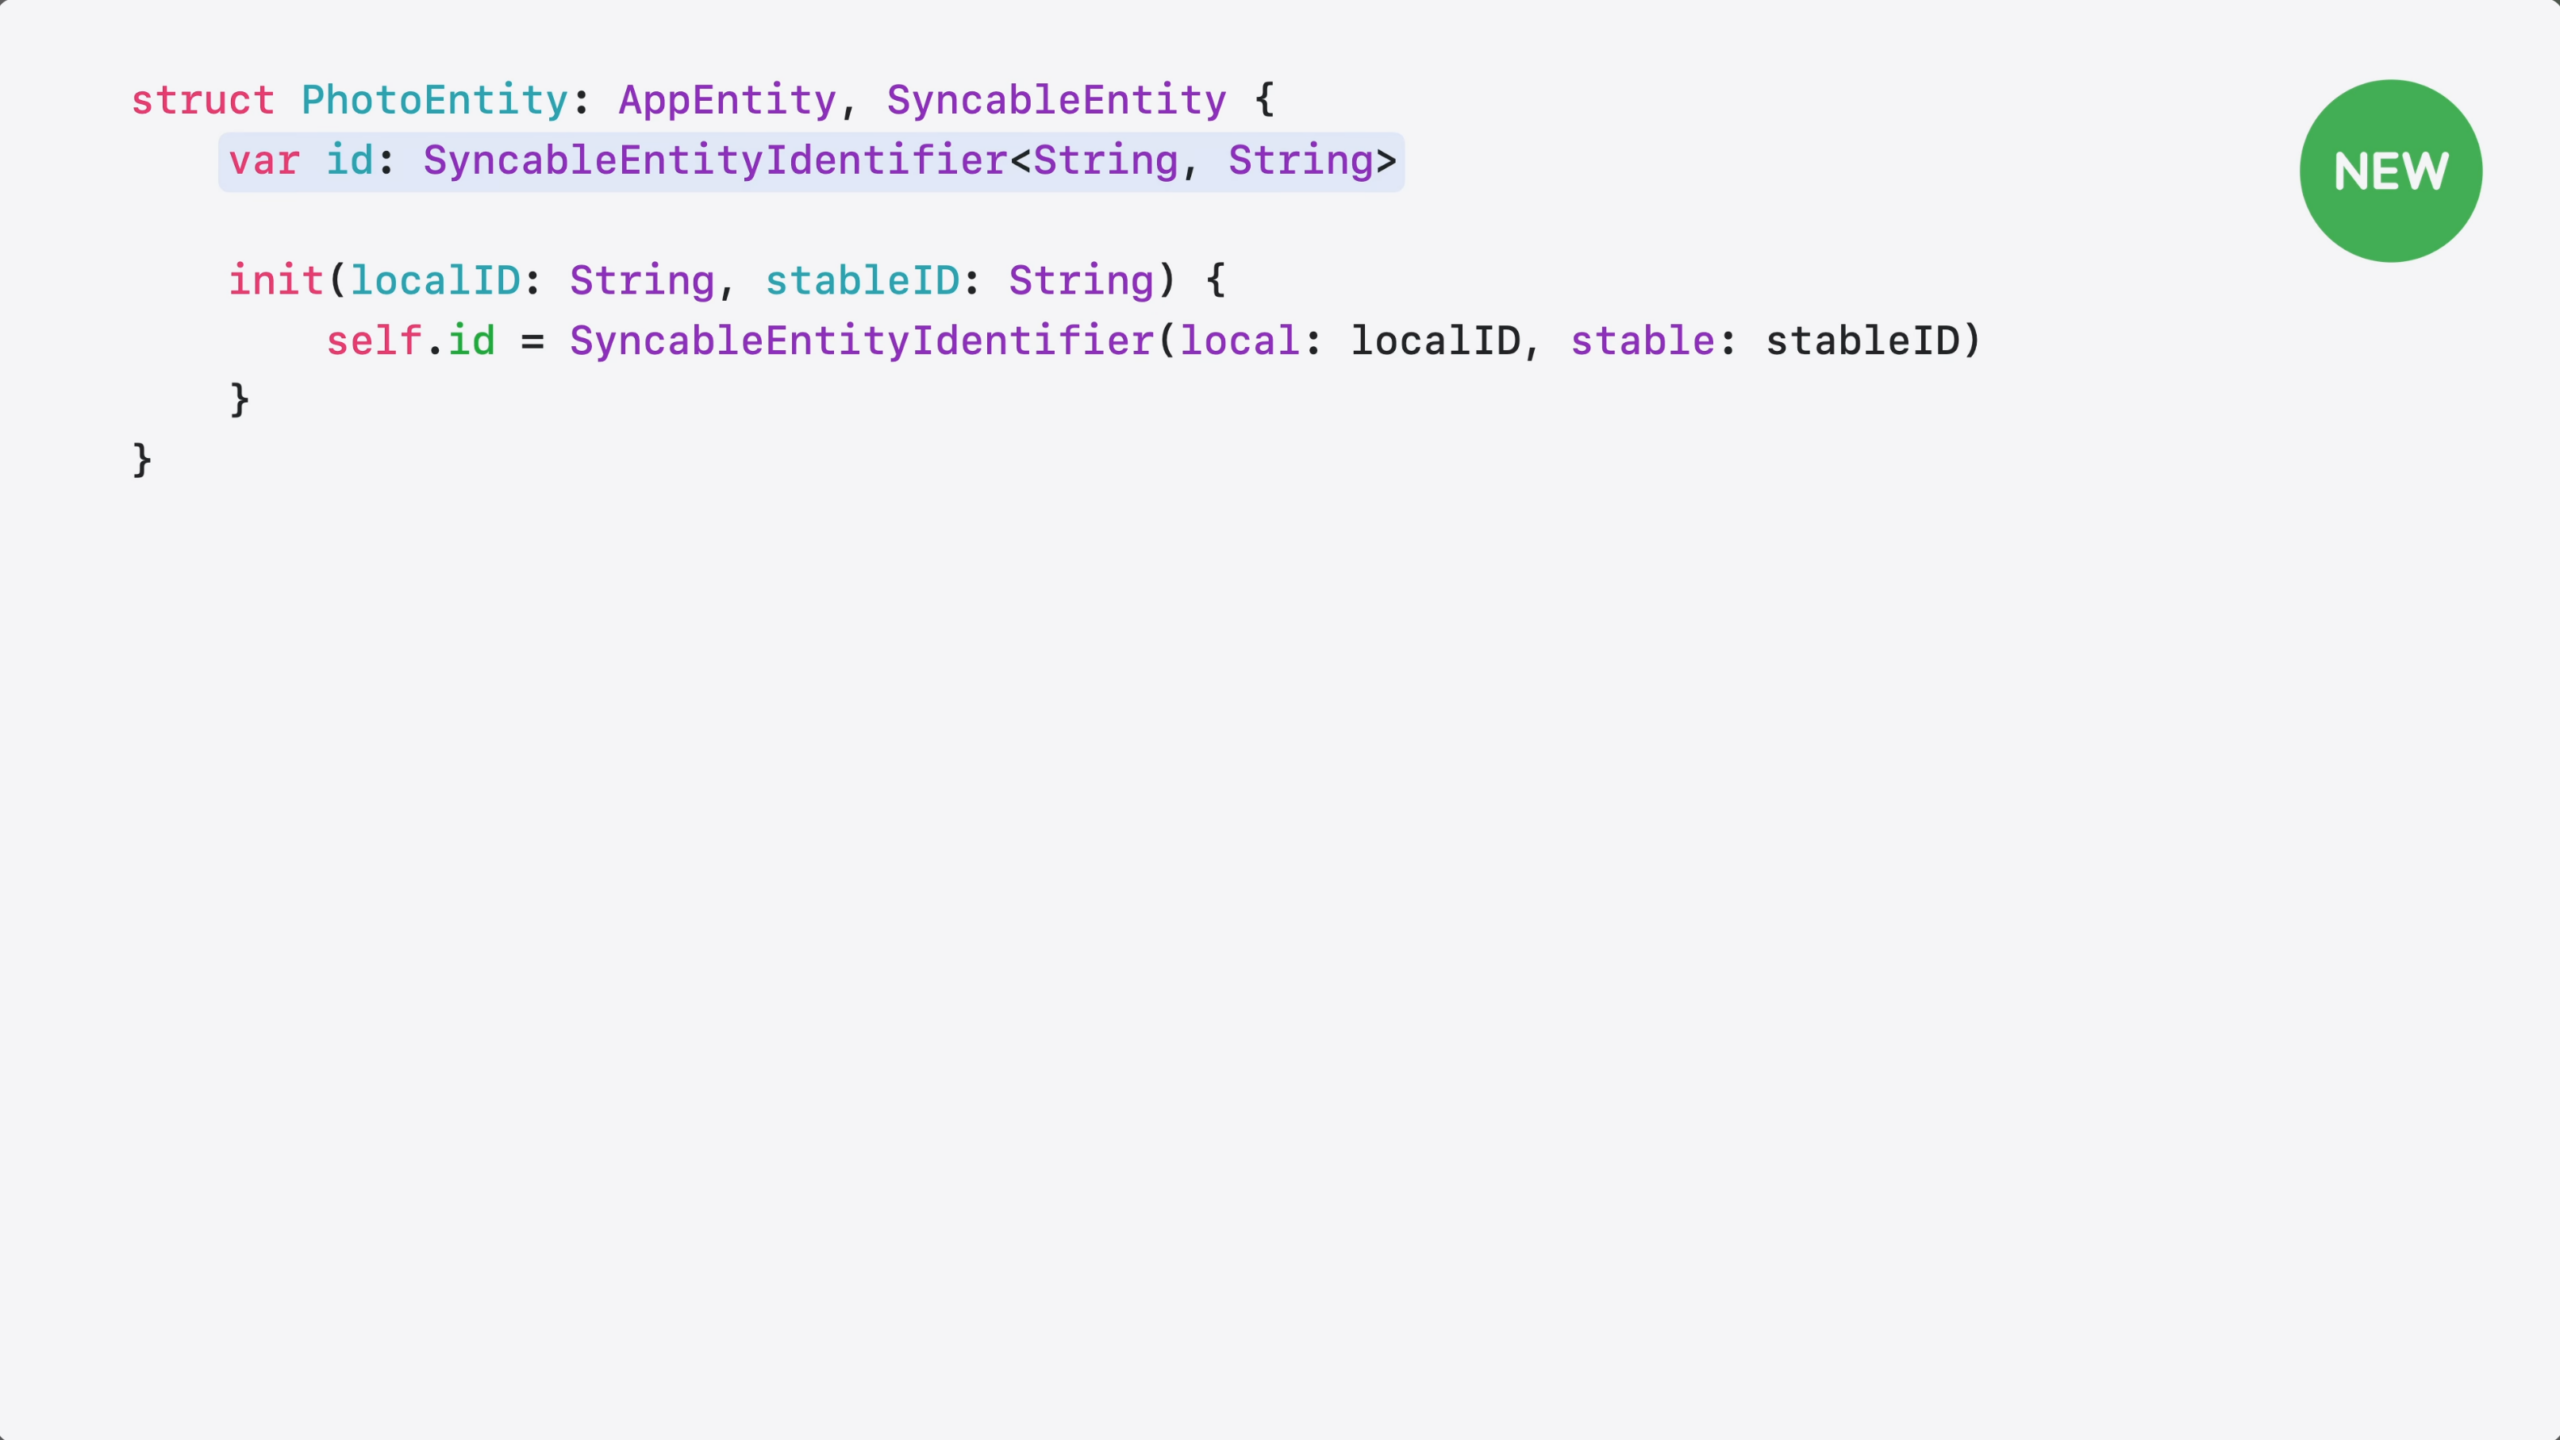
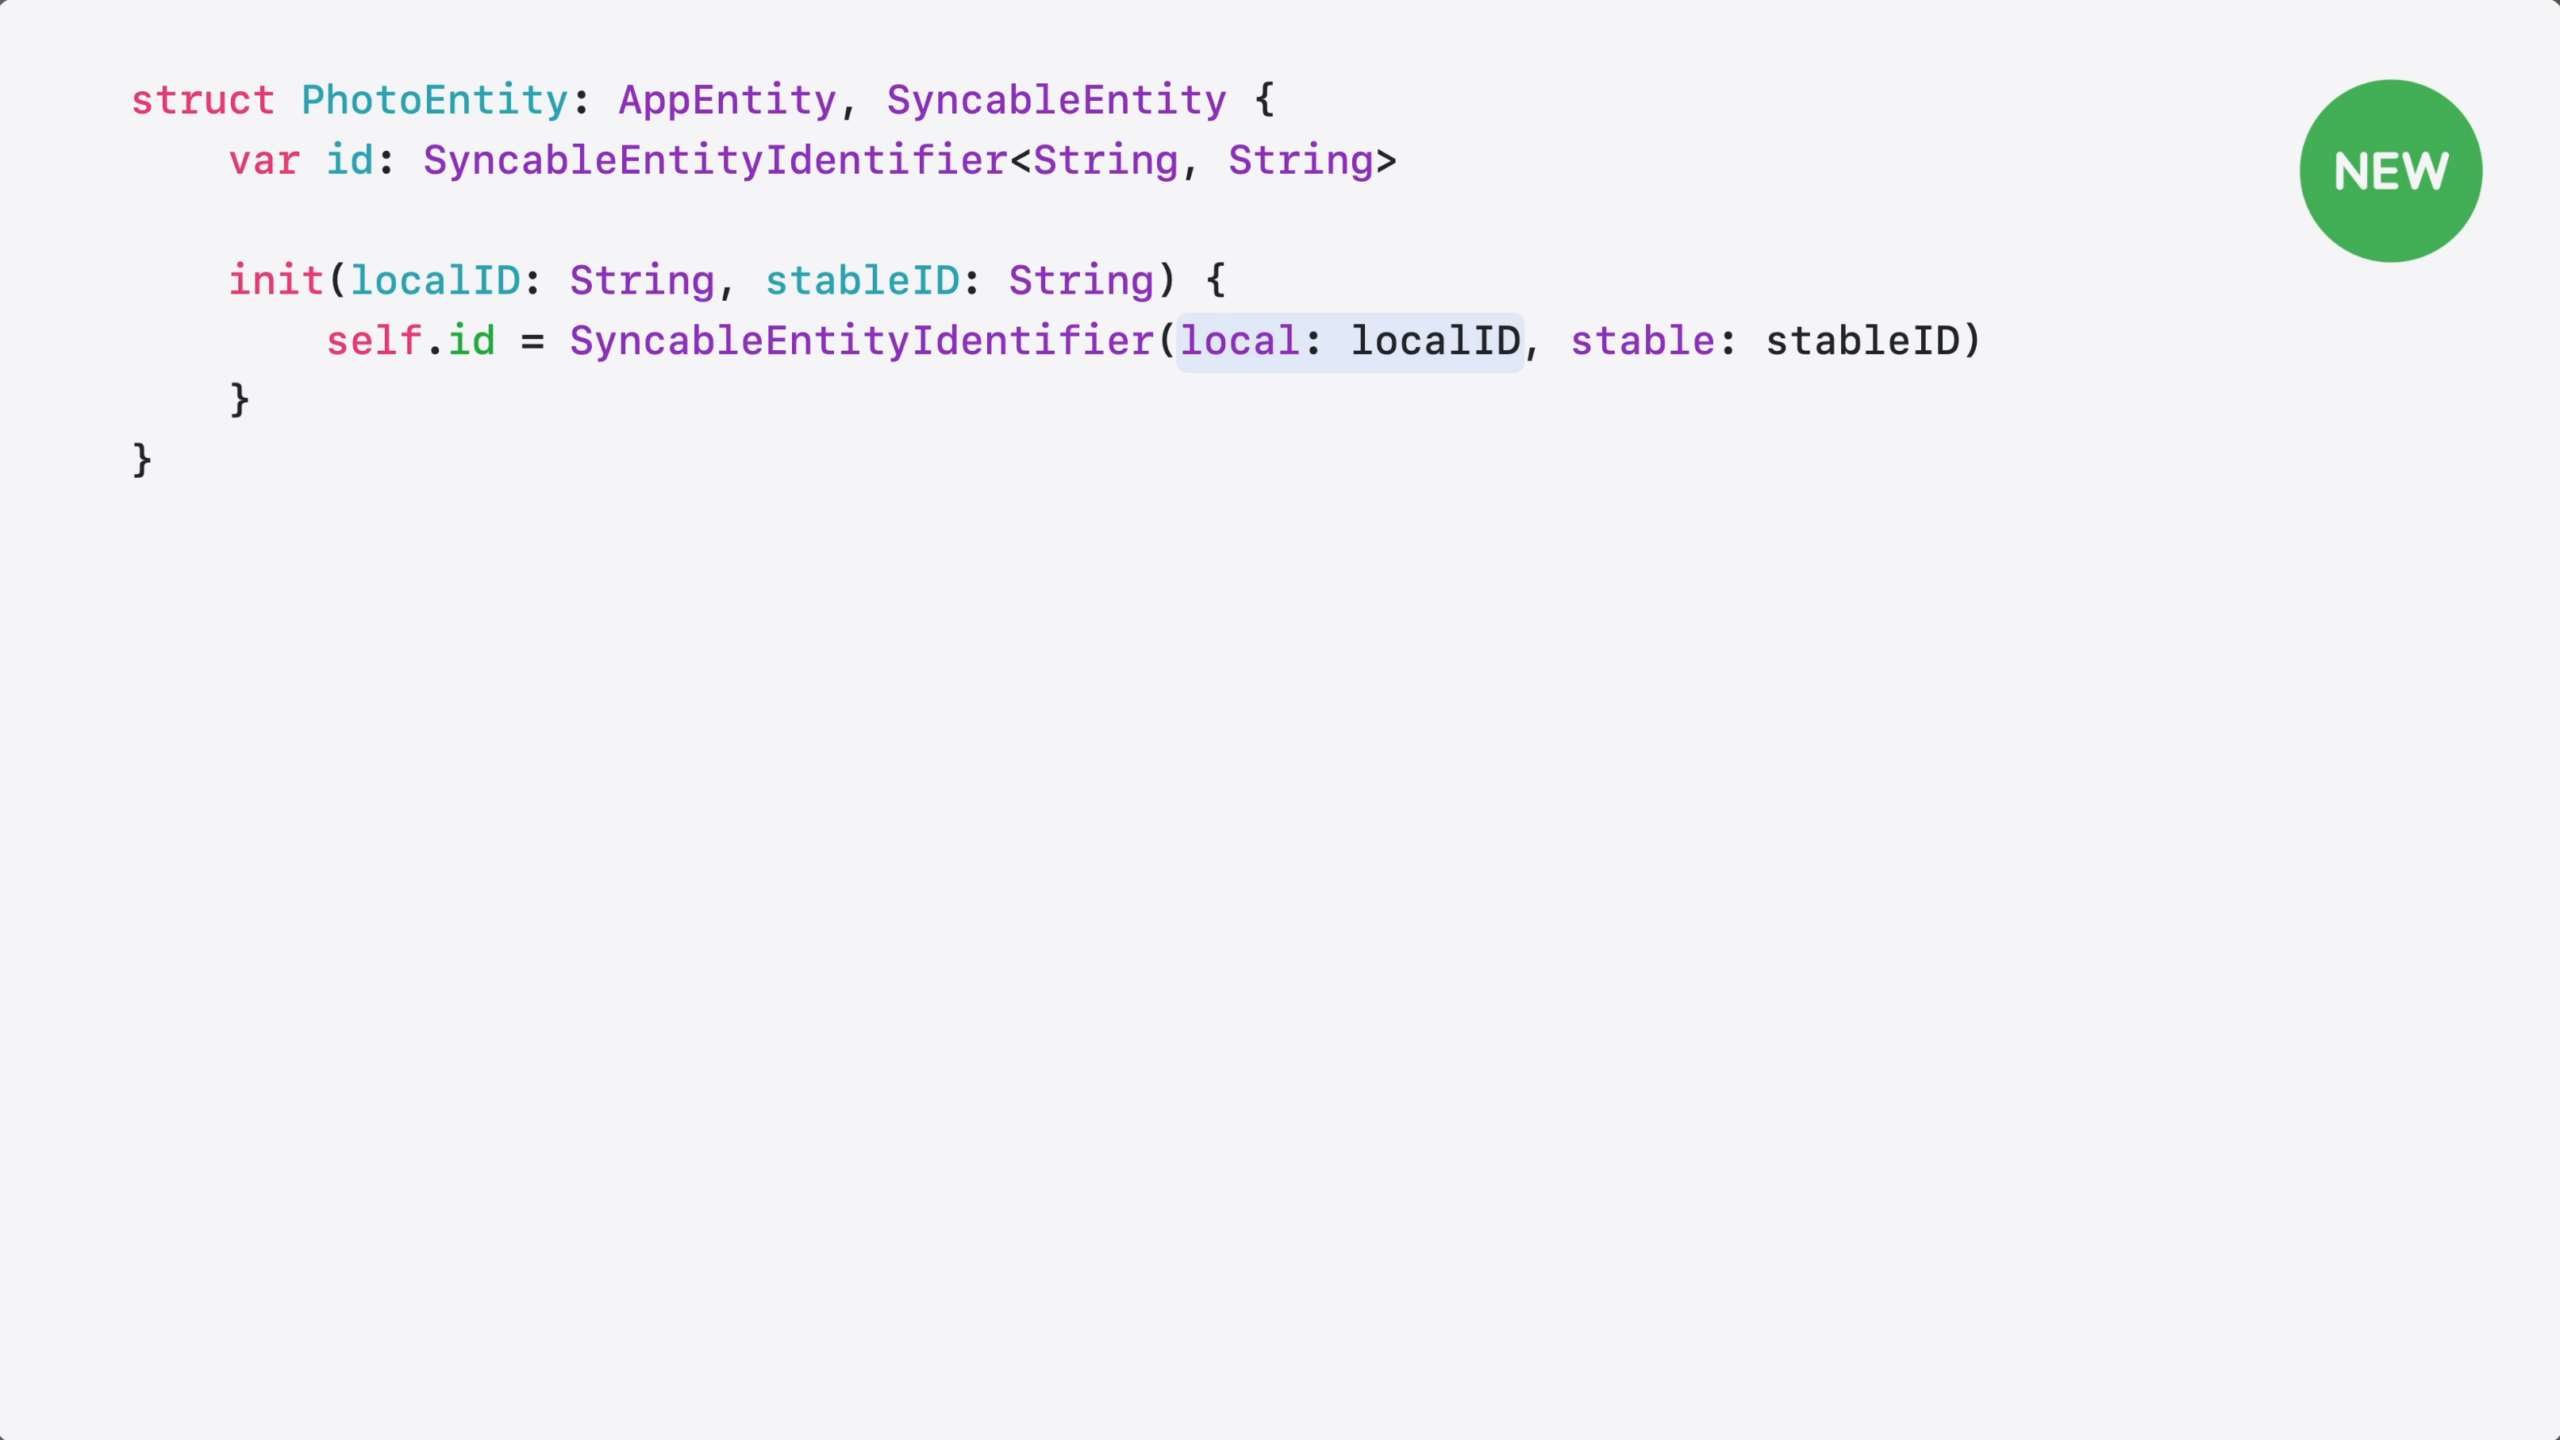
But, if you use local identifiers, like CoreData row IDs, you need both: a local ID and a stable one.
a pairs them into a single ID.
On-device, your code uses the local ID…
…and across devices, the system uses the stable one.
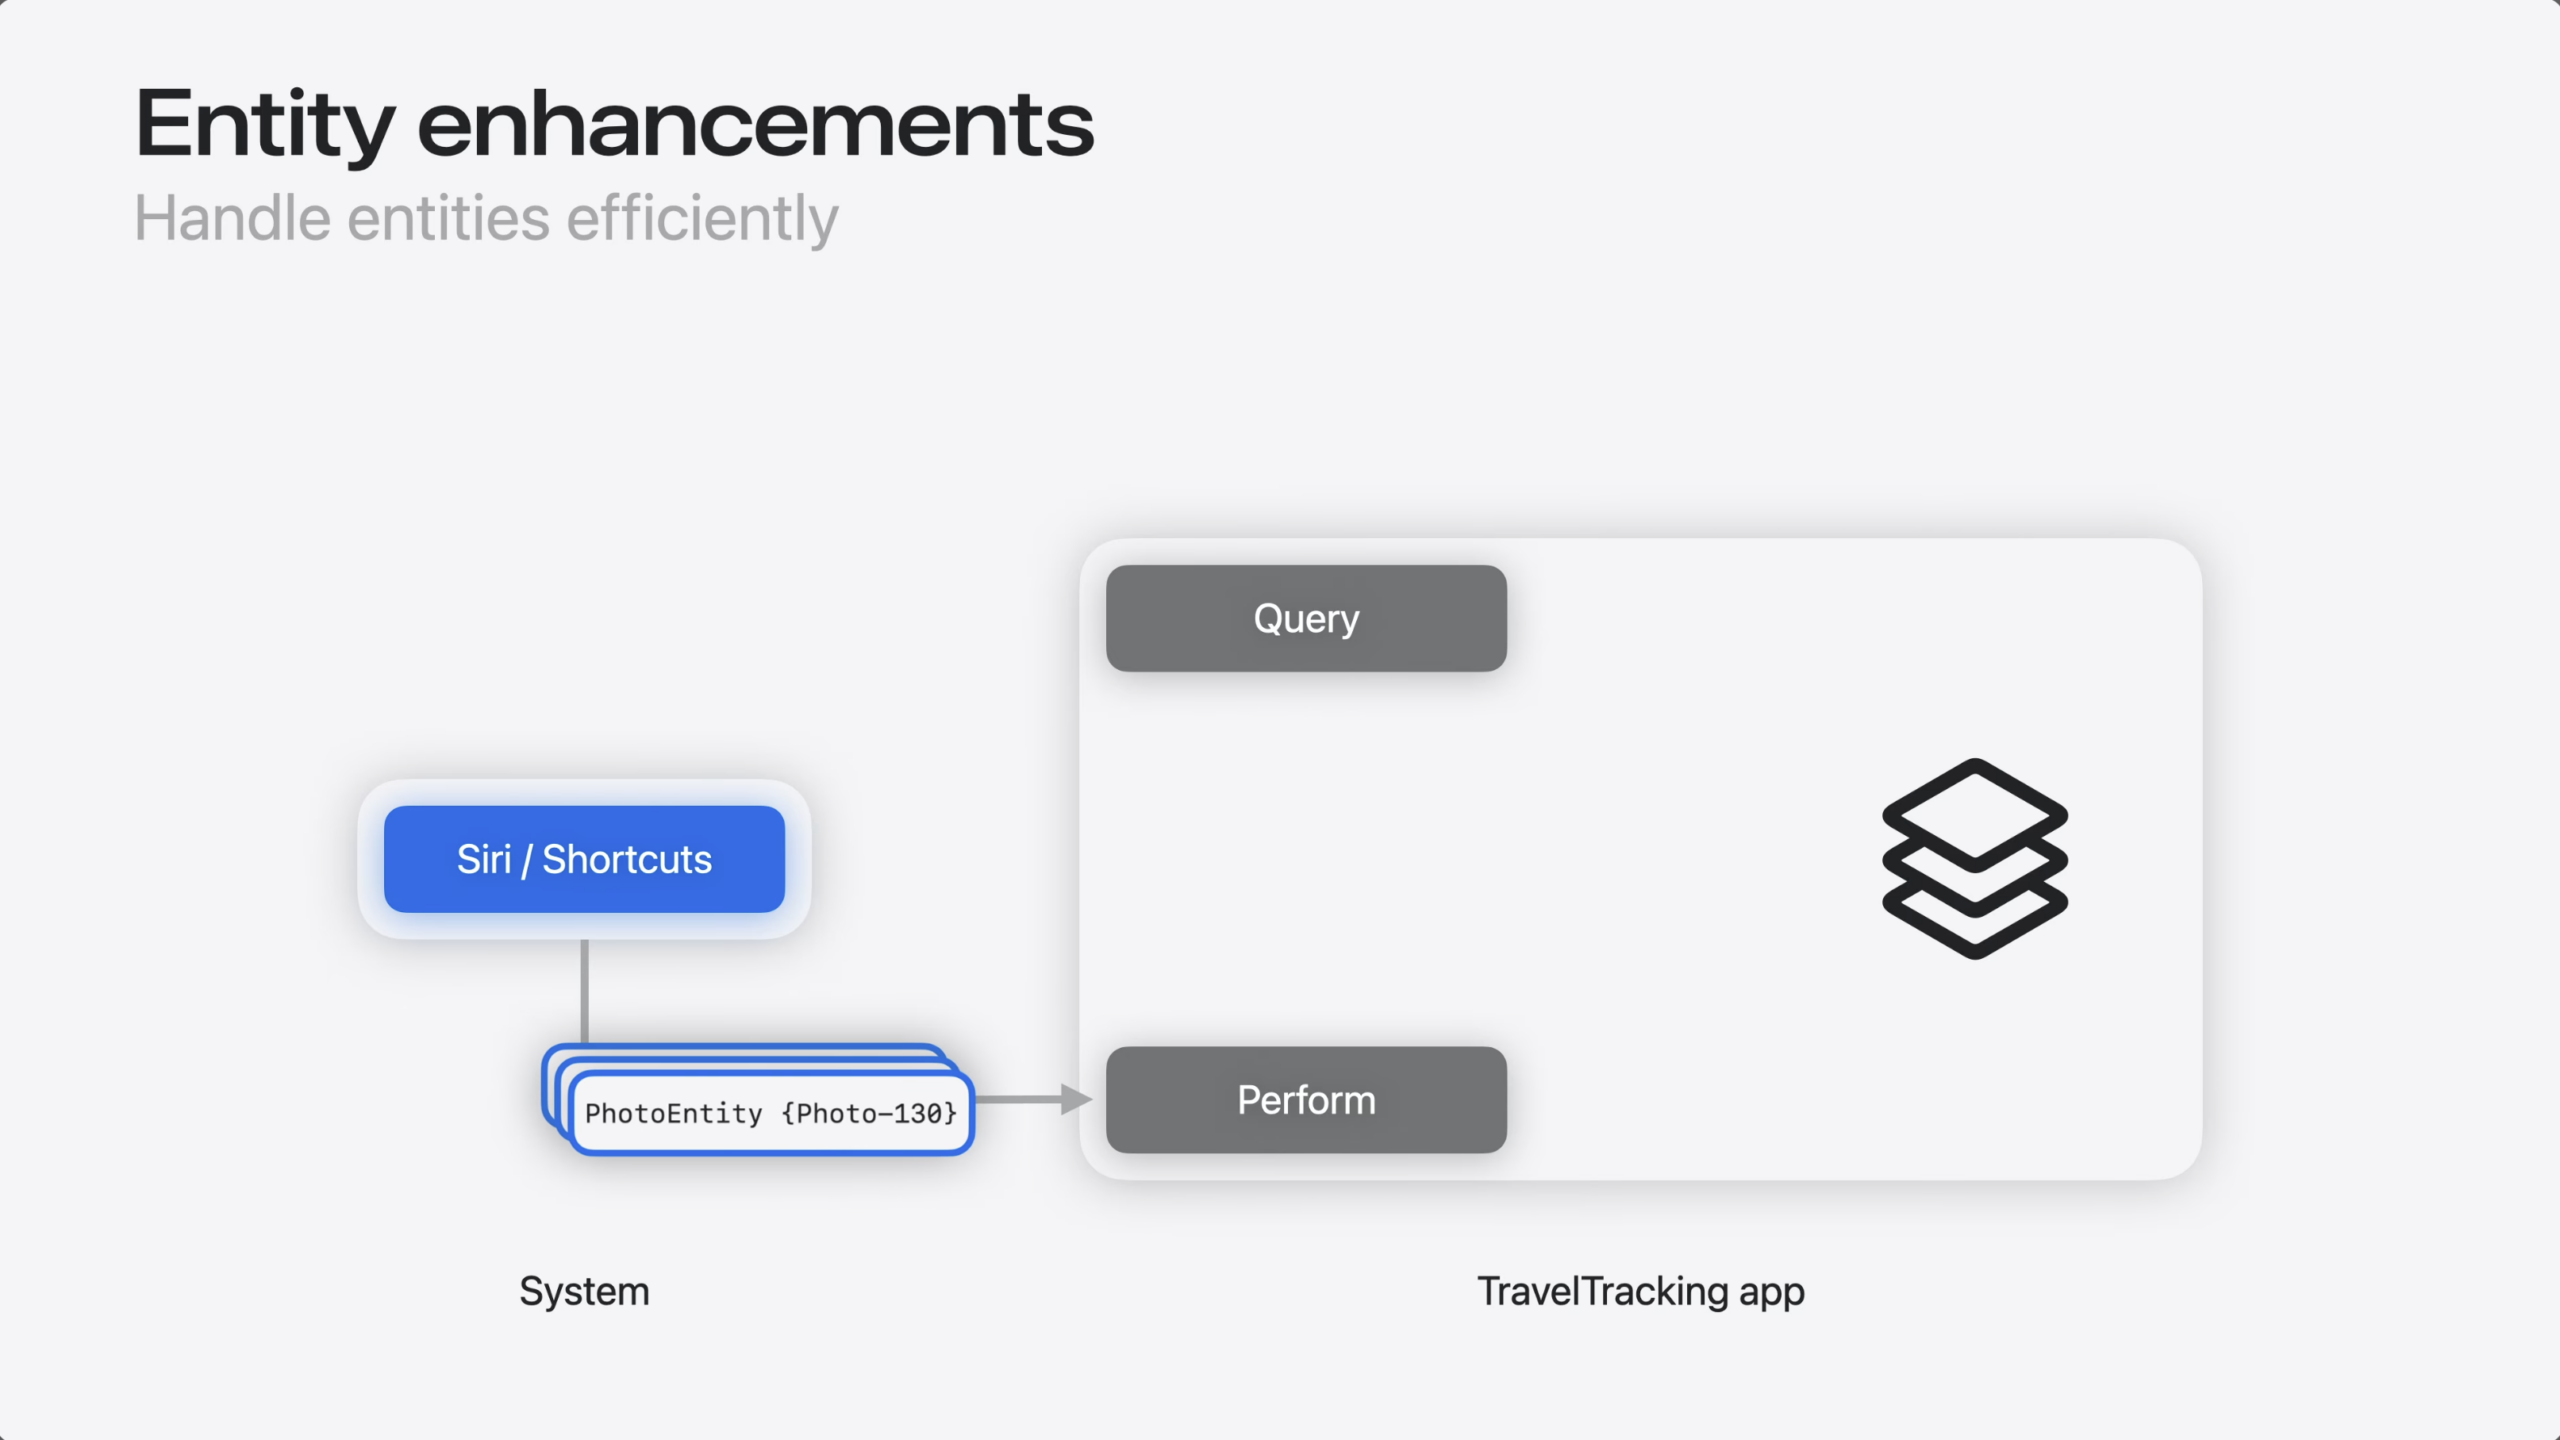
In the WWDC 26 session “Discover new capabilities in the App Intents framework,” App Intents Engineer Moe Mehrabi talks about improvements to App Intents when working with large collections of data, by wrapping them in an EntityCollection of IDs rather than the full payload of every entity:
[…] Your entities are shared and the system knows when they’re relevant. Now, let’s make them more efficient.
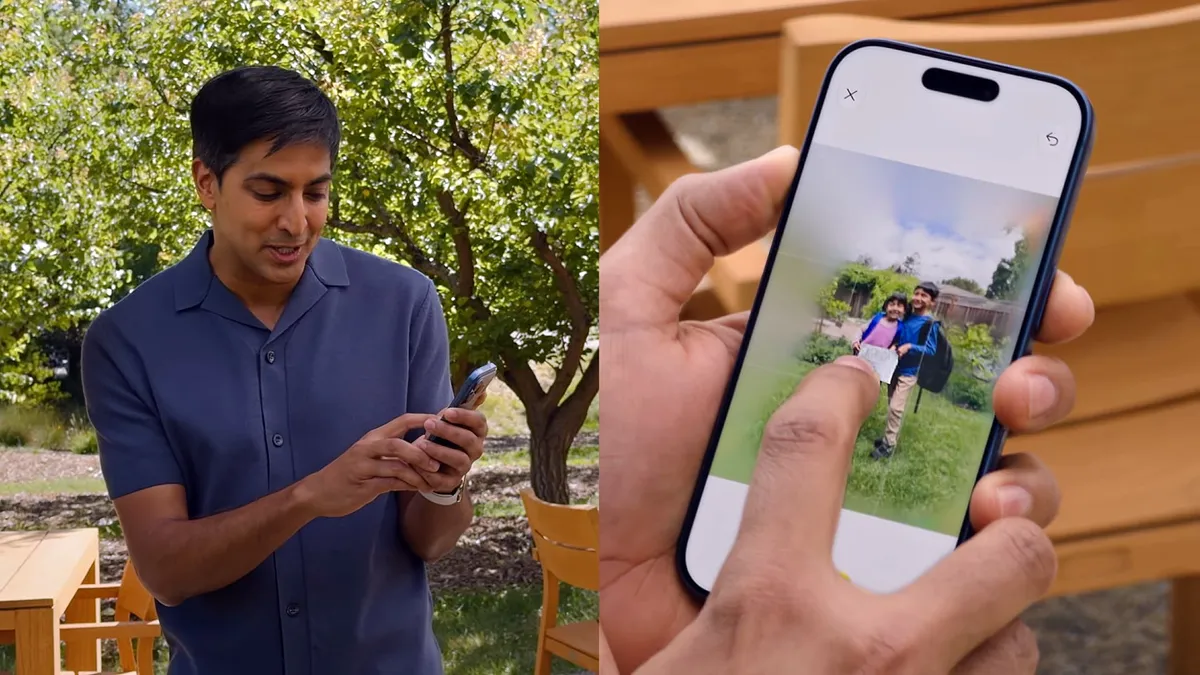
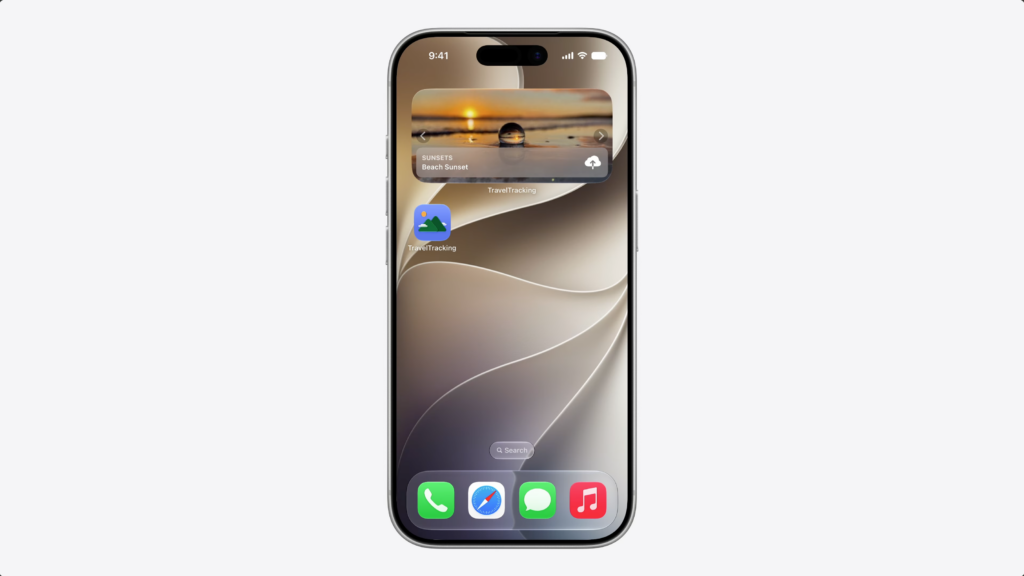
Back in the travel tracking app – the app has landmark photos, but I also wanted to let people save their own travel photos.
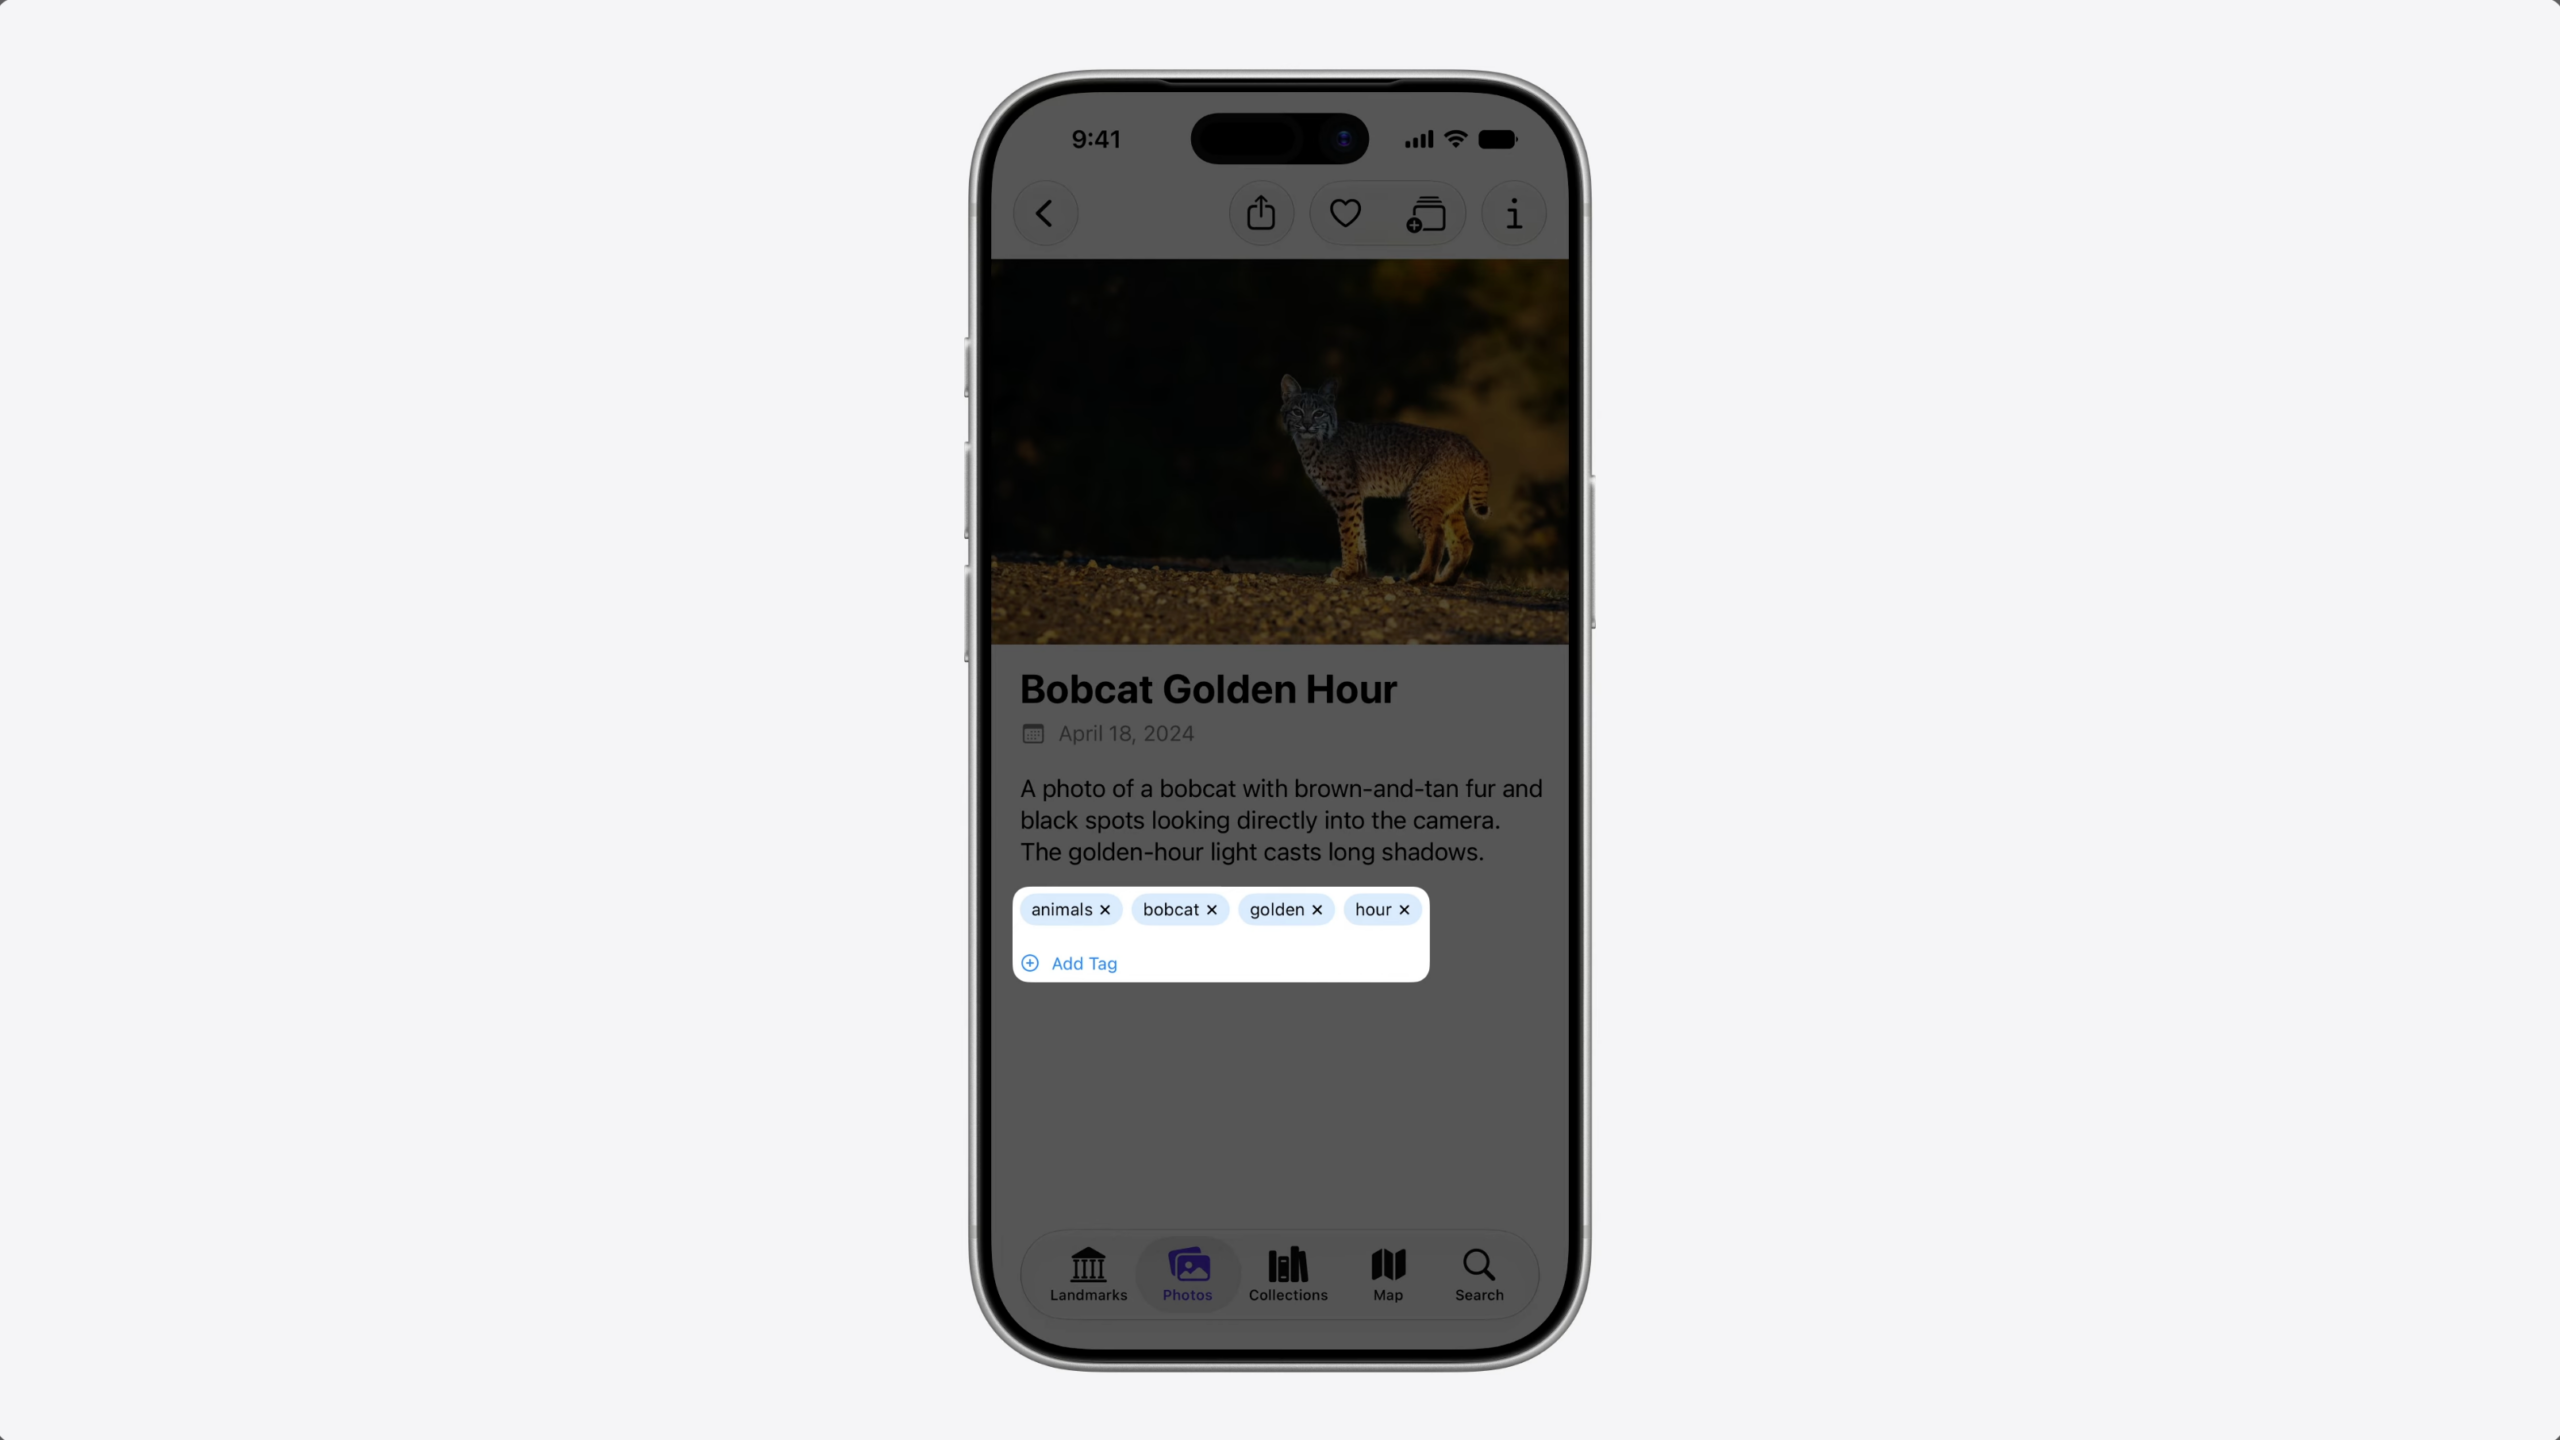
So I added a photo album view. And to make the photos available to the system, I defined a PhotoEntity with an app schema for photos.
This gives the system the context it needs to work with my photos across Siri, Shortcuts, and Spotlight.
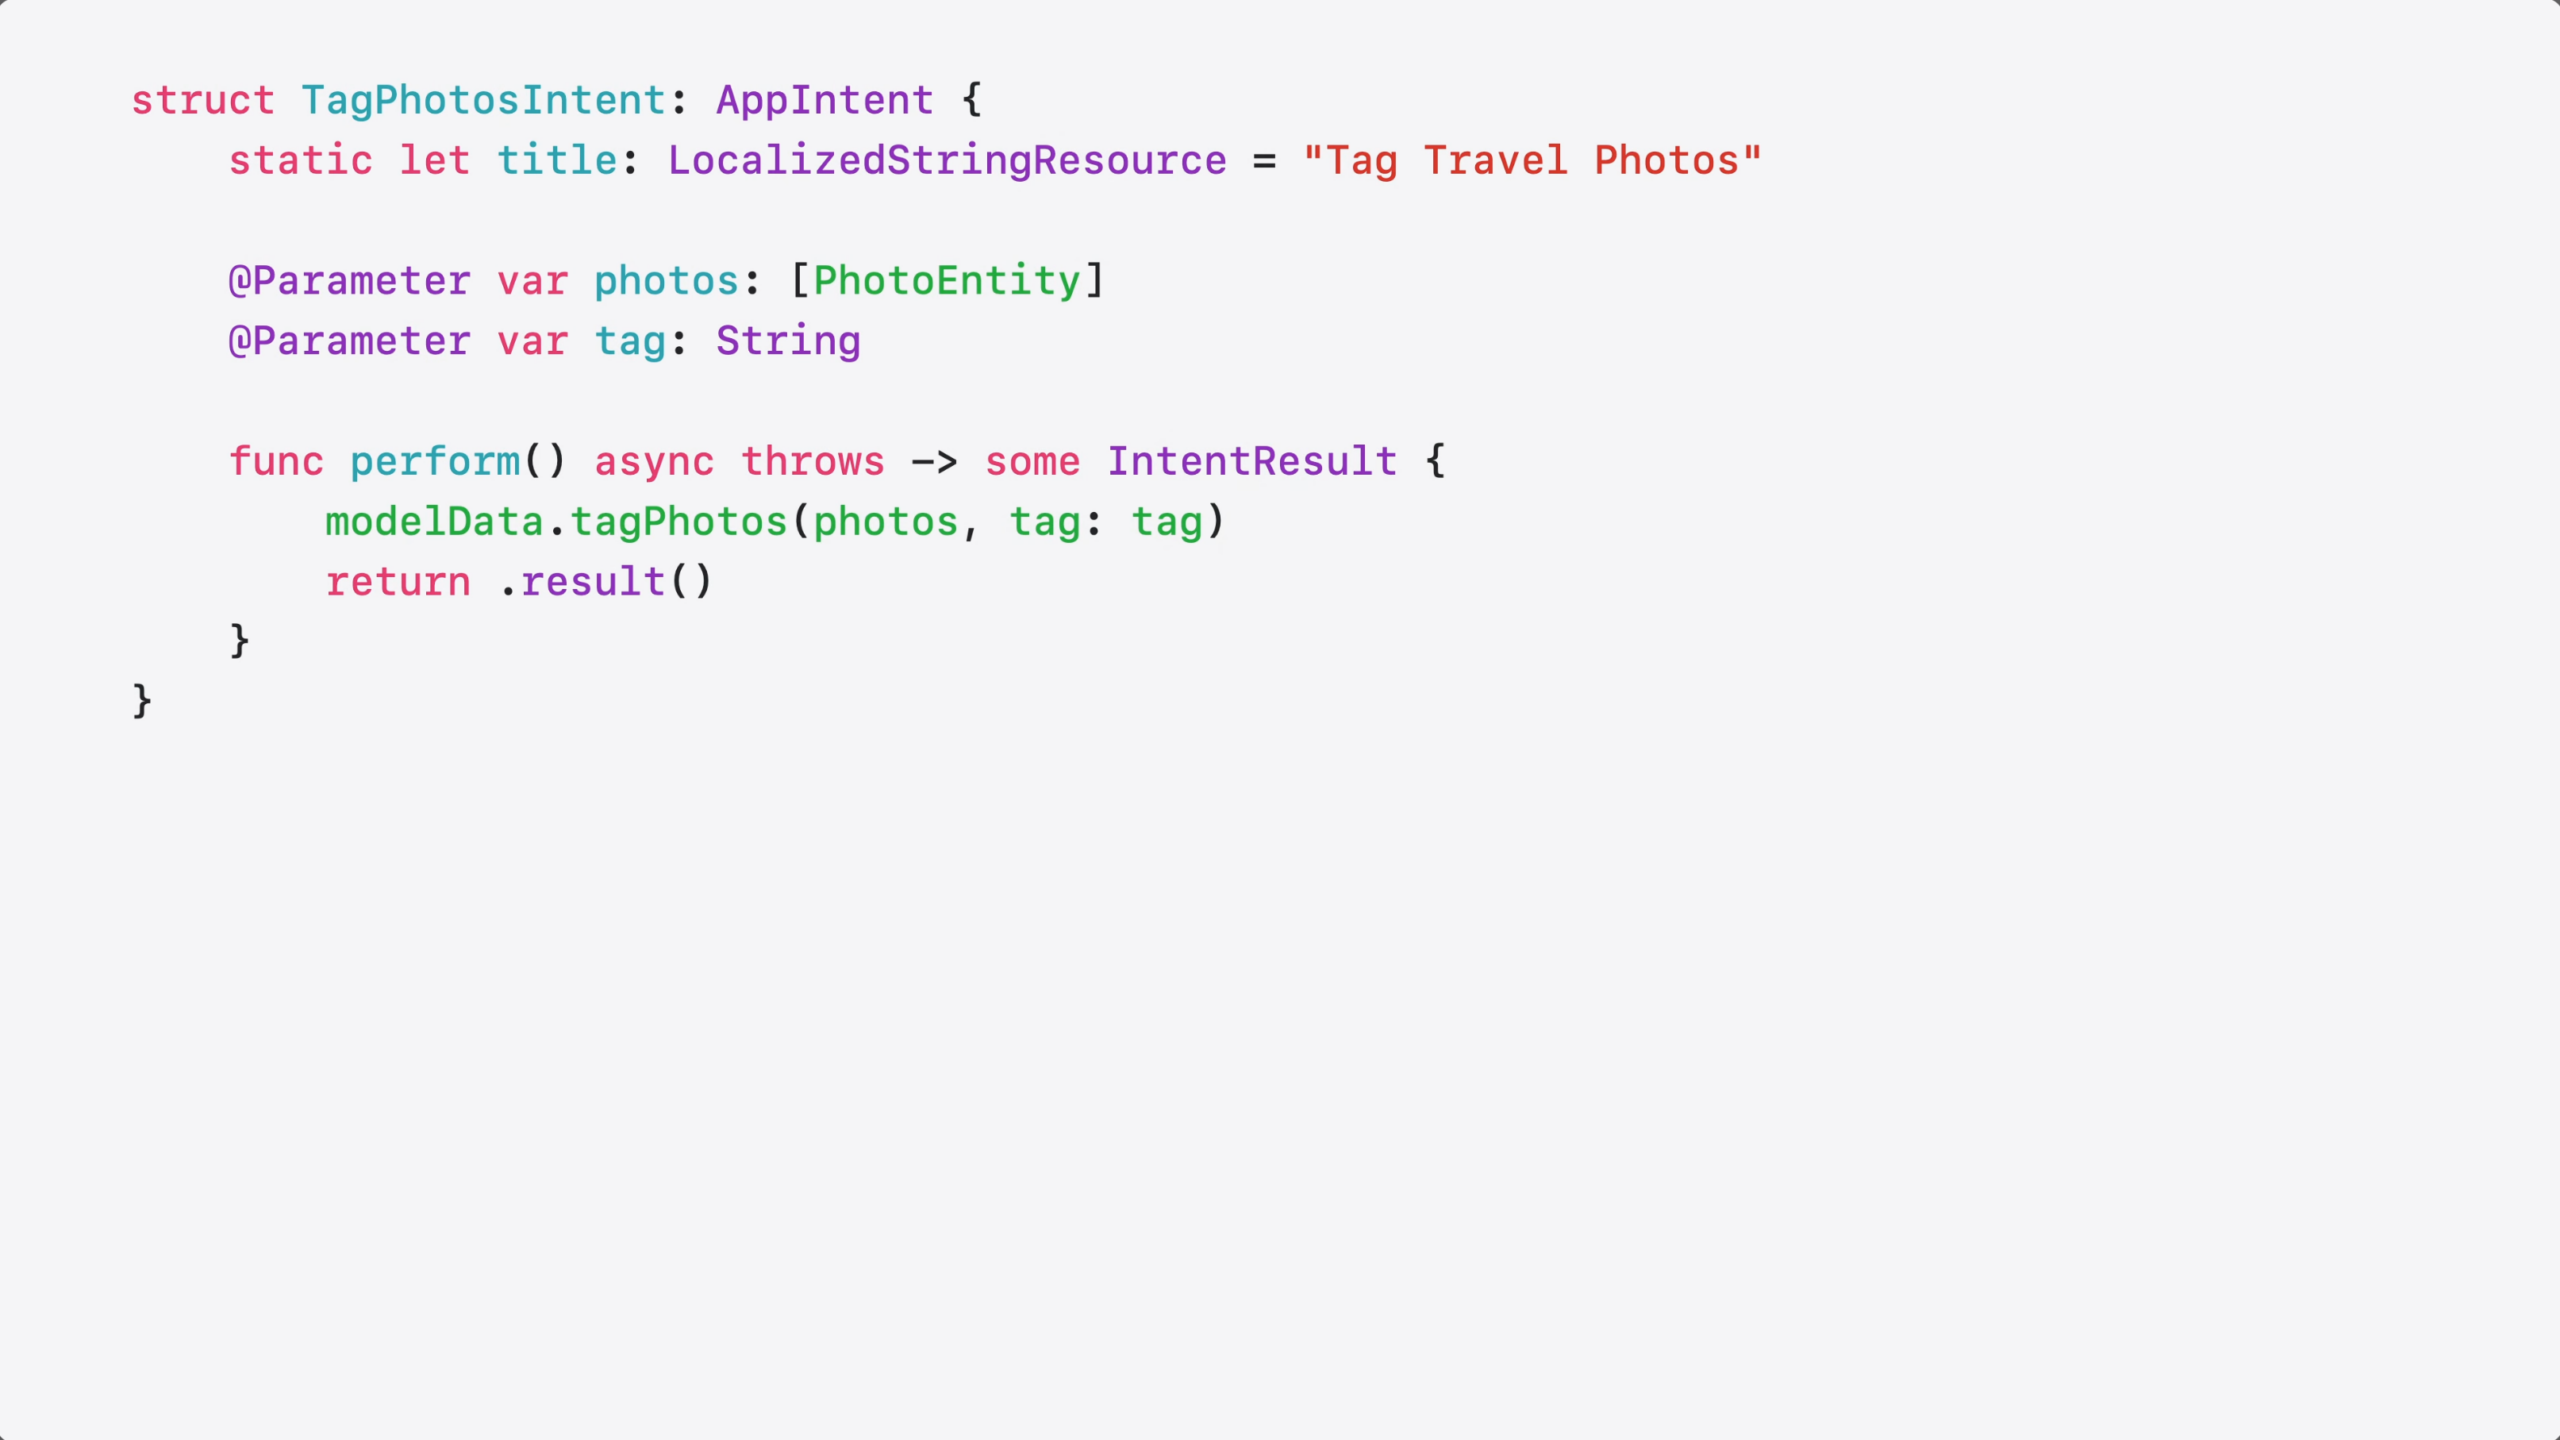
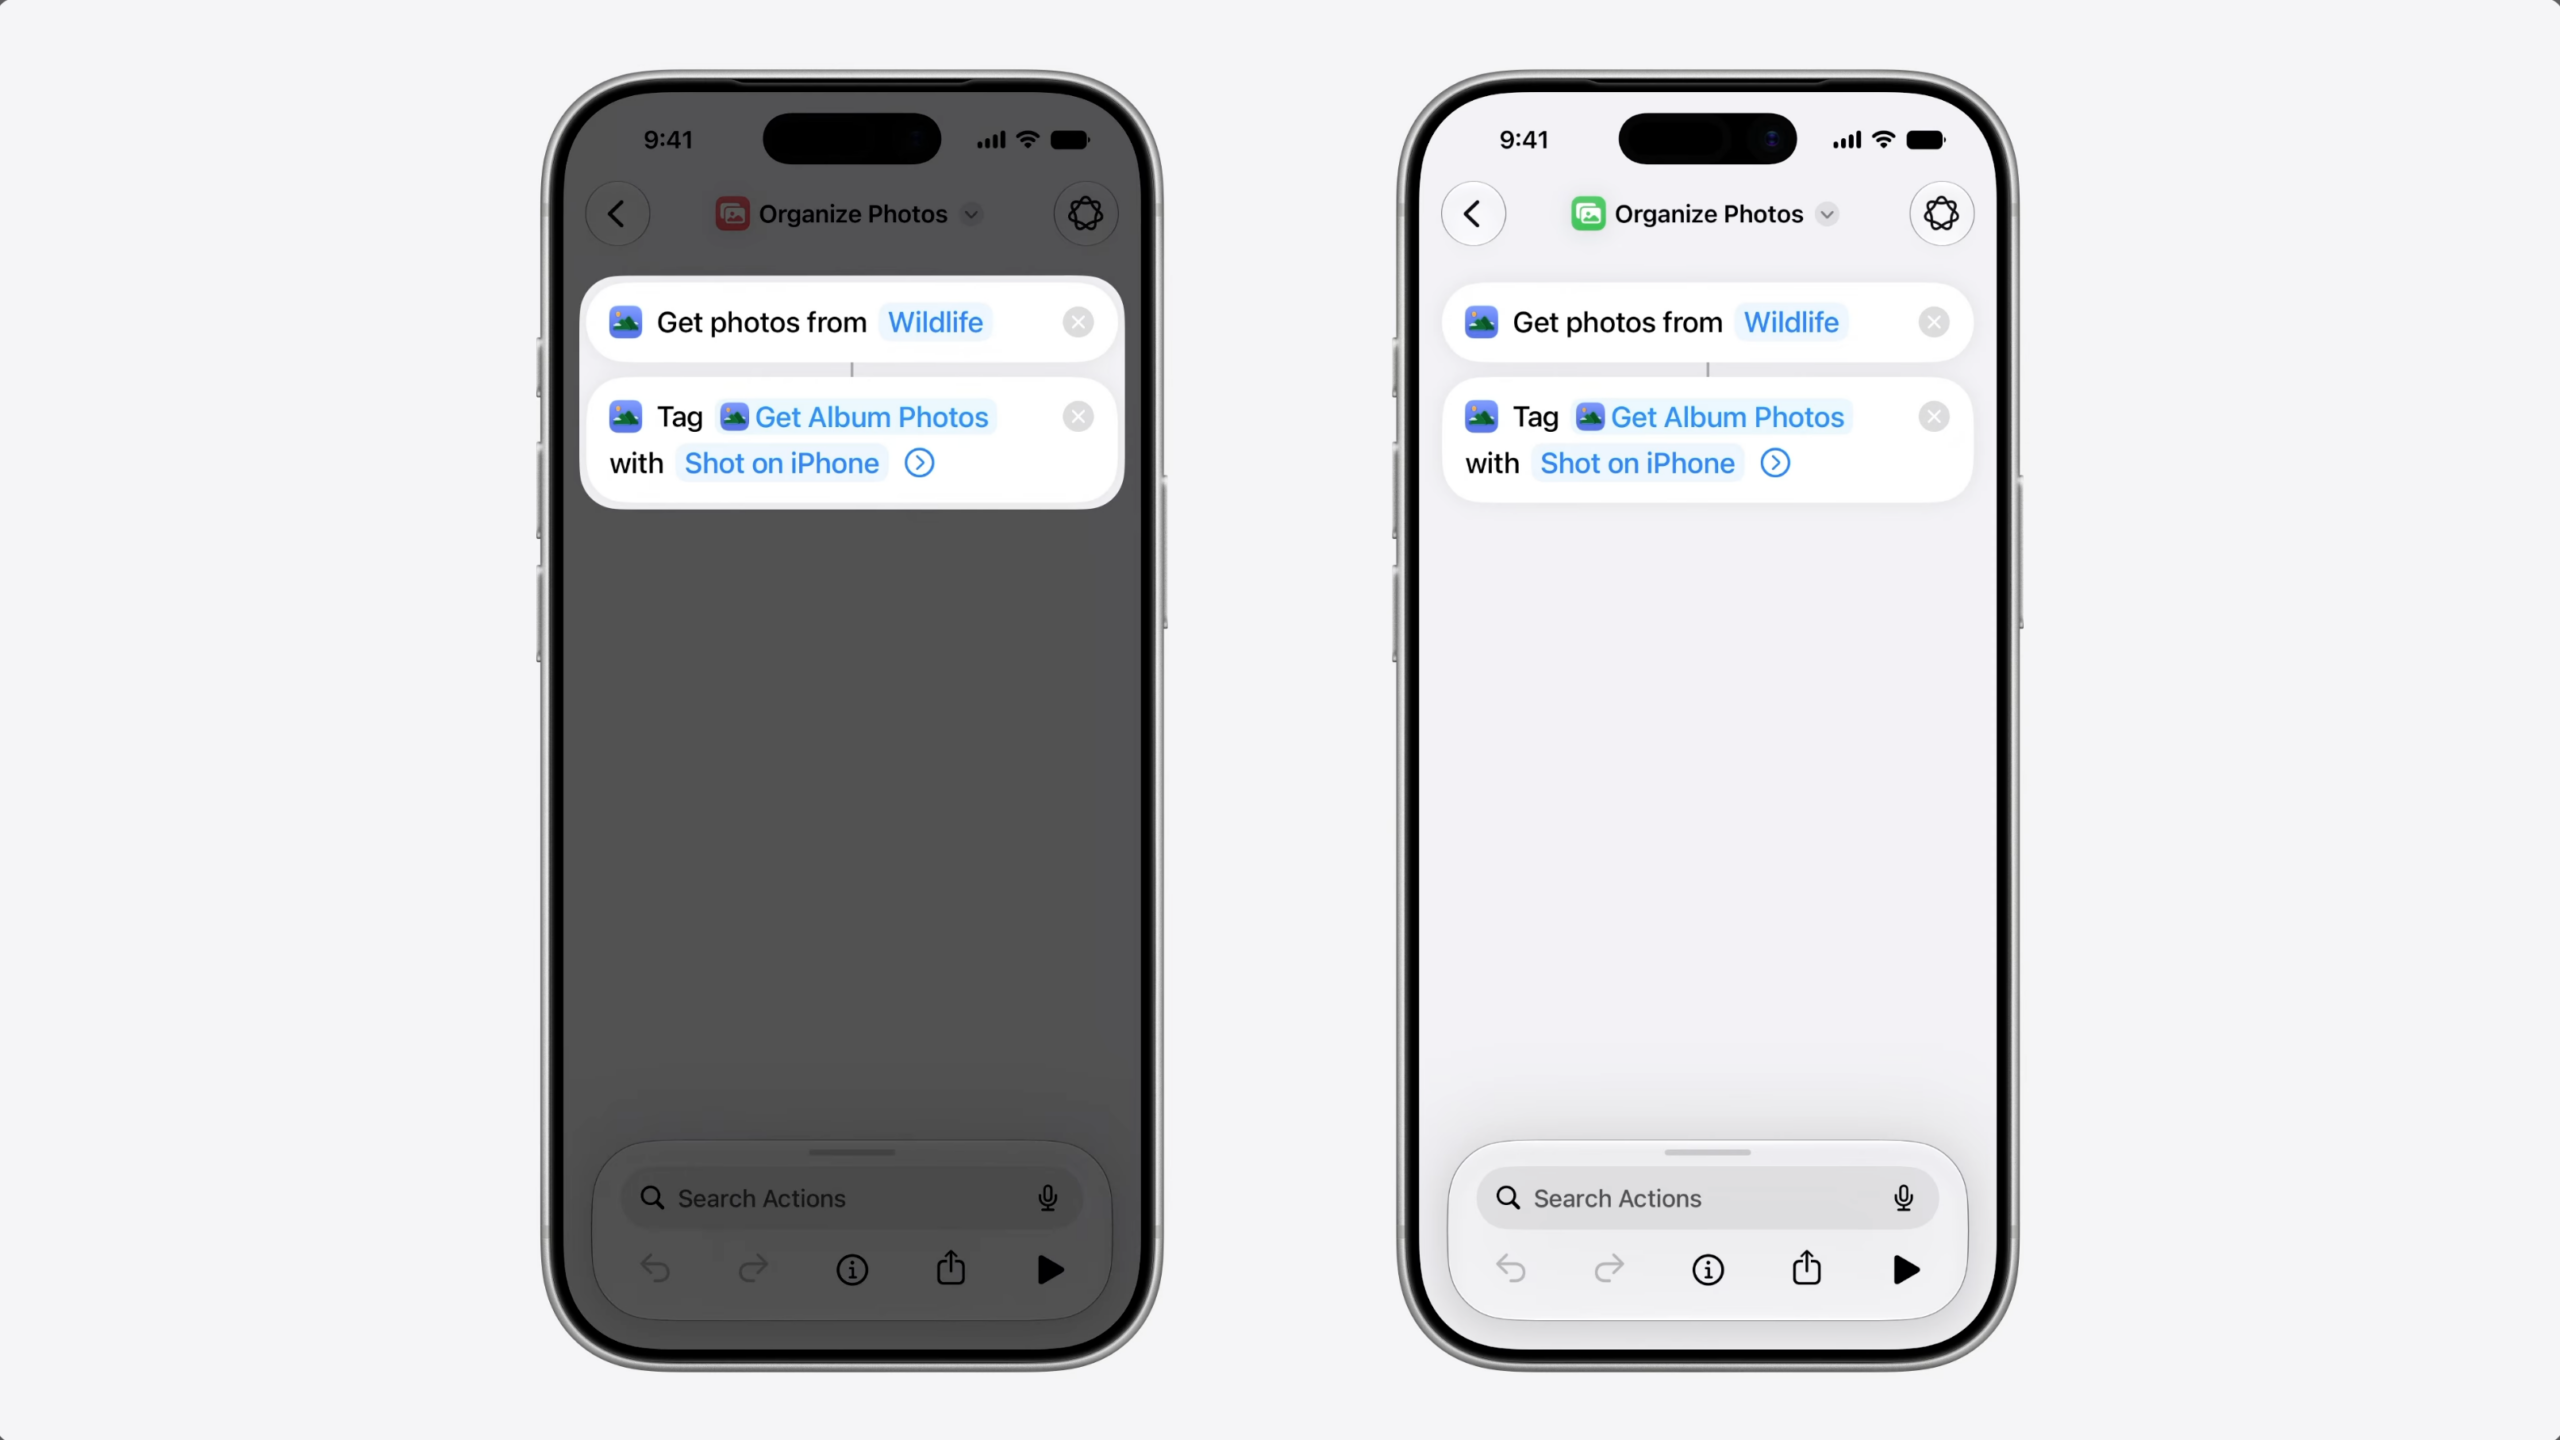
I also created an intent to tag my photos by keyword, so people could organize and find them easily.
As the photo library grew, I noticed something – tagging a lot of photos at once was slower than expected.
Let’s walk through the code to understand why.
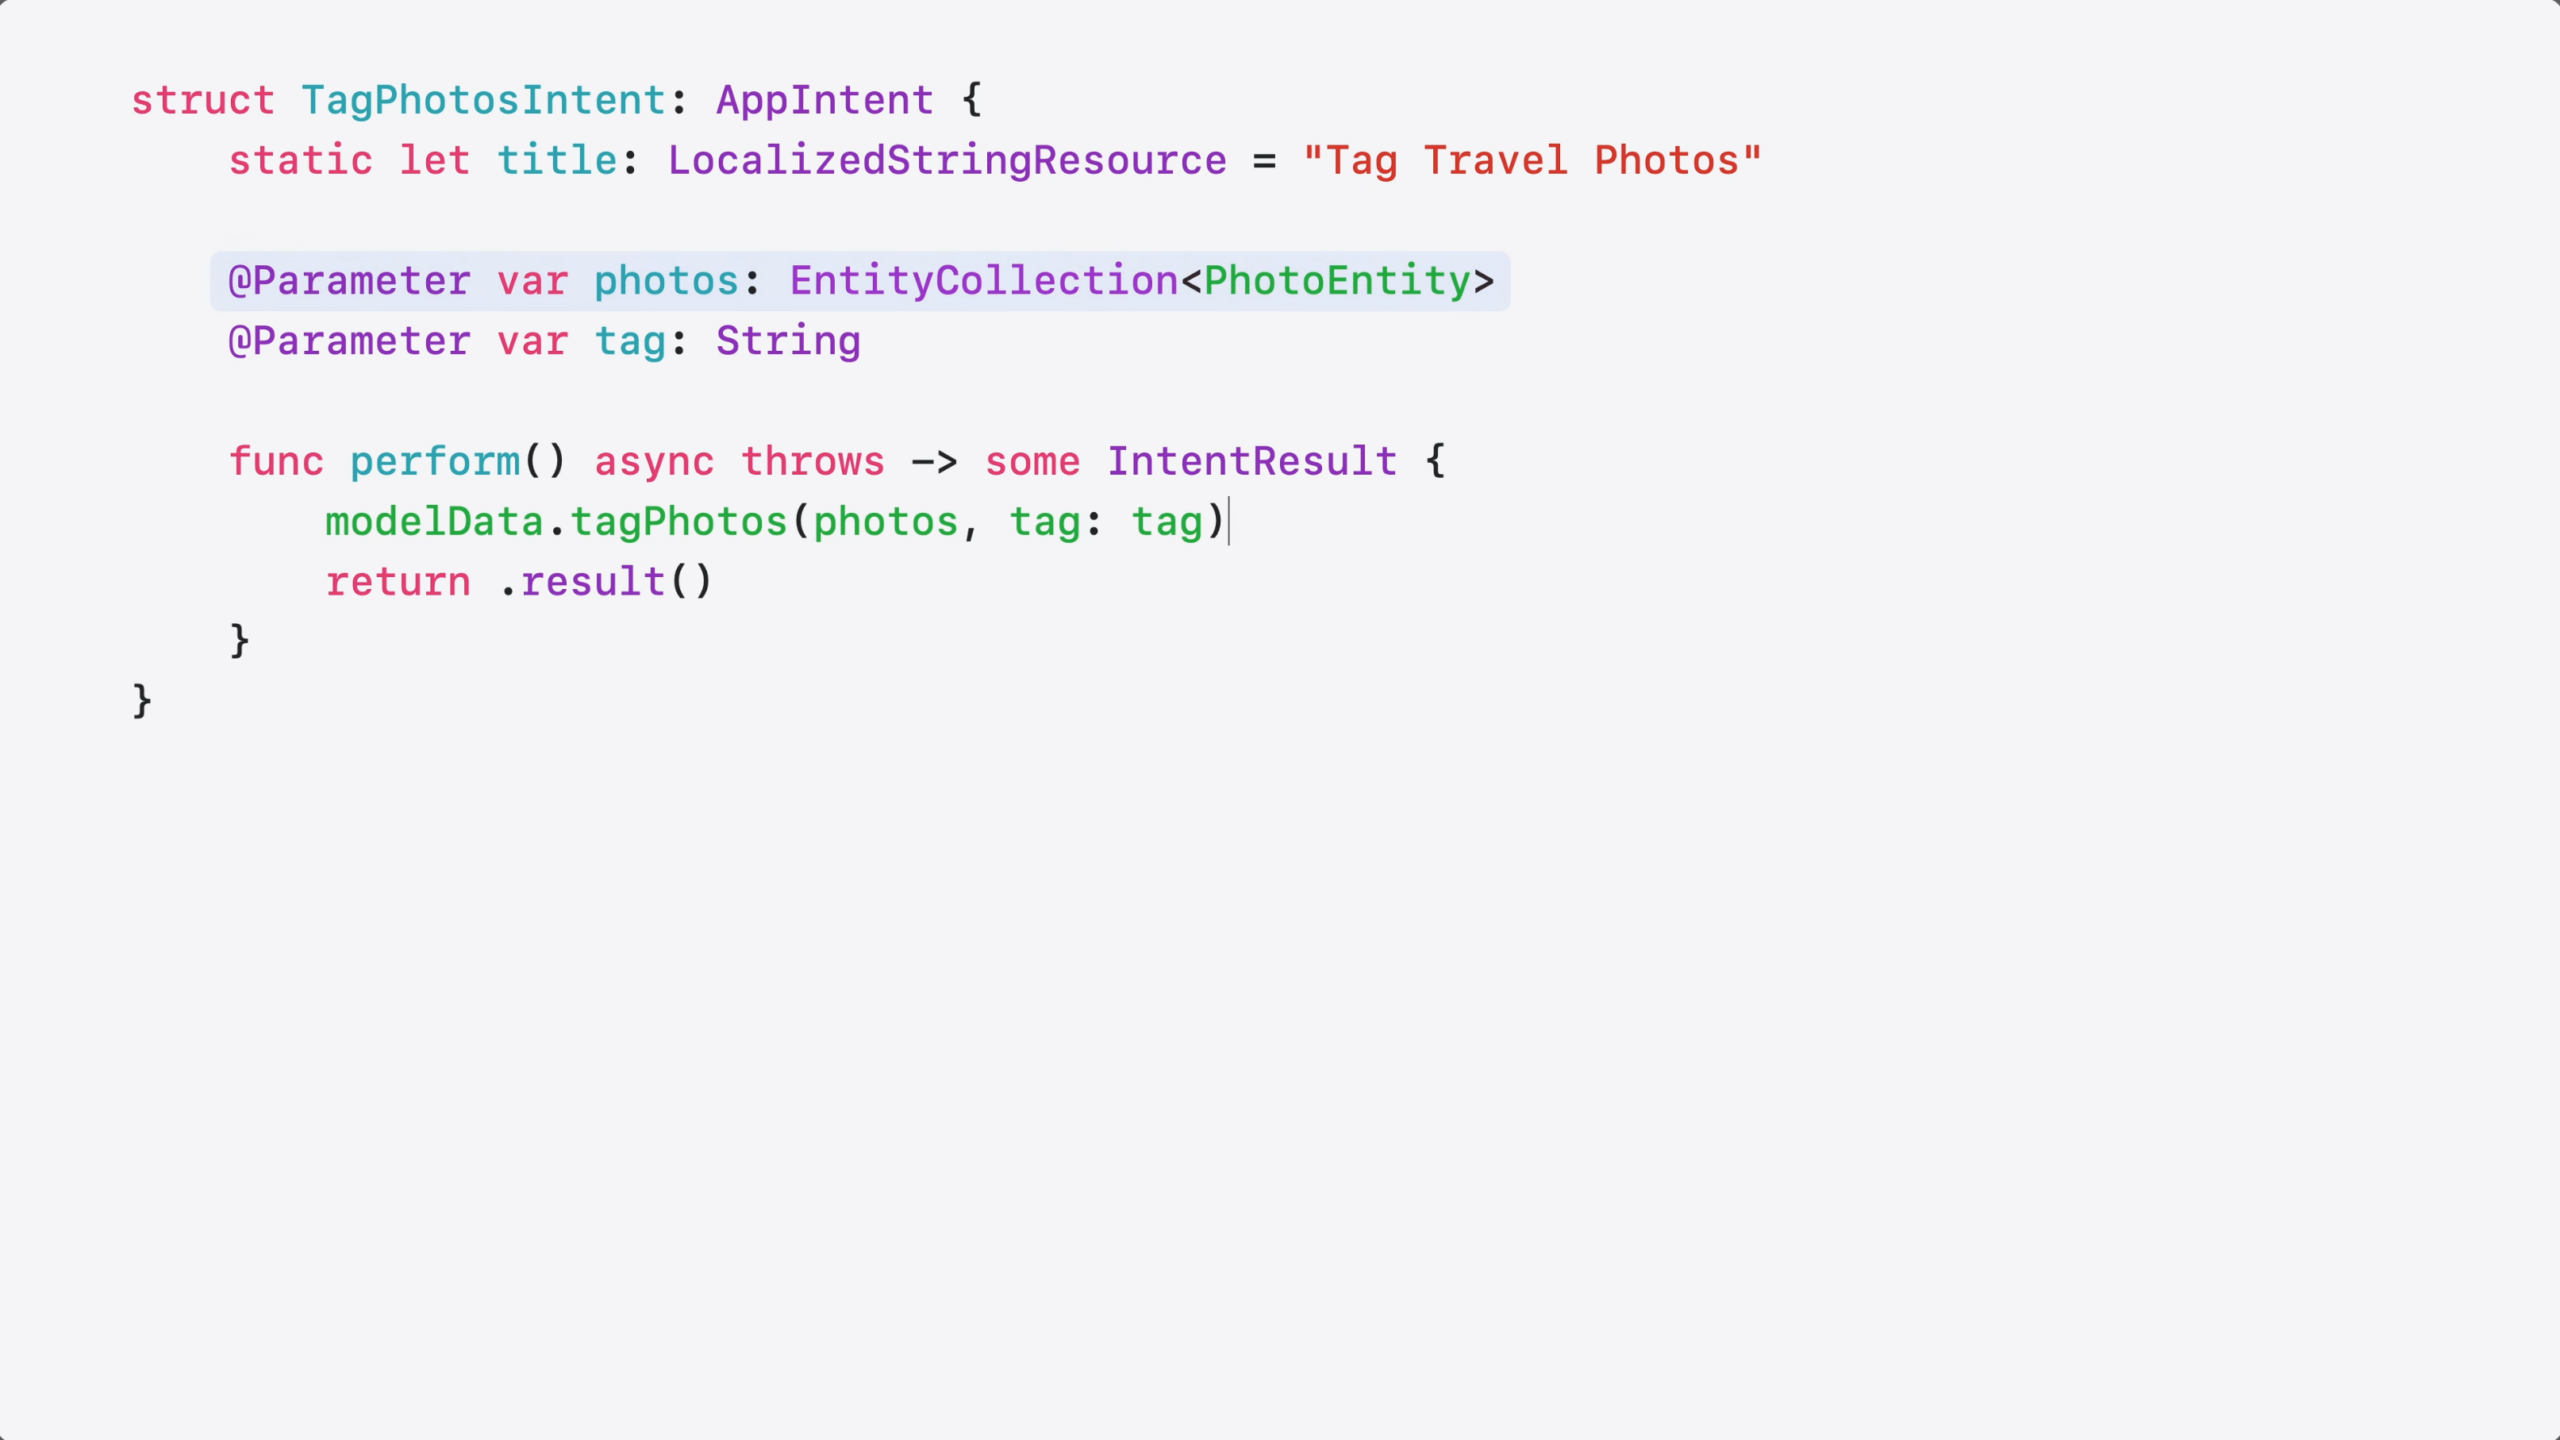
The intent is very simple – it just adds a keyword to my photos.
It takes a list of photo entities and a tag as a @Parameter…
…and the Perform method just applies the tag to each photo item.
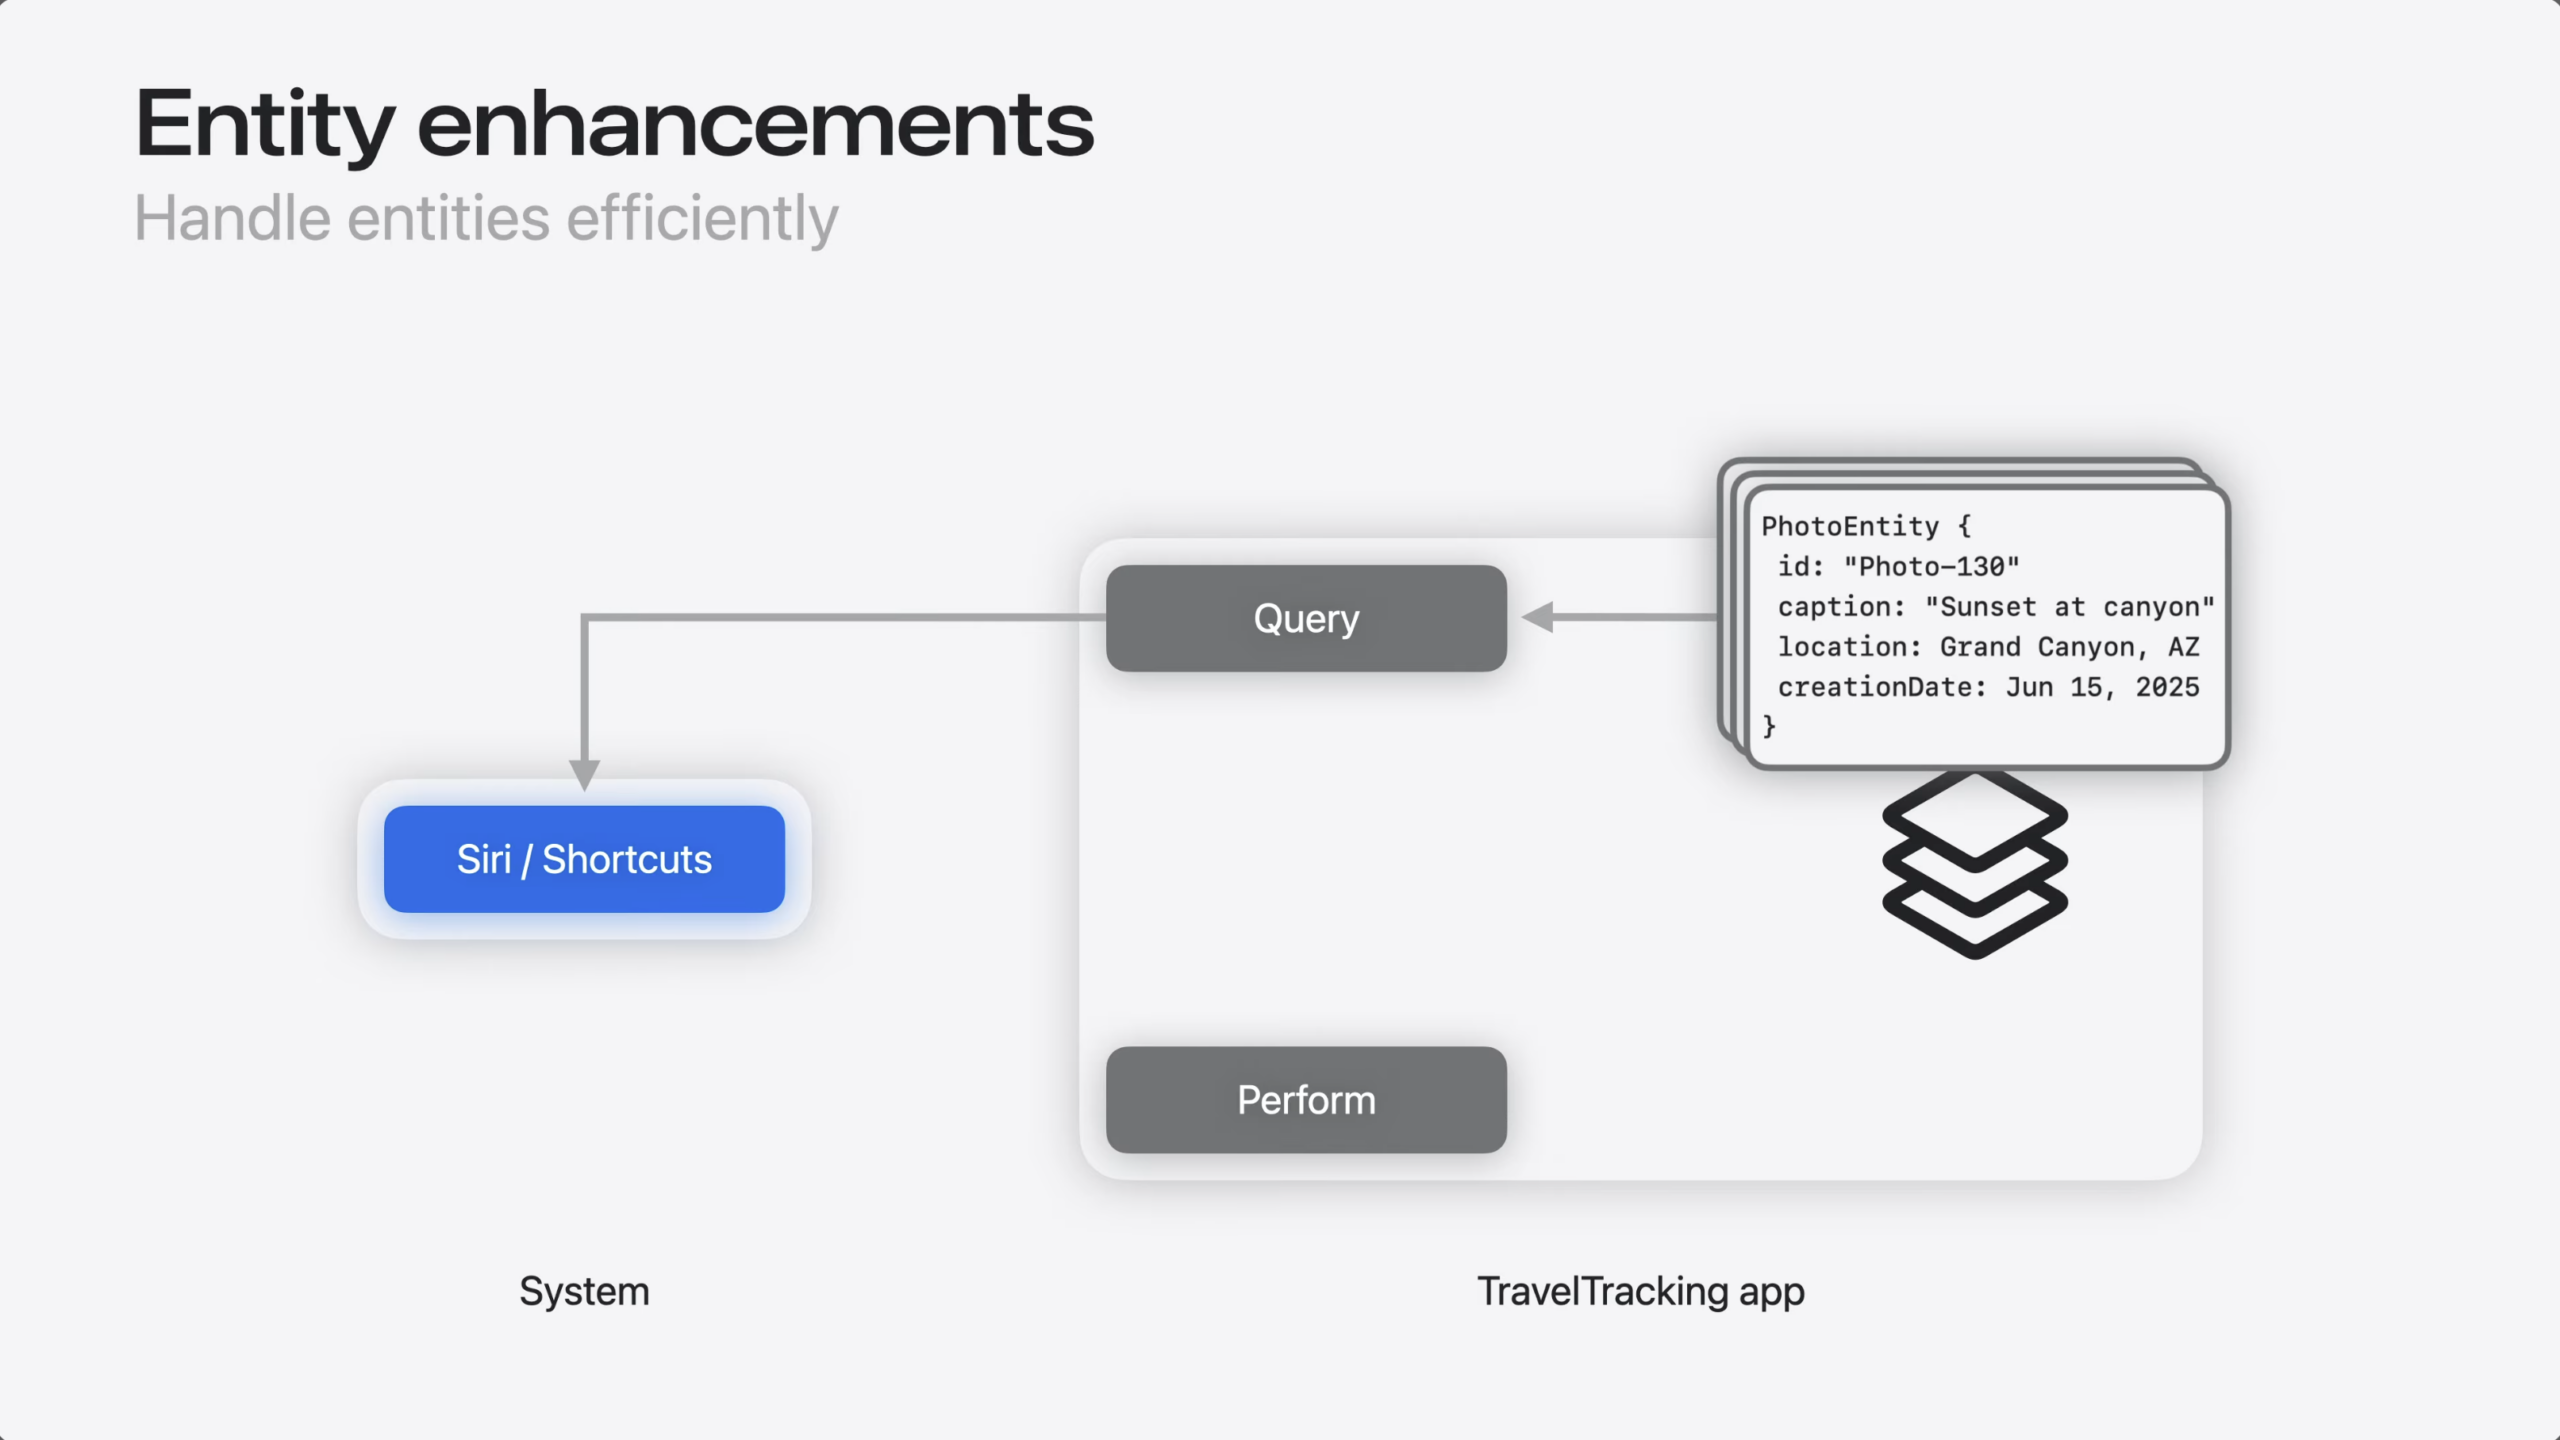
So, why was that actually a problem? Well, it has to do with how App Intents resolves parameters.
Before an intent runs, the system resolves every entity.
That means calling the entity query to populate all of its properties, so the intent has everything it may need.
For most intents, that’s exactly what you want. But in my case, this meant resolving hundreds or thousands of photo entities…
…even though my code only needs the entity ID to update my data model.
So, how do I fix this?
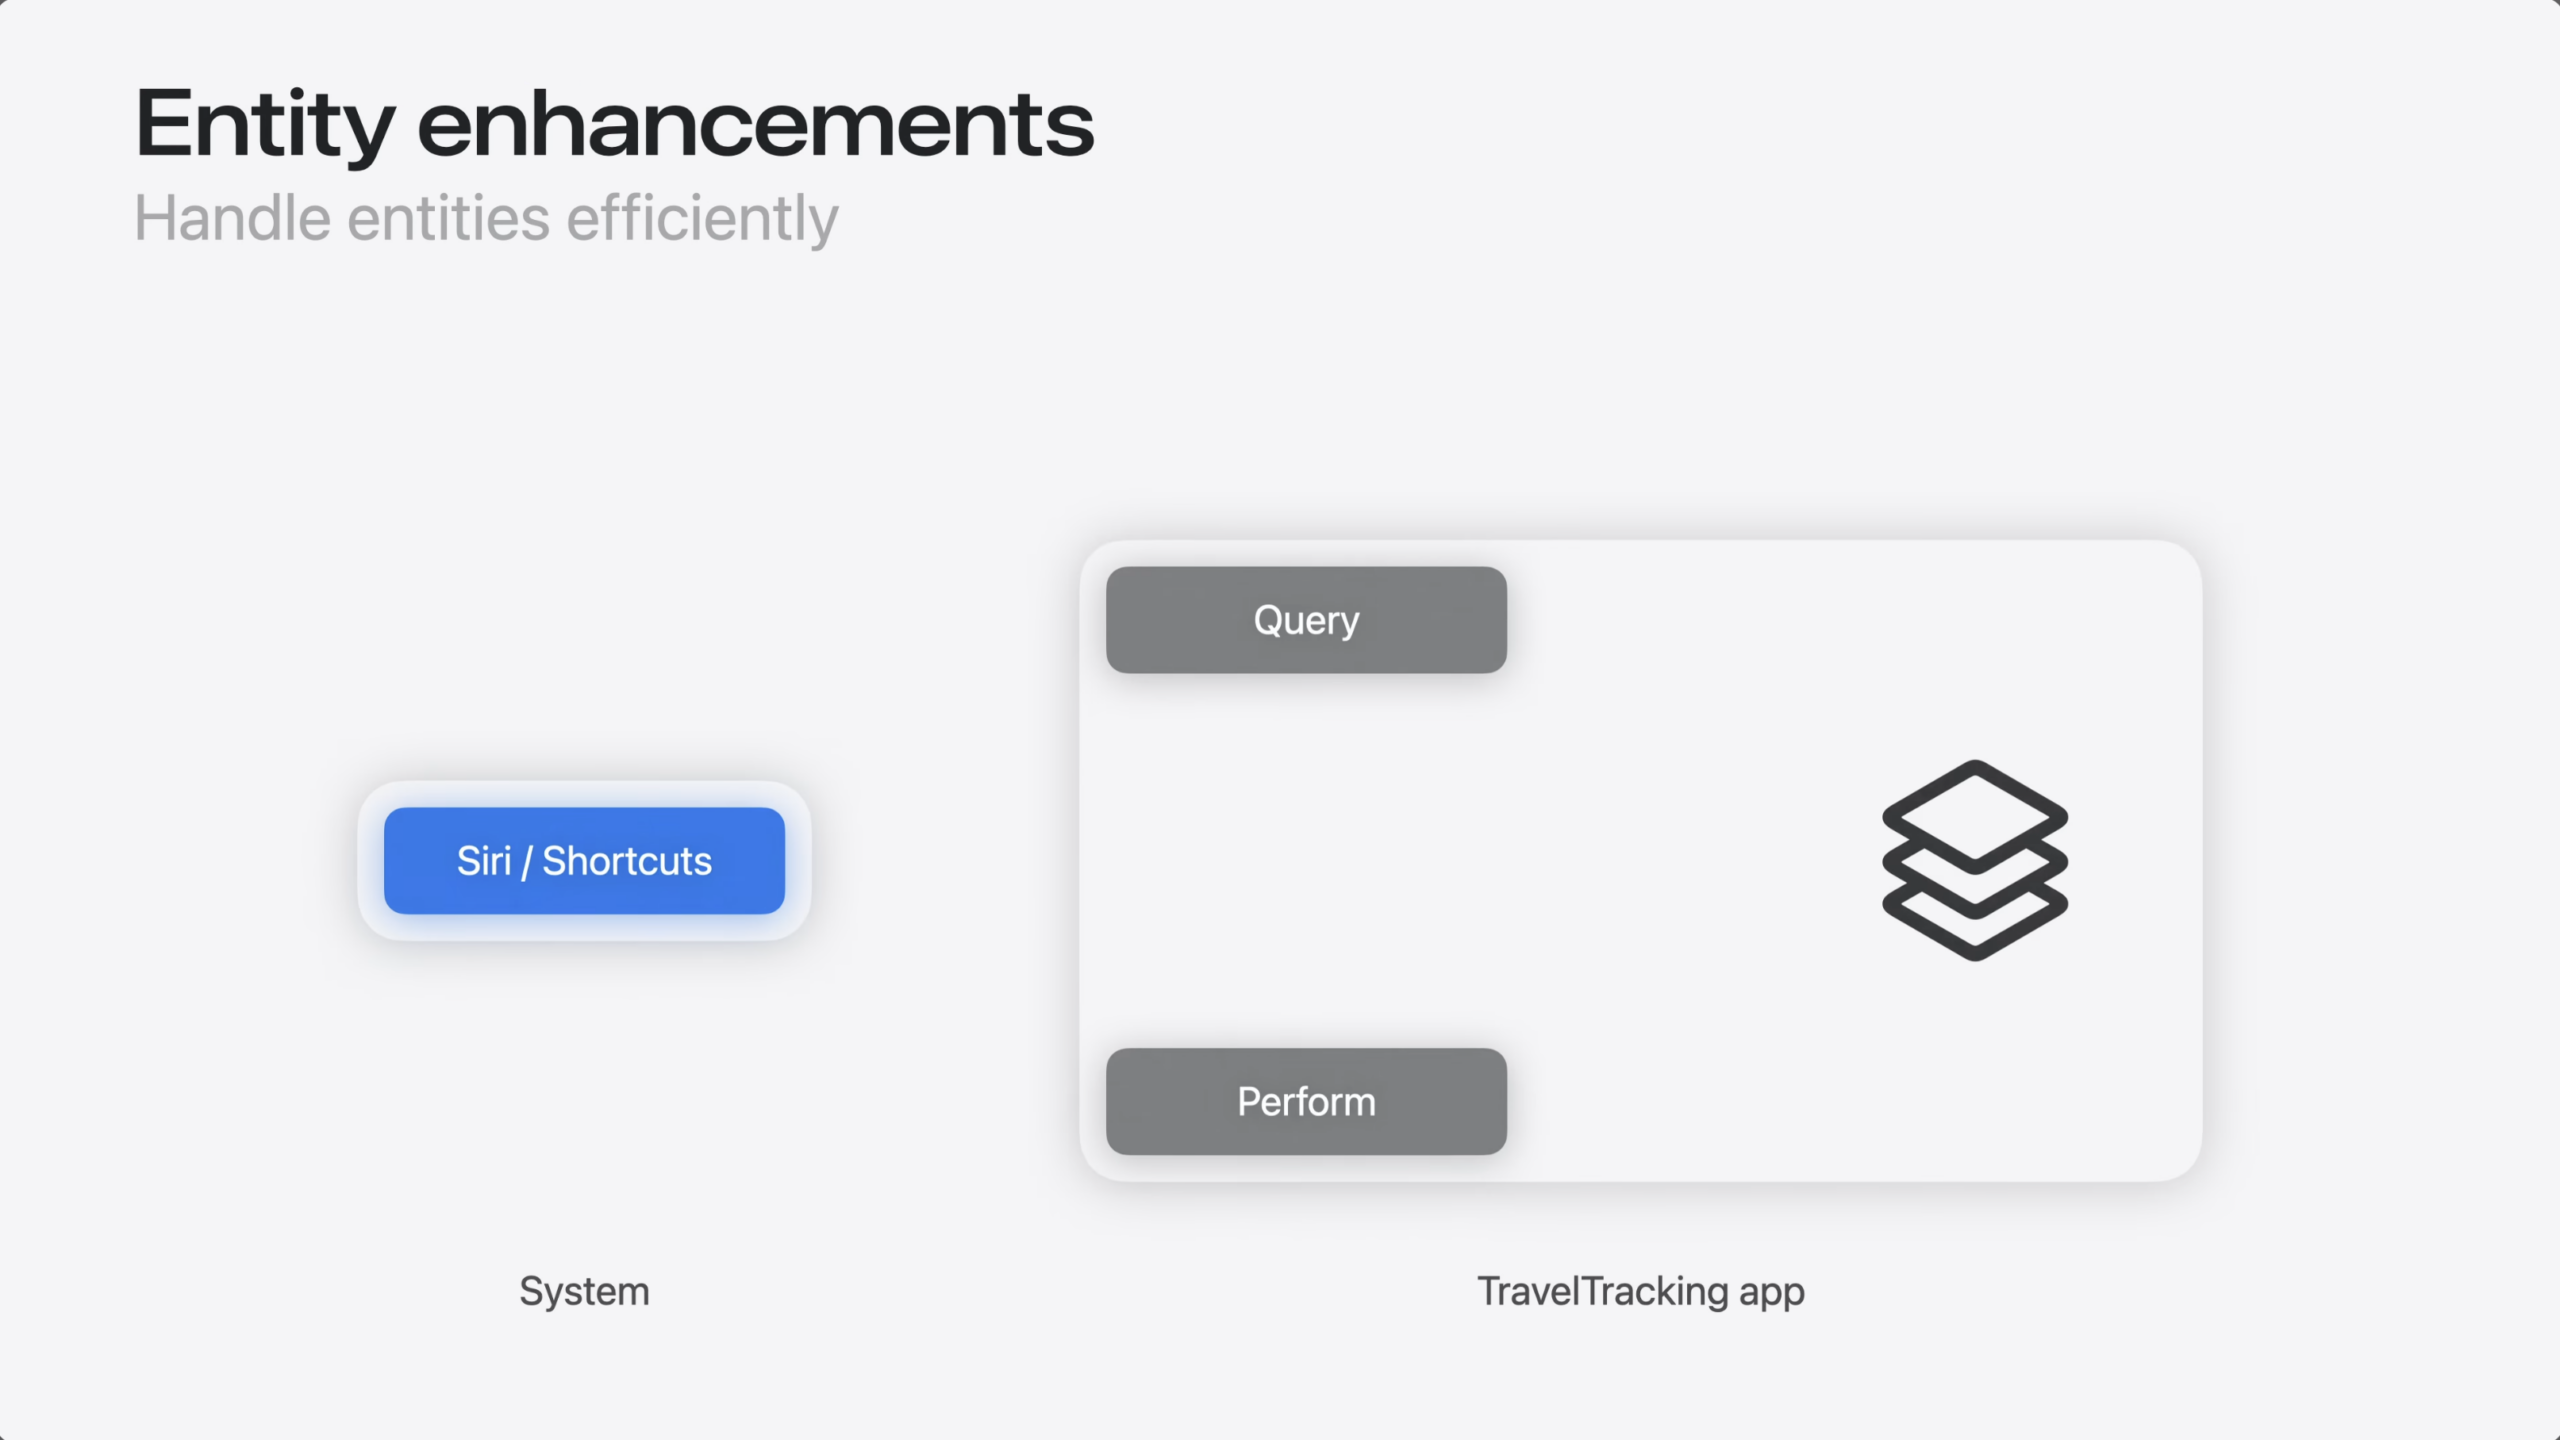
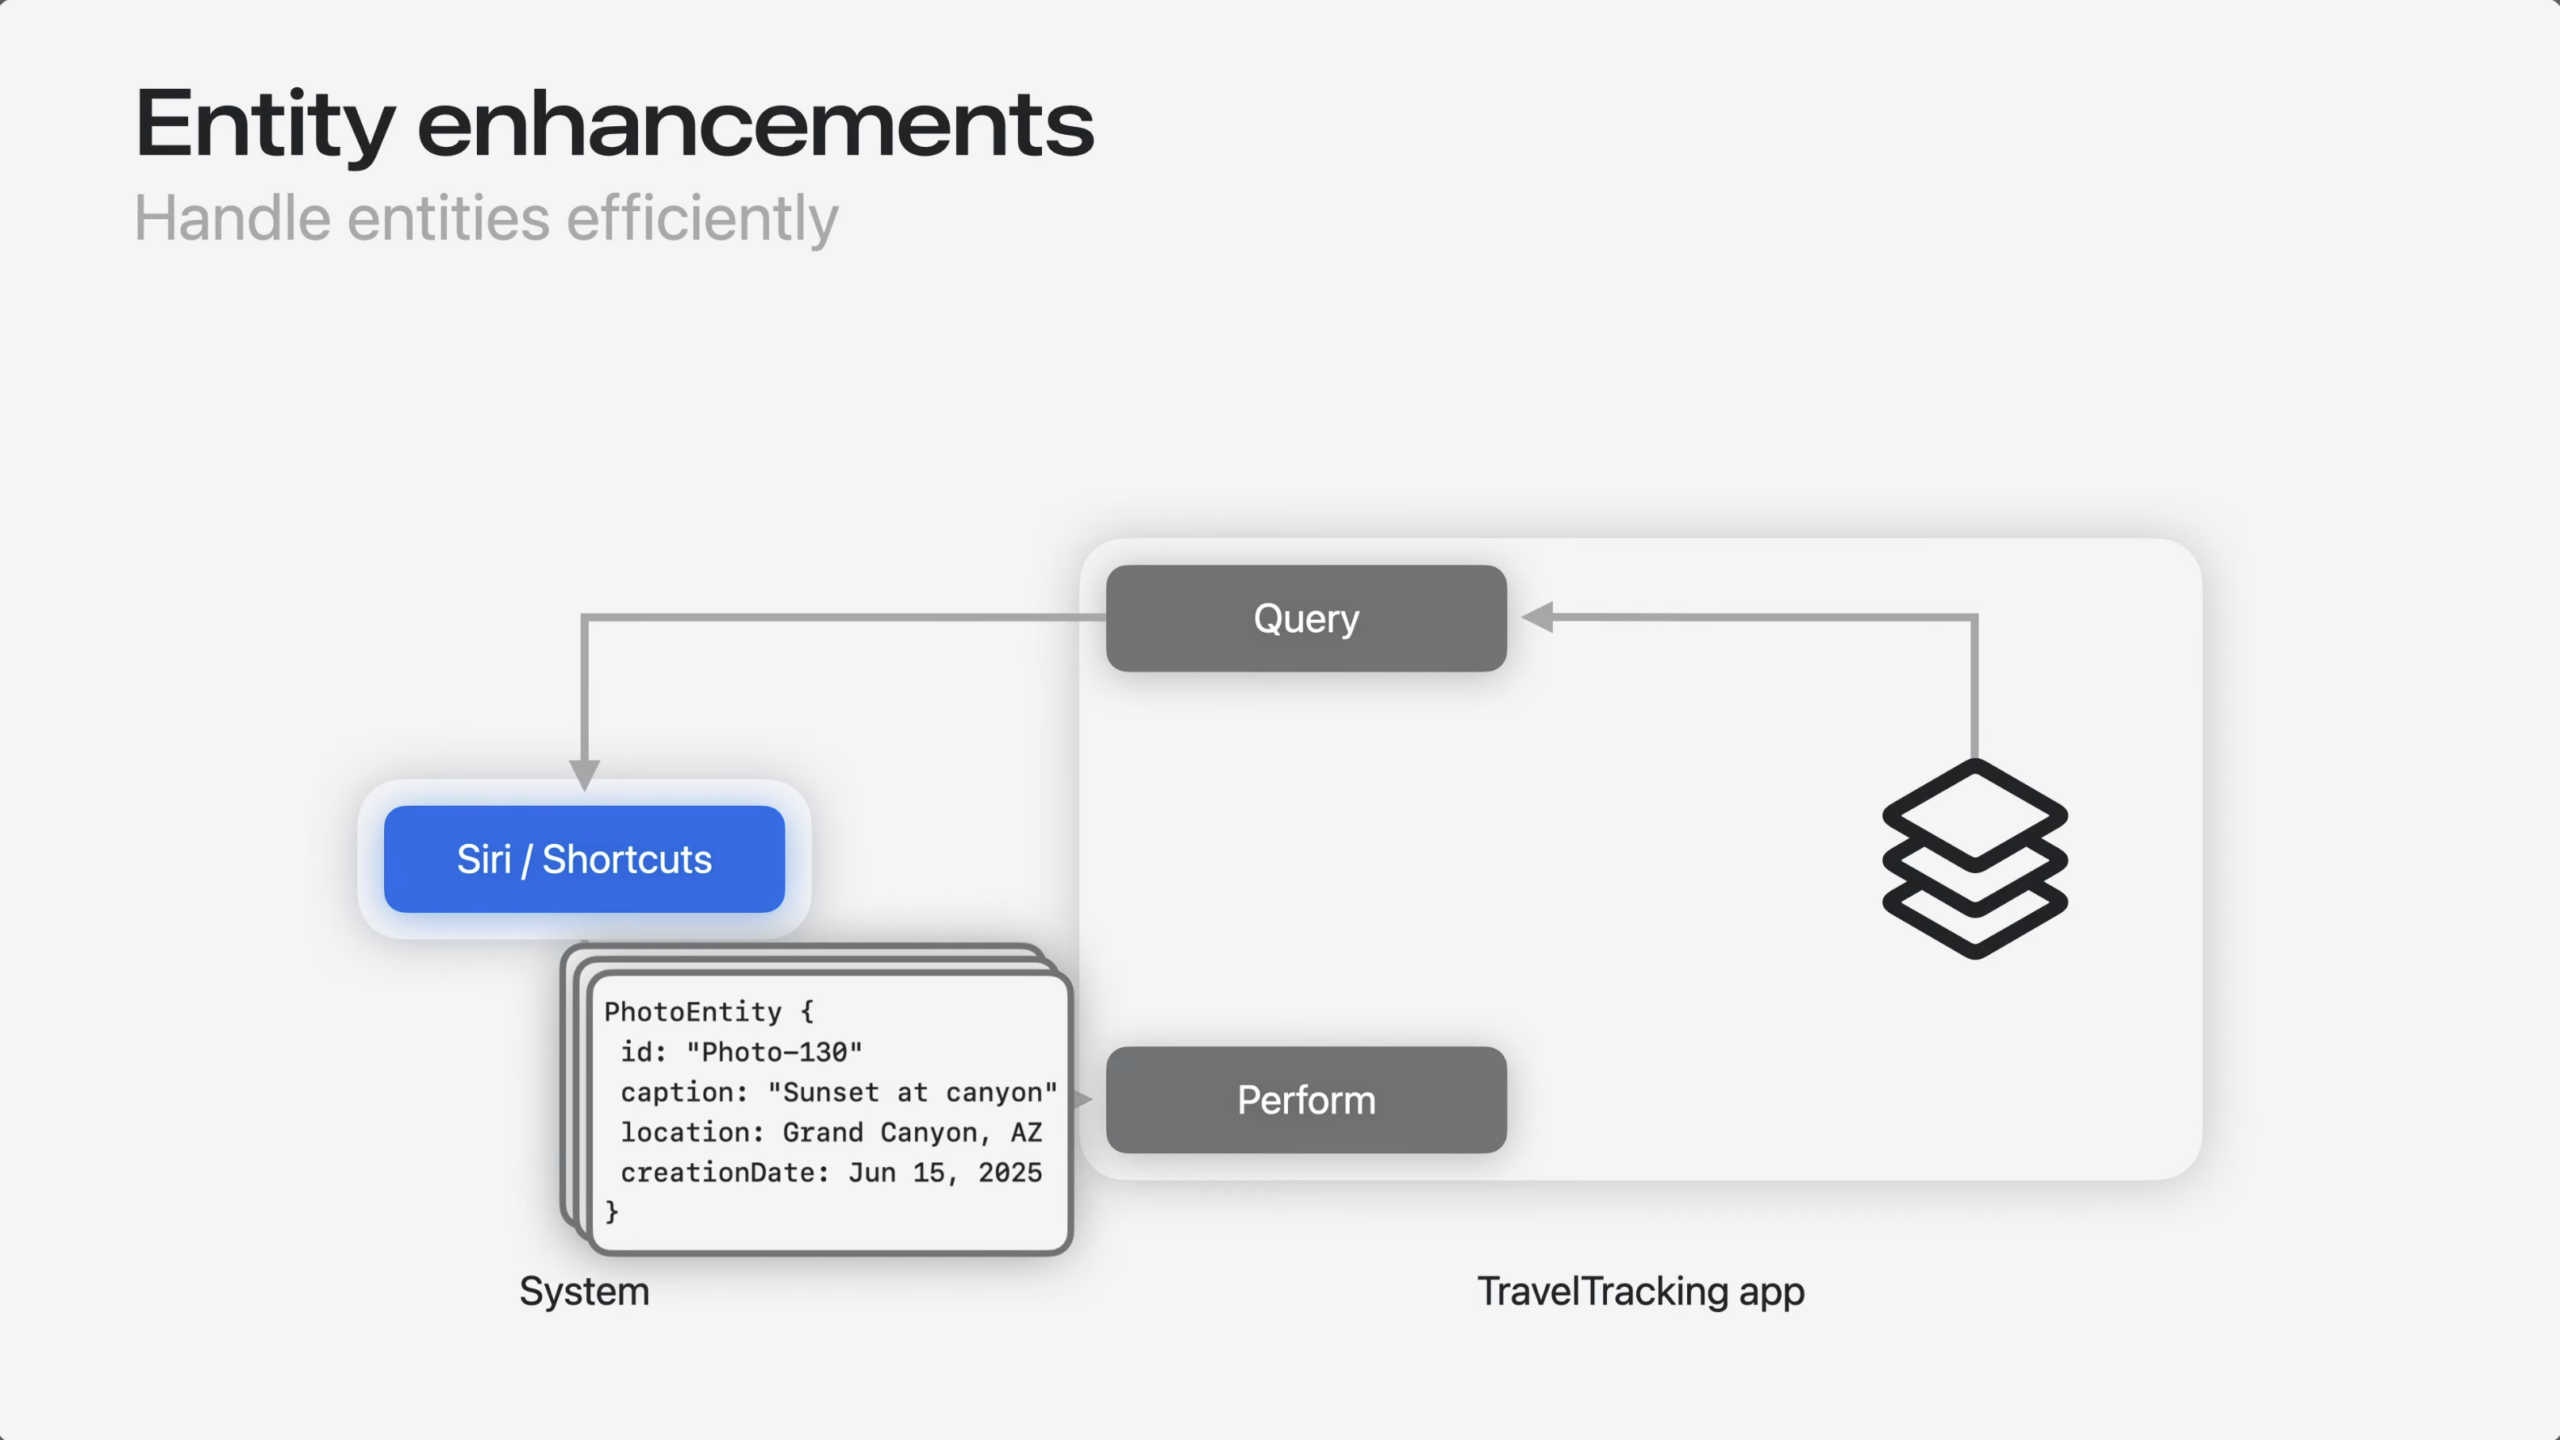
Entity Collection fixes this. It’s a new type that stores an array of entity identifiers instead of fully-resolved entities.
When you use EntityCollection as your parameter type, the system passes just the identifiers to the intent’s perform method – without resolving the full entities.
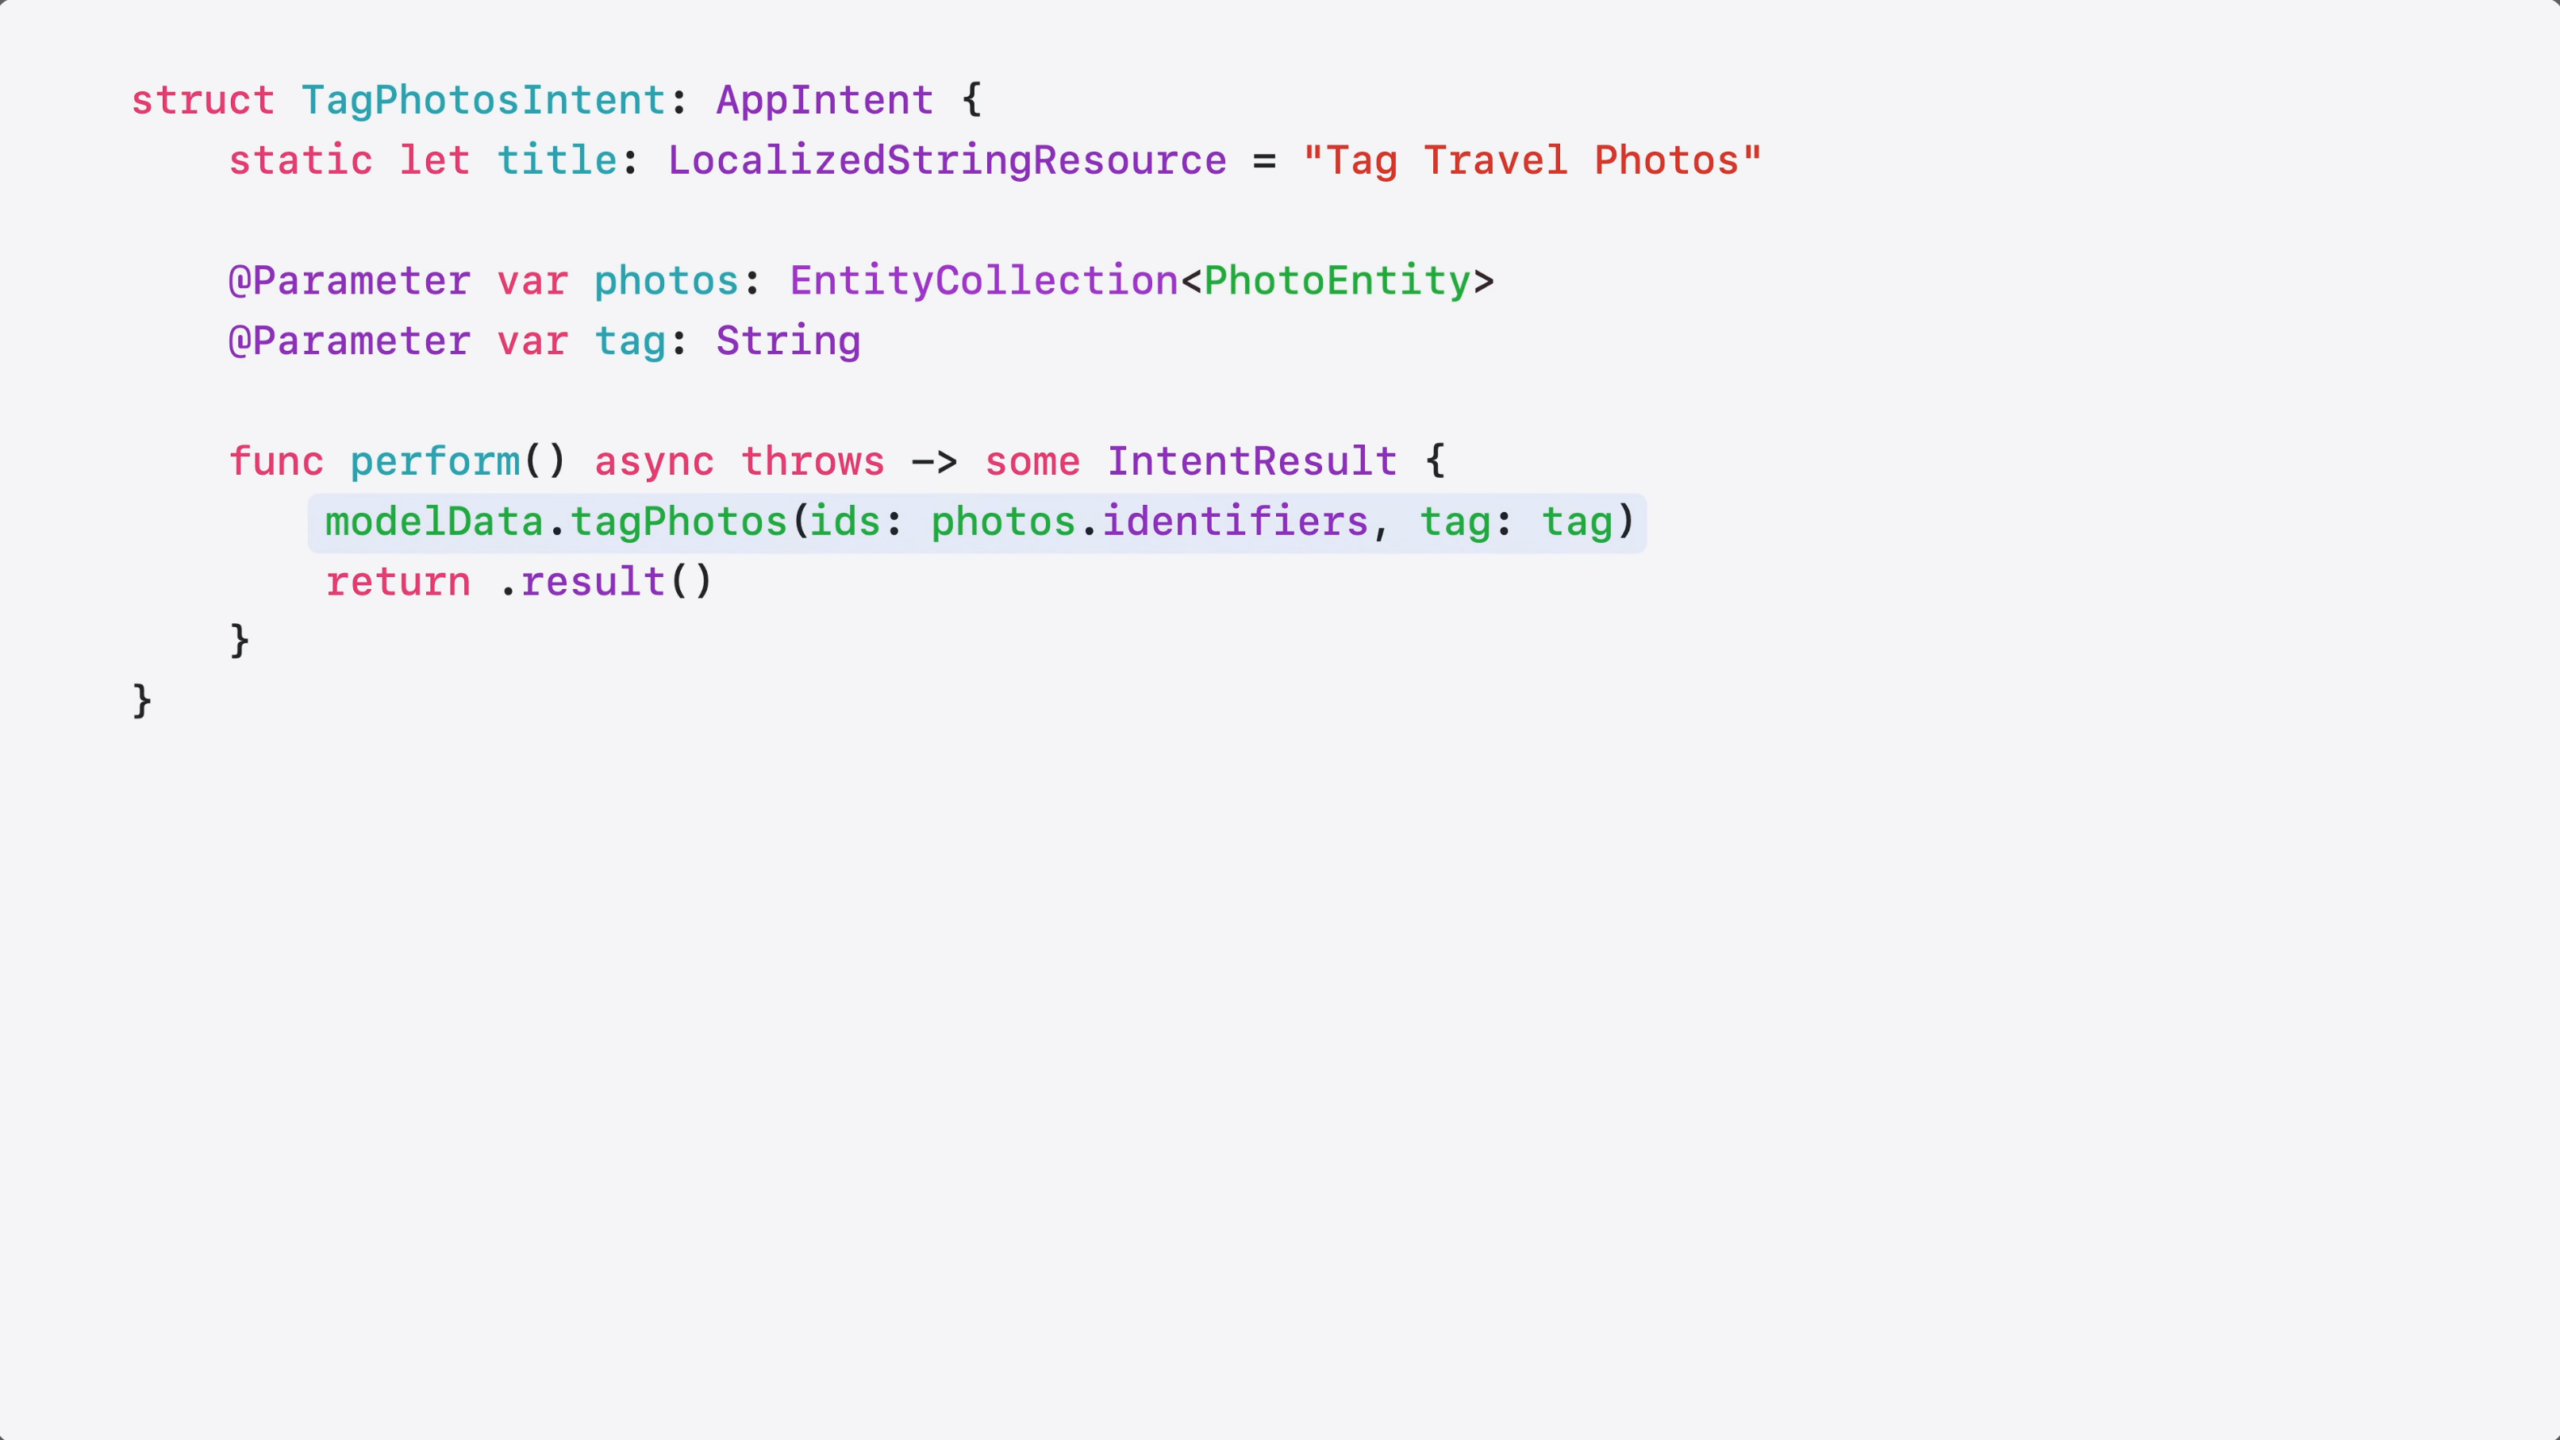
Here’s the updated code.
I changed my @Parameter type to EntityCollection…
…and passed the identifiers directly to my tagging method. That’s all it took!
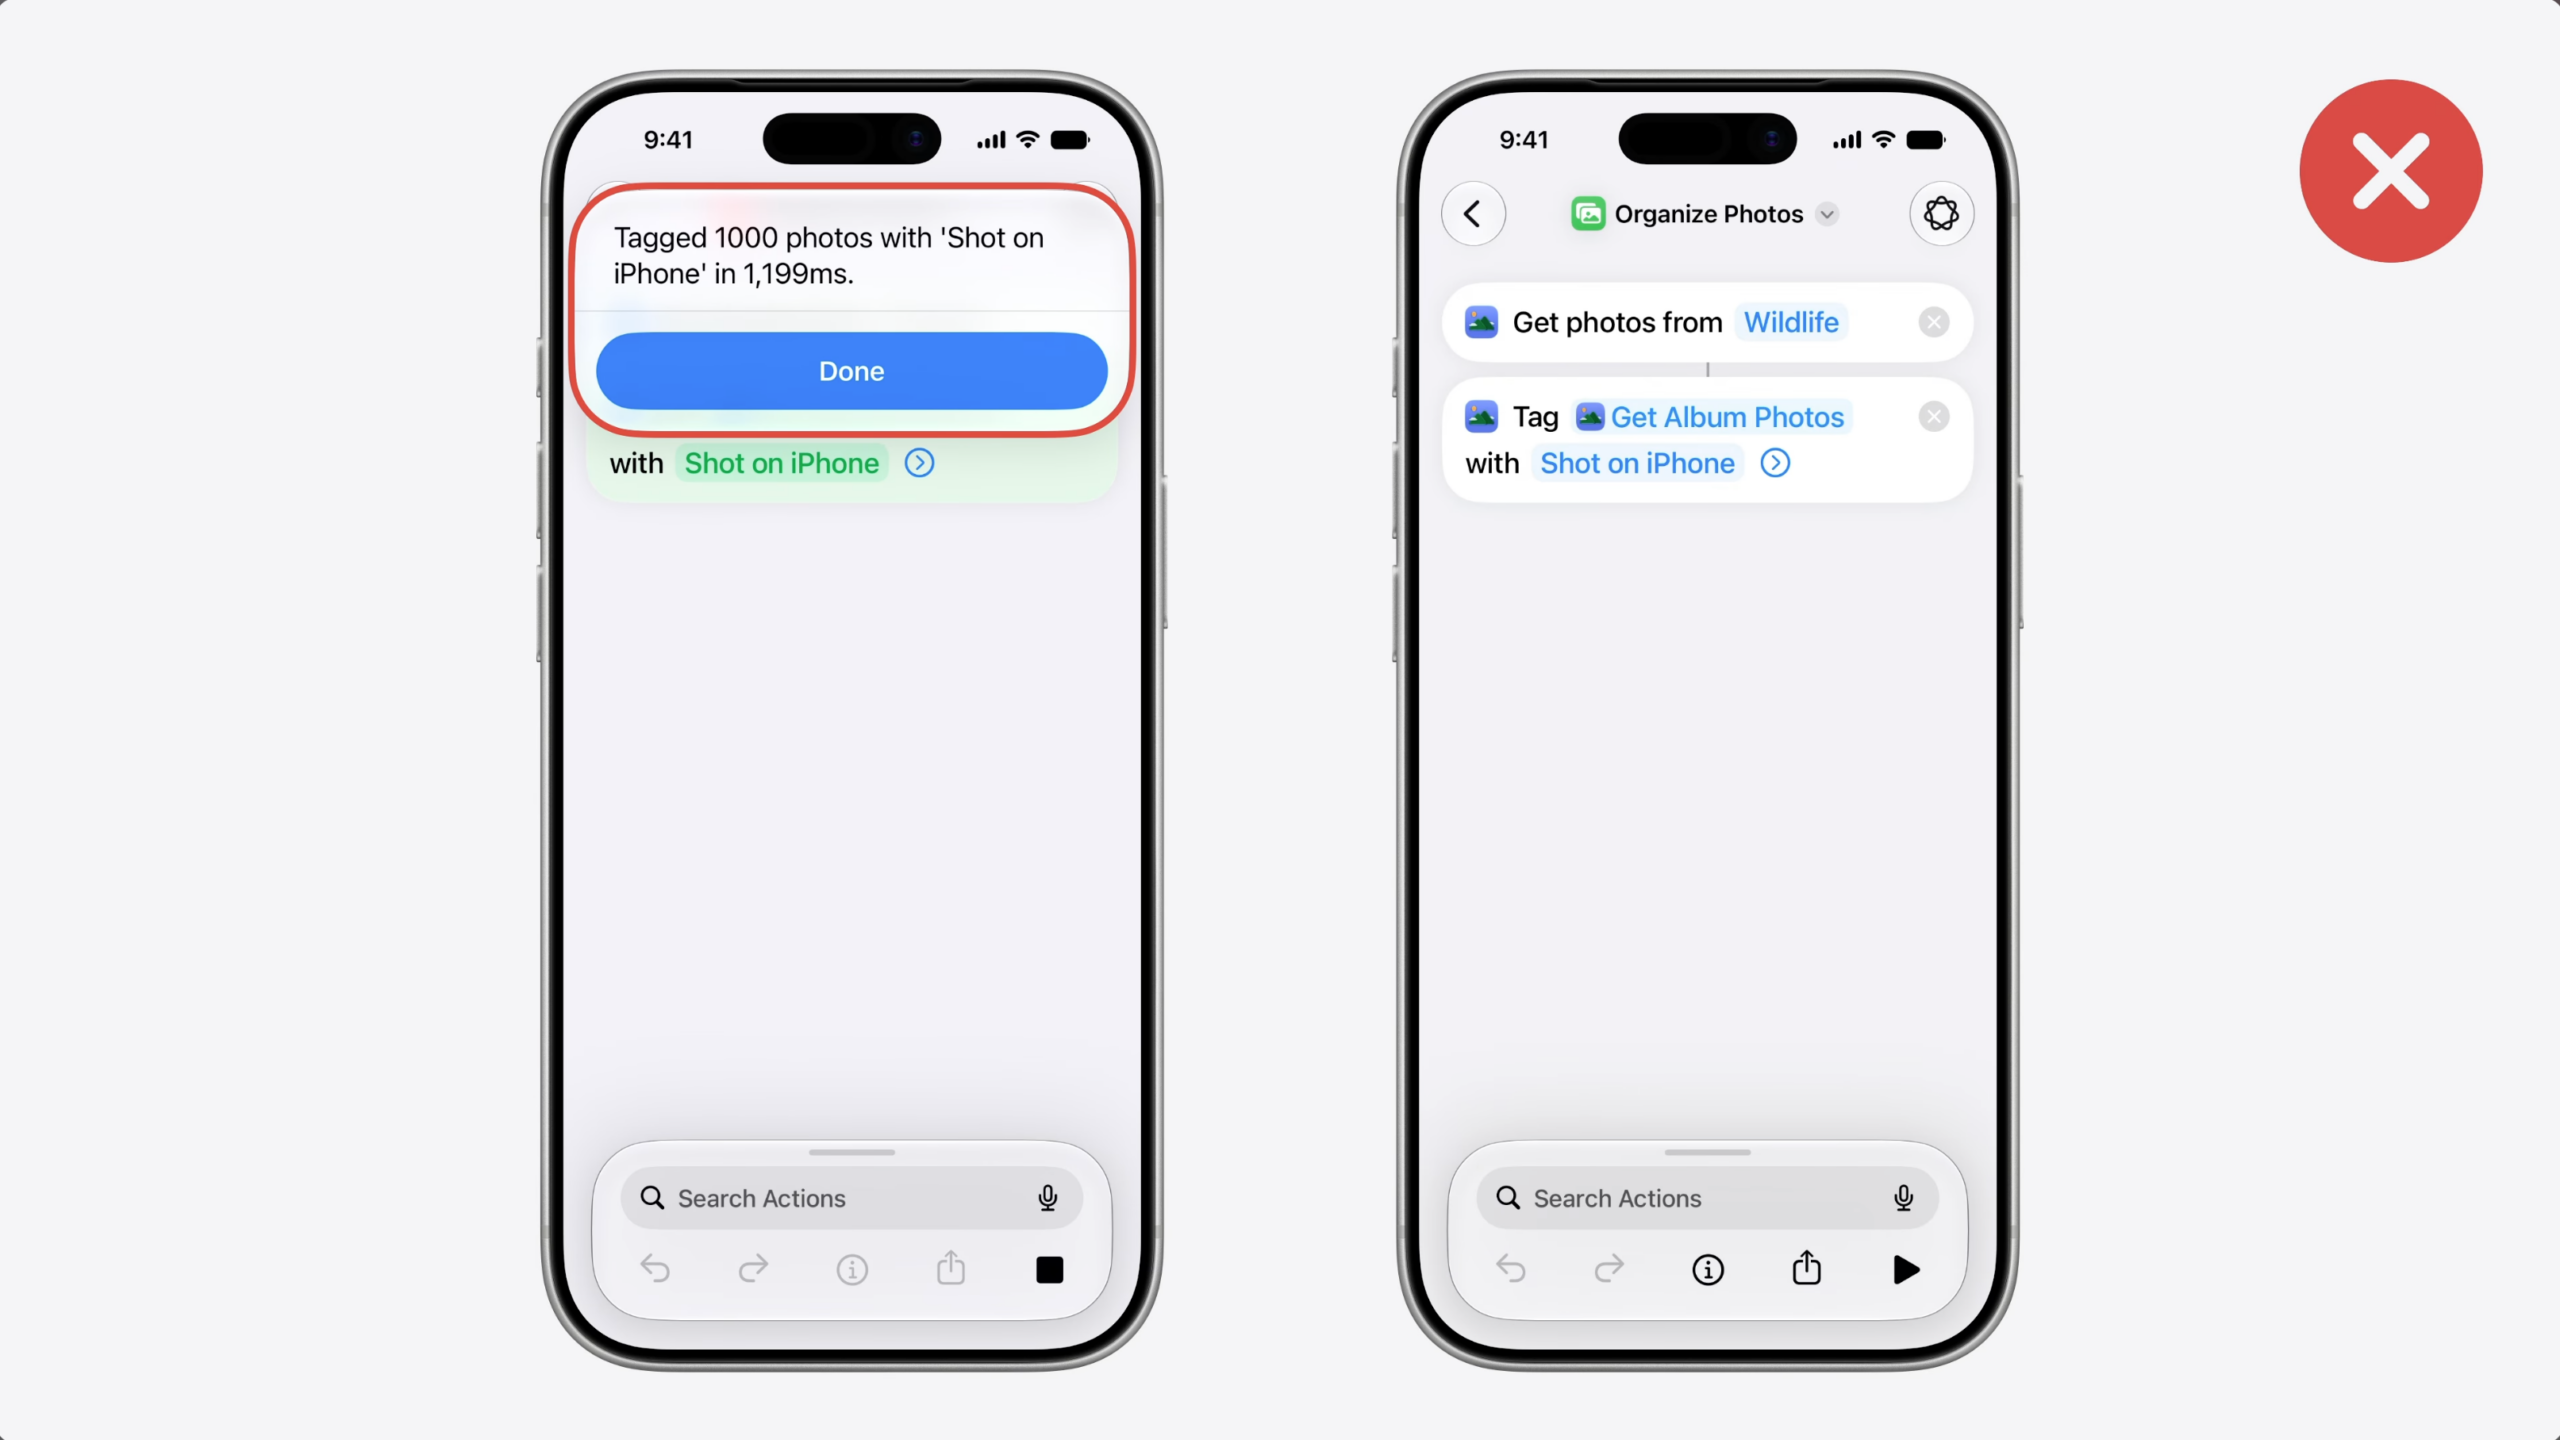
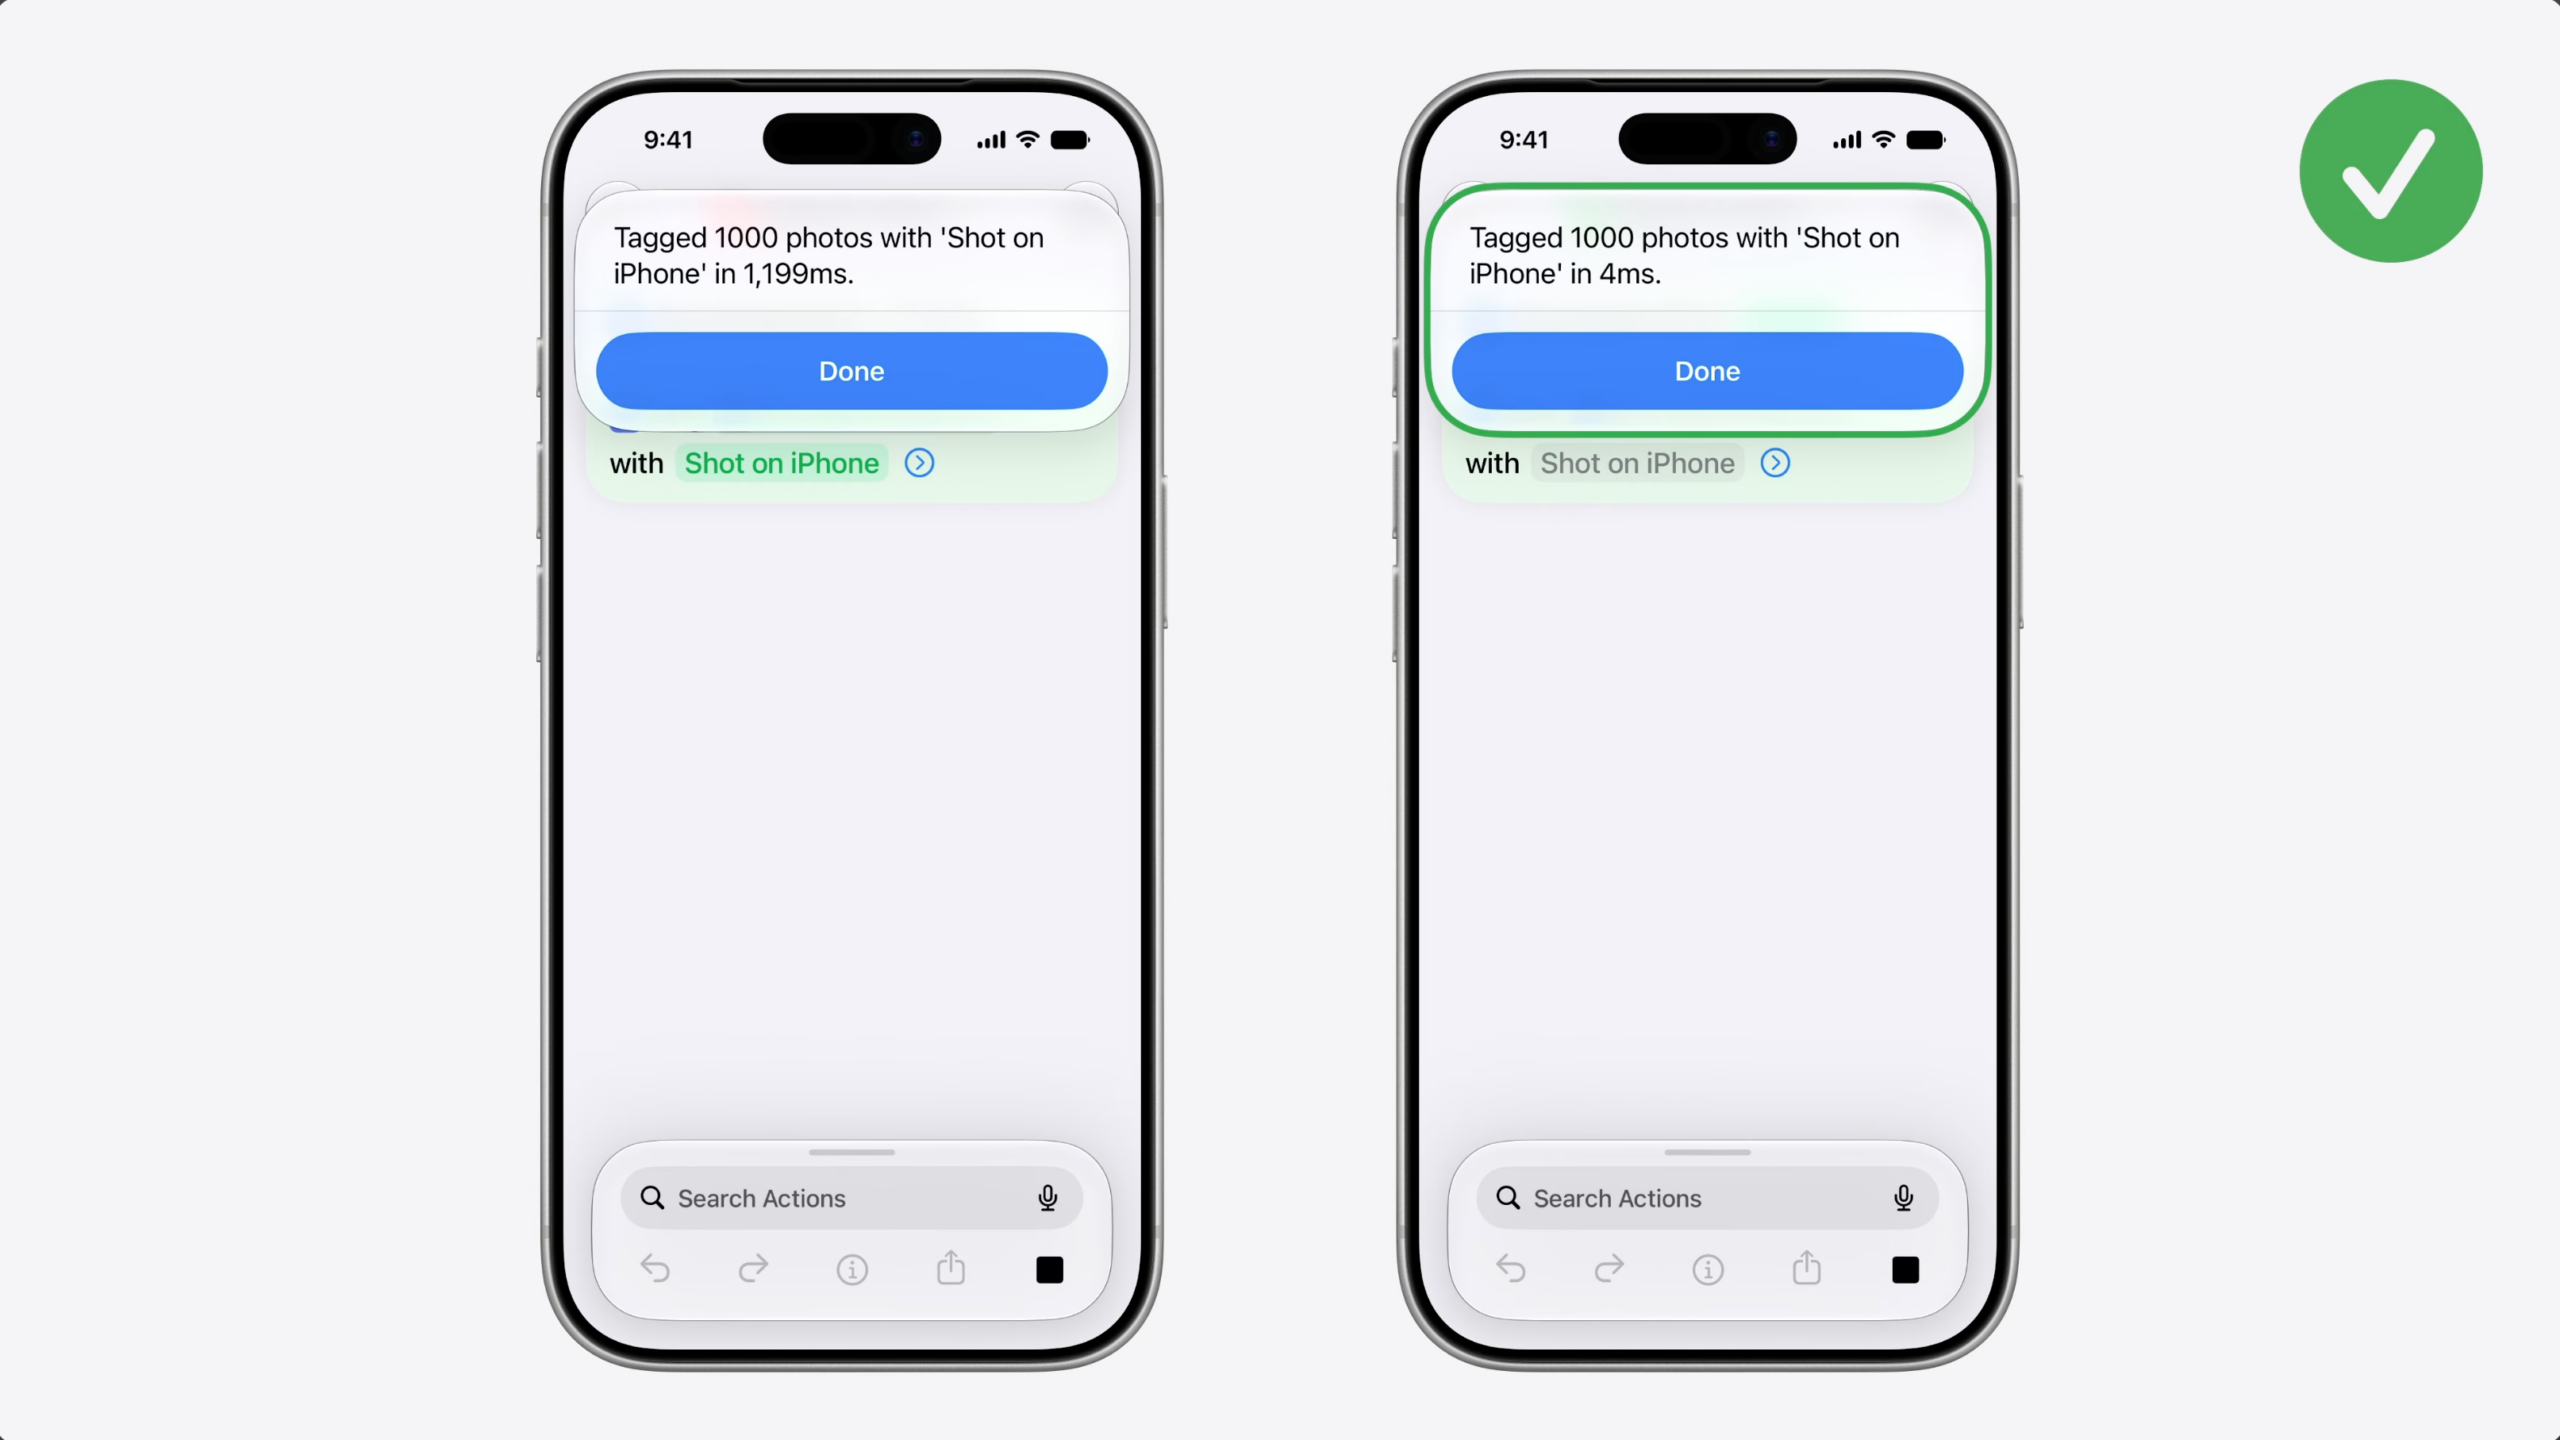
To confirm the fix worked, I built a shortcut to find and tag 1000 photos.
First, with a regular array of photos entities (1,199ms).
Then, with EntityCollection, which was almost instant (4ms).
The code change was small, but the performance difference is significant.
If your Siri AI actions are slow, try EntityCollection. Don’t let your App Intents be the bottleneck.
Now, let’s talk about helping the system suggest entities when they are relevant.
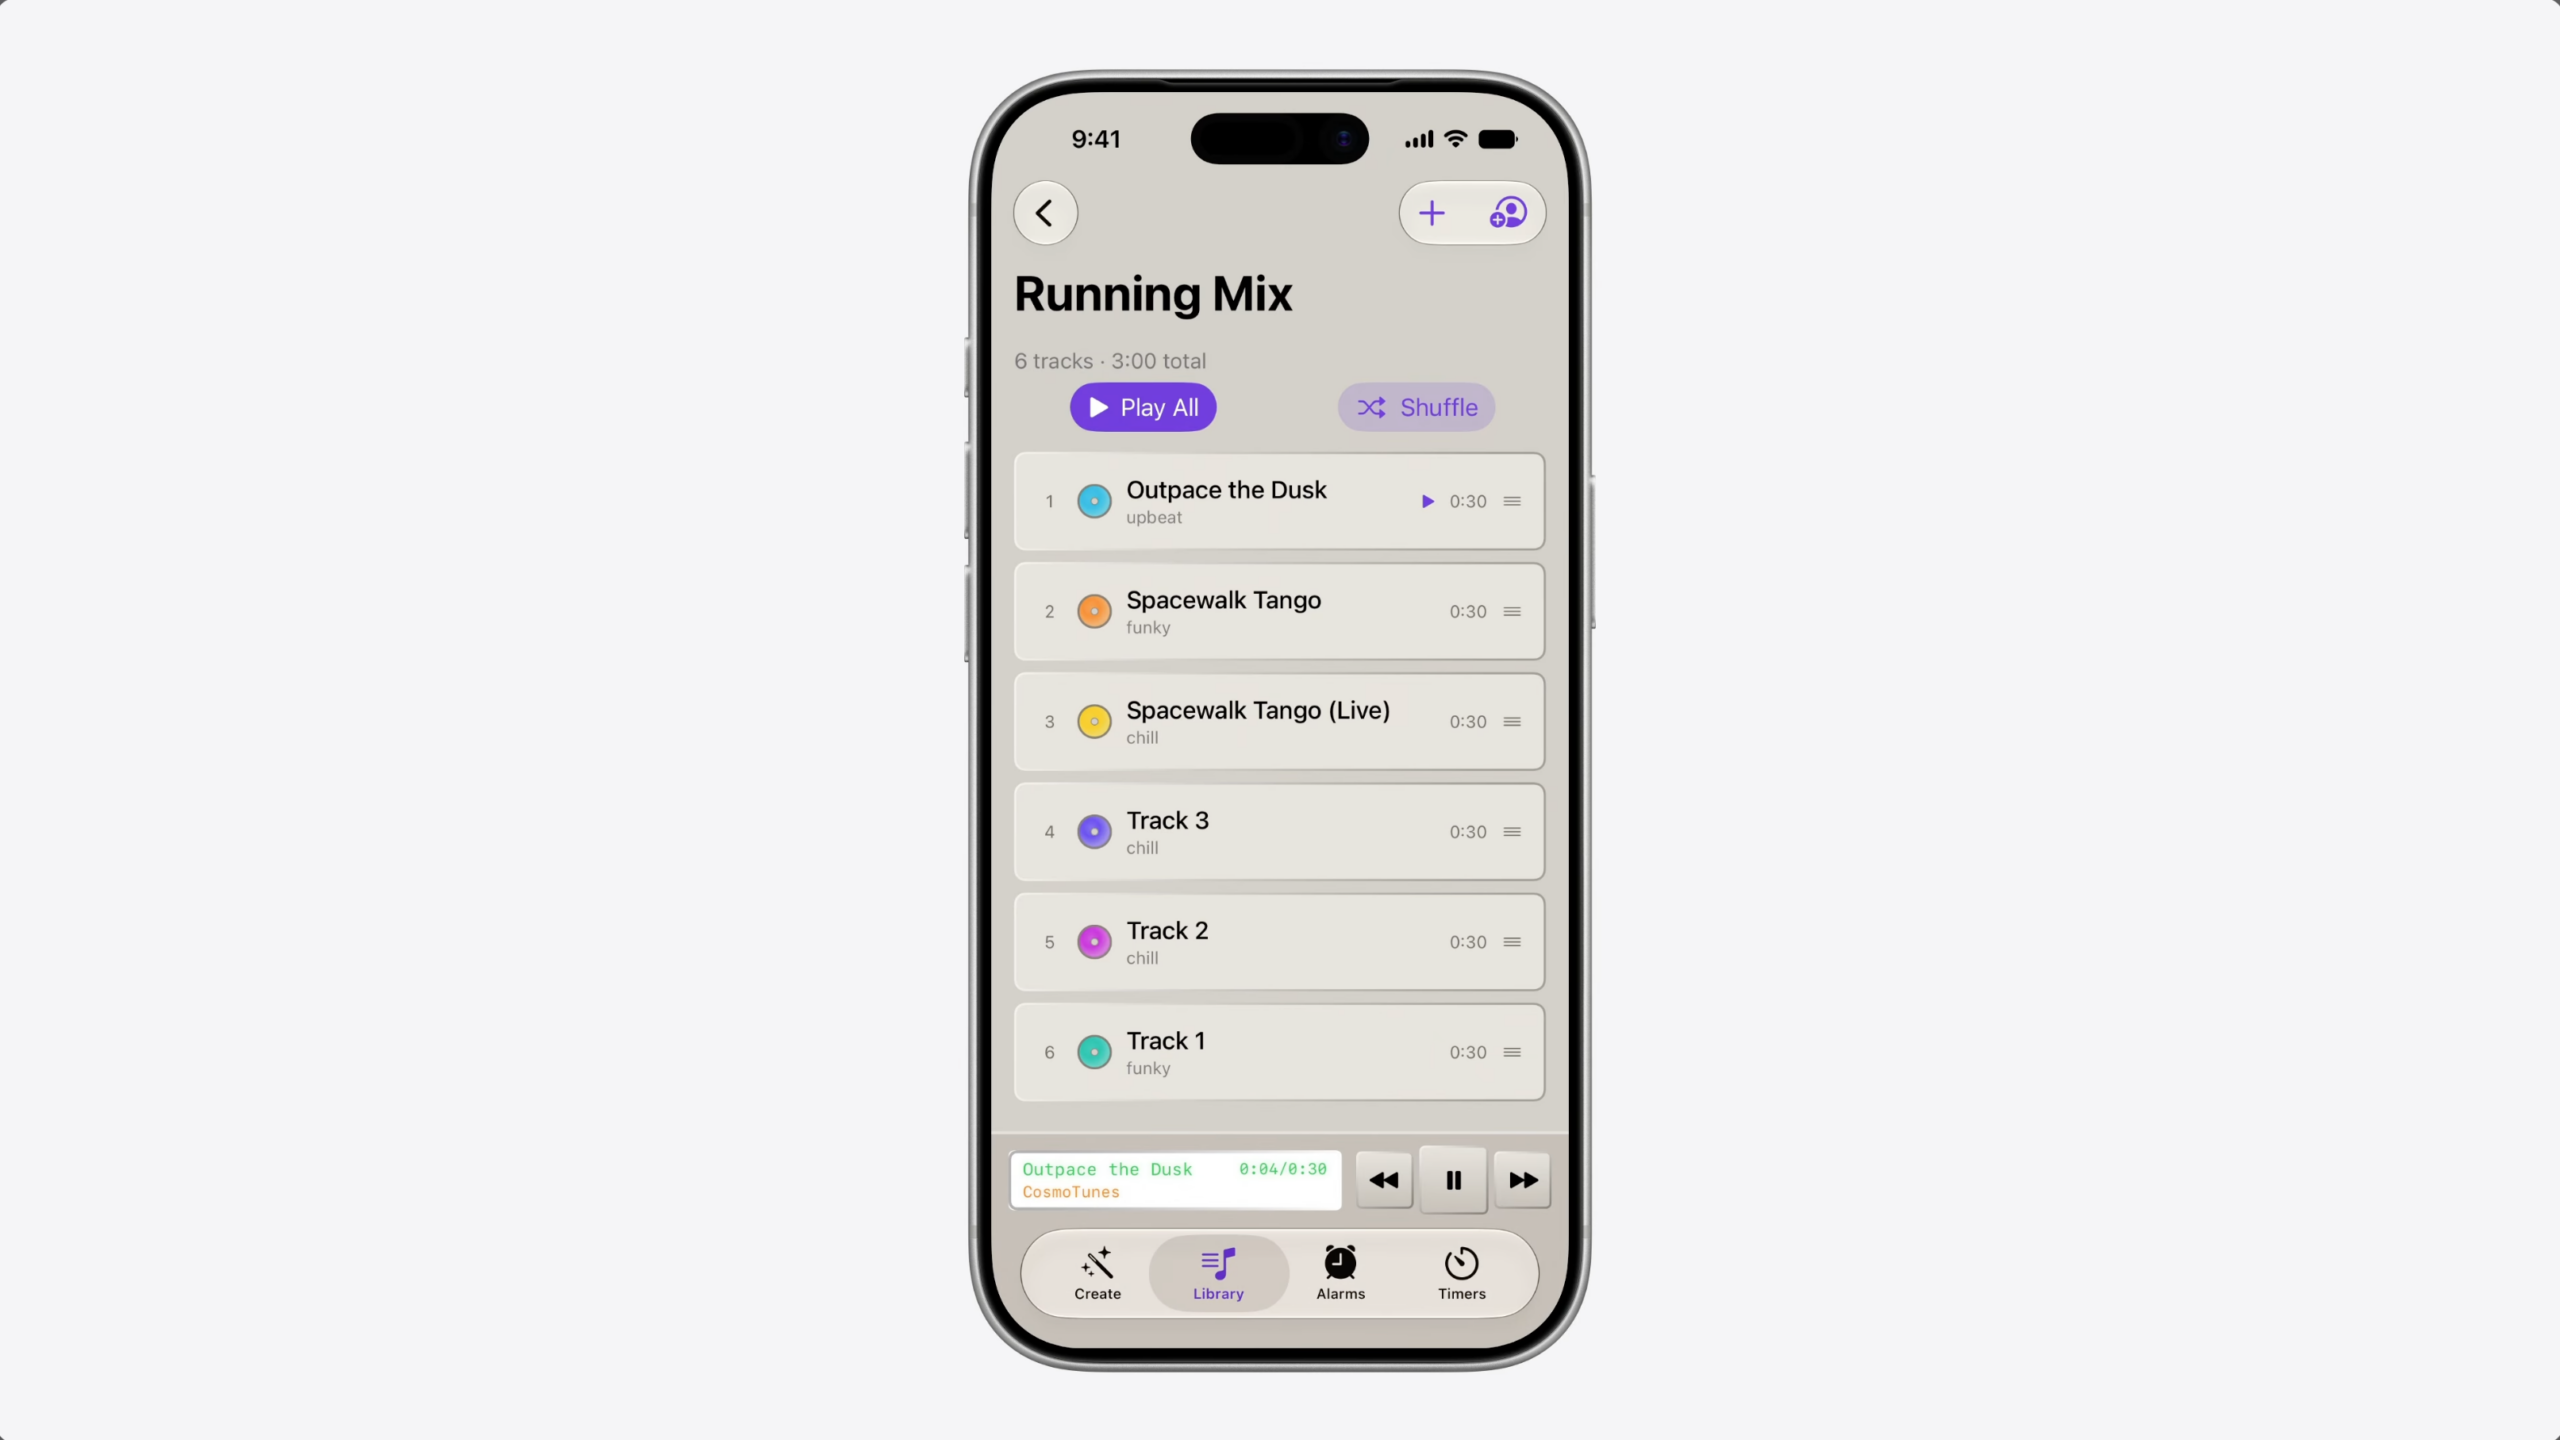
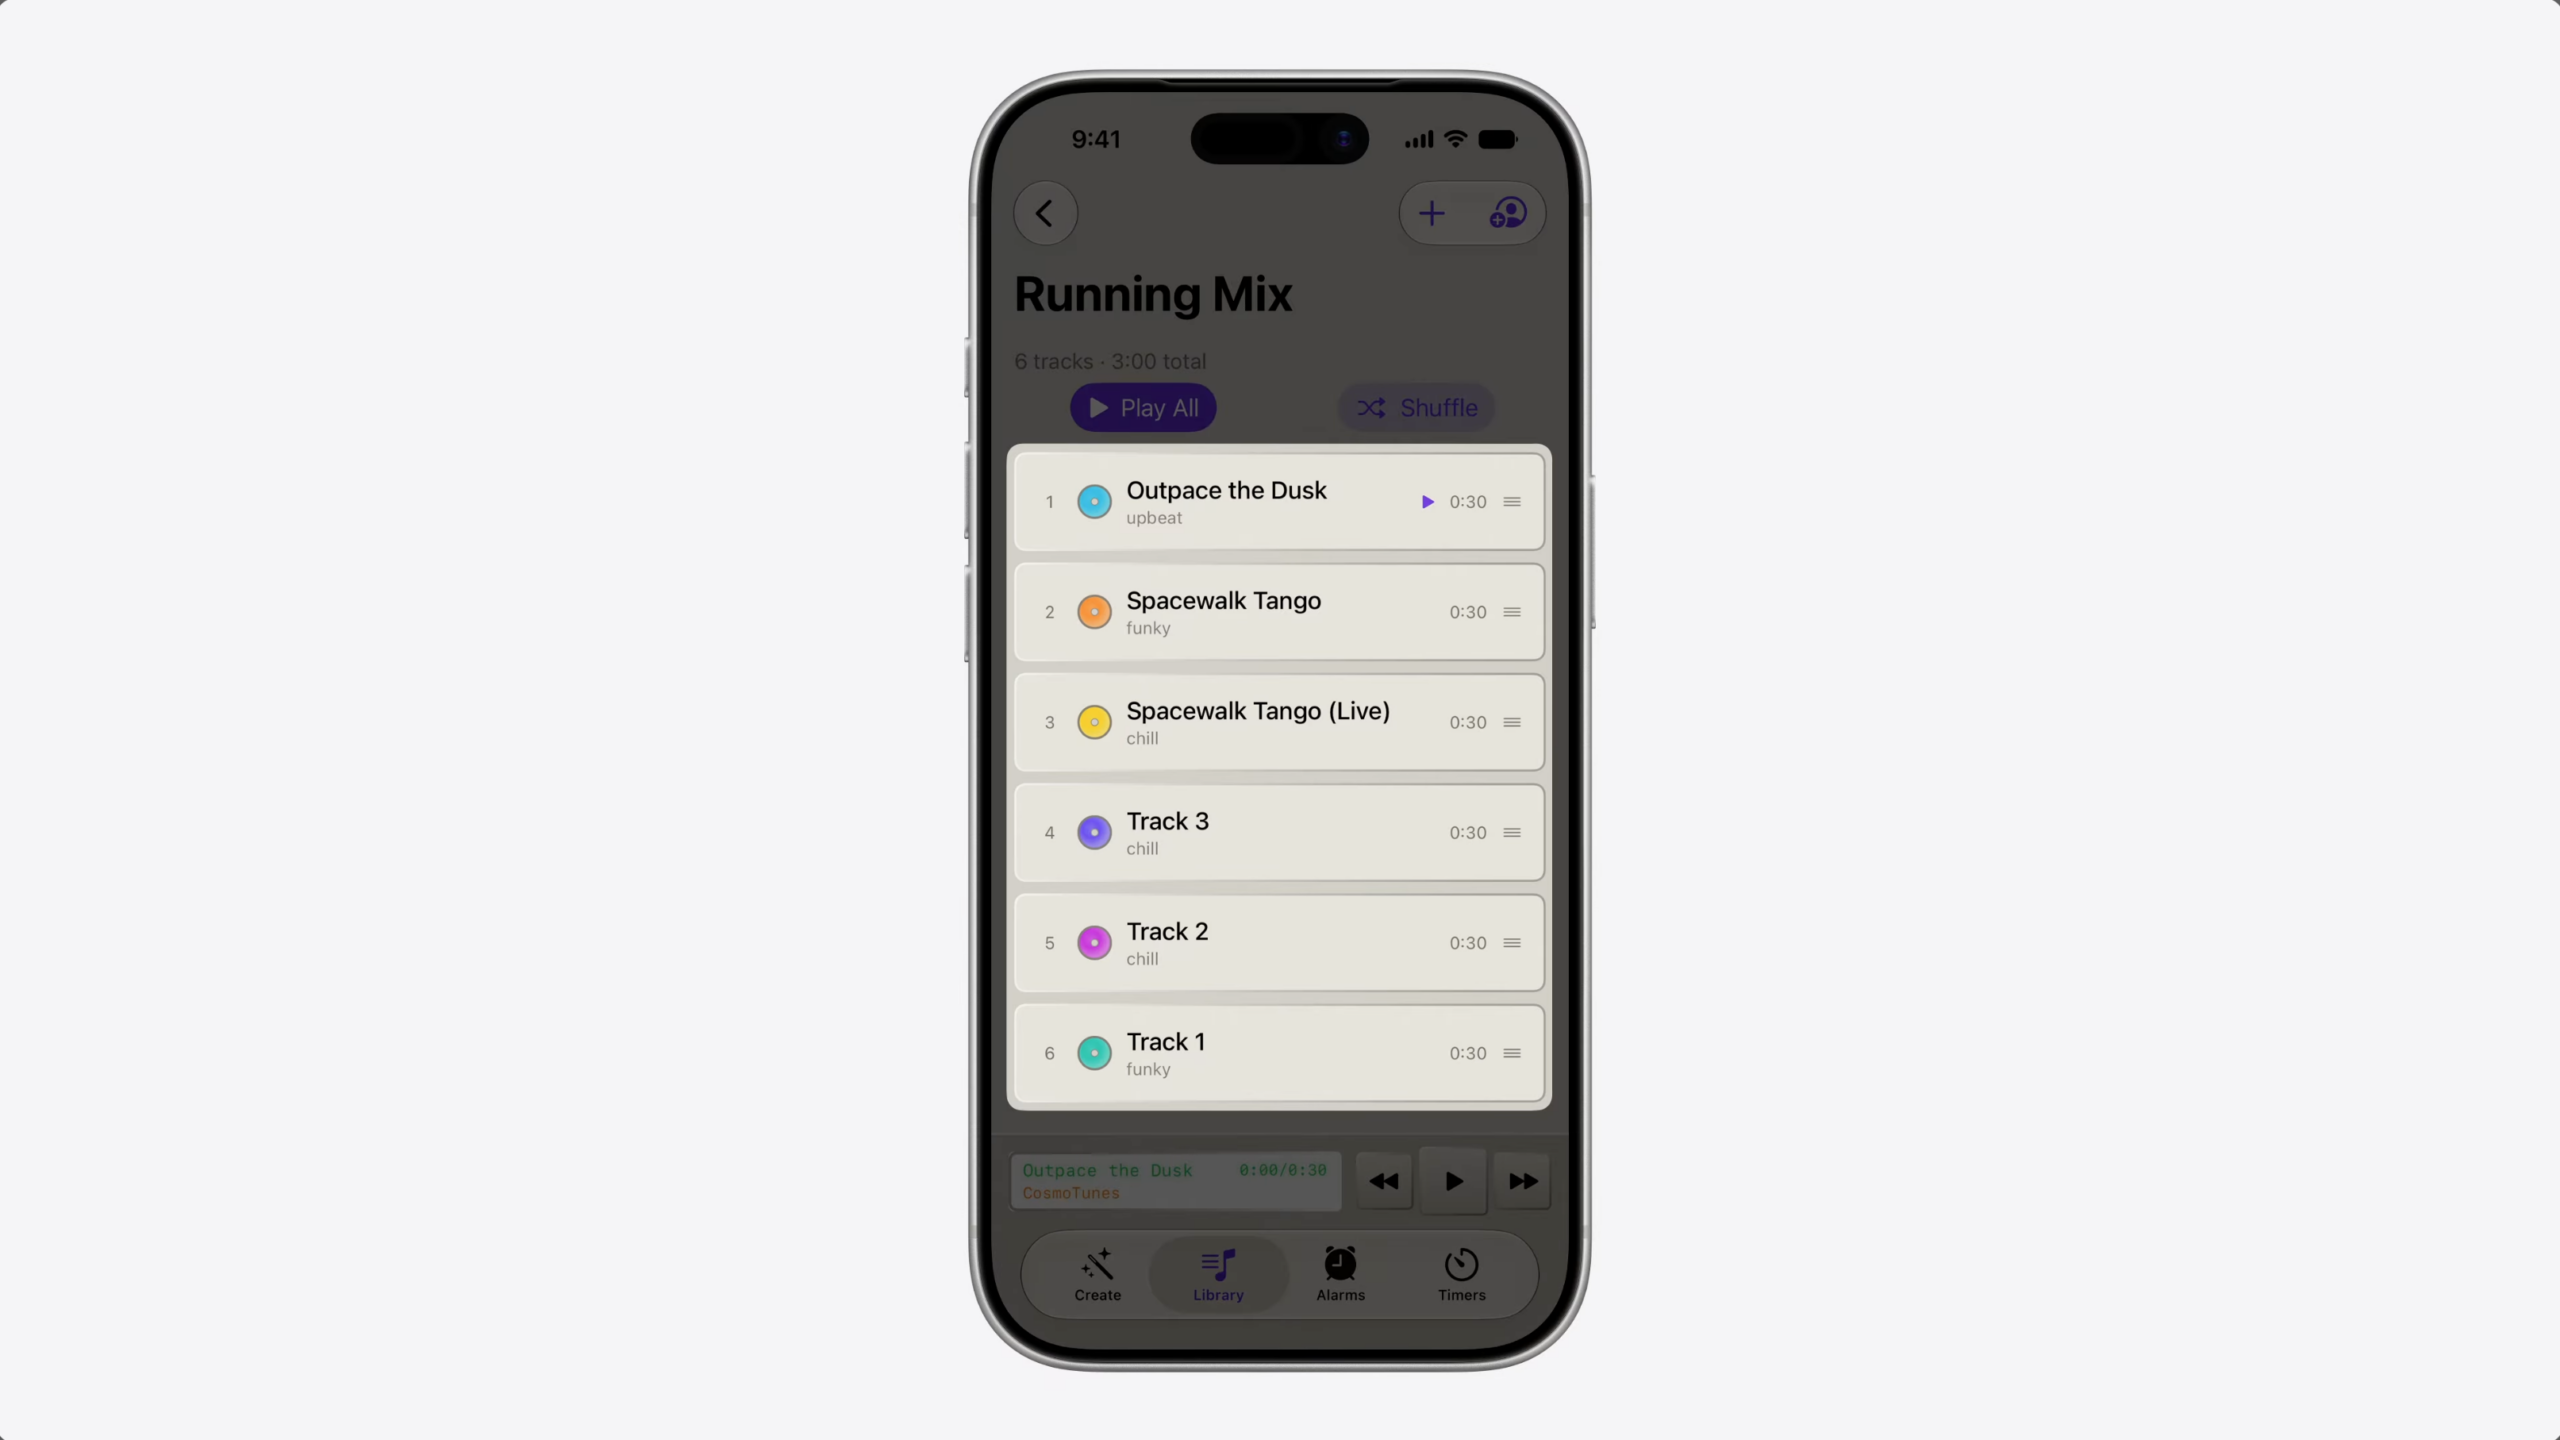
Suppose you’re building a music app like CosmoTunes, the sample app from the video “Explore advanced App Intents features for Siri and Apple Intelligence.”
Your app has a brand new, high-tempo playlist that’s perfect for running.
When someone sets up a workout in the Fitness app…
…they get a list of suggested playlists. How do you get your playlist into those Suggestions?
Today, we have two ways to make your content available to the system.
The first is to index your context in Spotlight. This makes it available to people searching for your content in the Spotlight UI, including Semantic Search. This is also the primary way Siri is able to retrieve your content.
The second approach is interaction donation. When people take actions in your app, you donate those interactions to the system through the IntentDonationManager API. Over time, the system learns patterns and can suggest similar actions in the future. Siri also uses these interactions to delivery a more personalized experience.
But, what about that new playlist? Nobody’s searched for it in Spotlight because they don’t know it exists.
And since nobody’s played it, there’s no interaction either.
You need a way to tell the system this playlist is relevant, so it can surface it at the right moment.
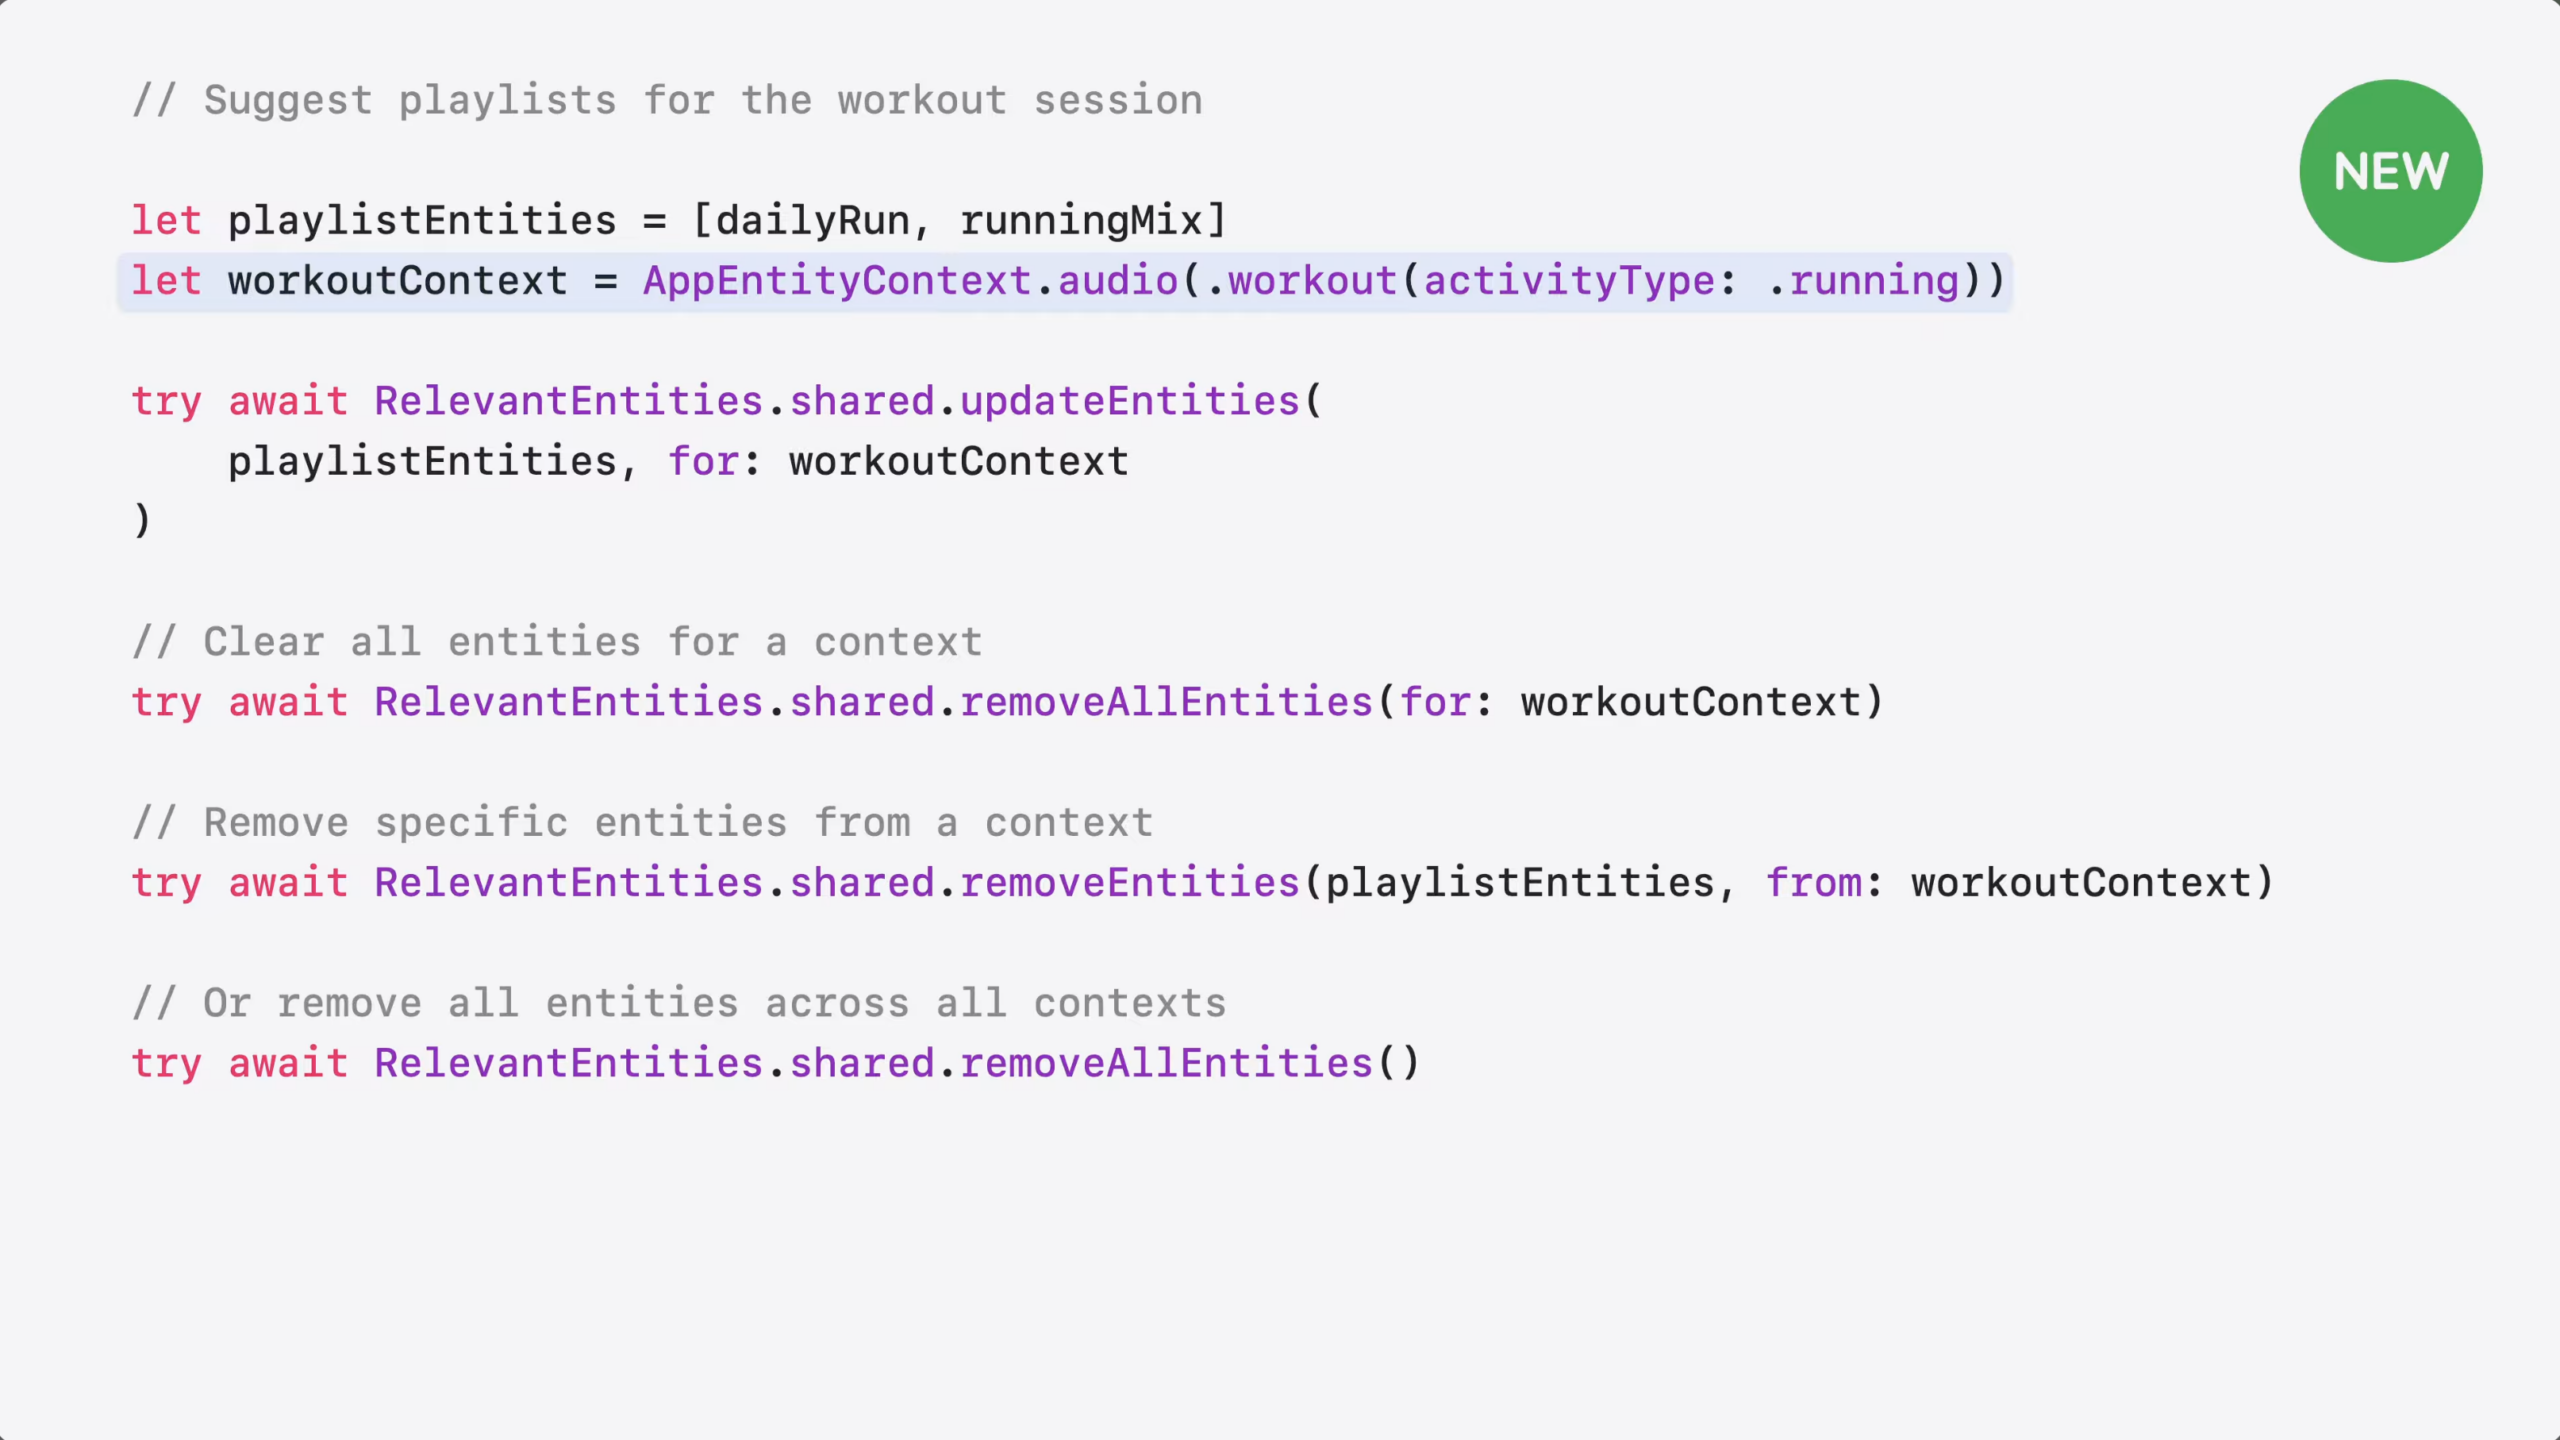
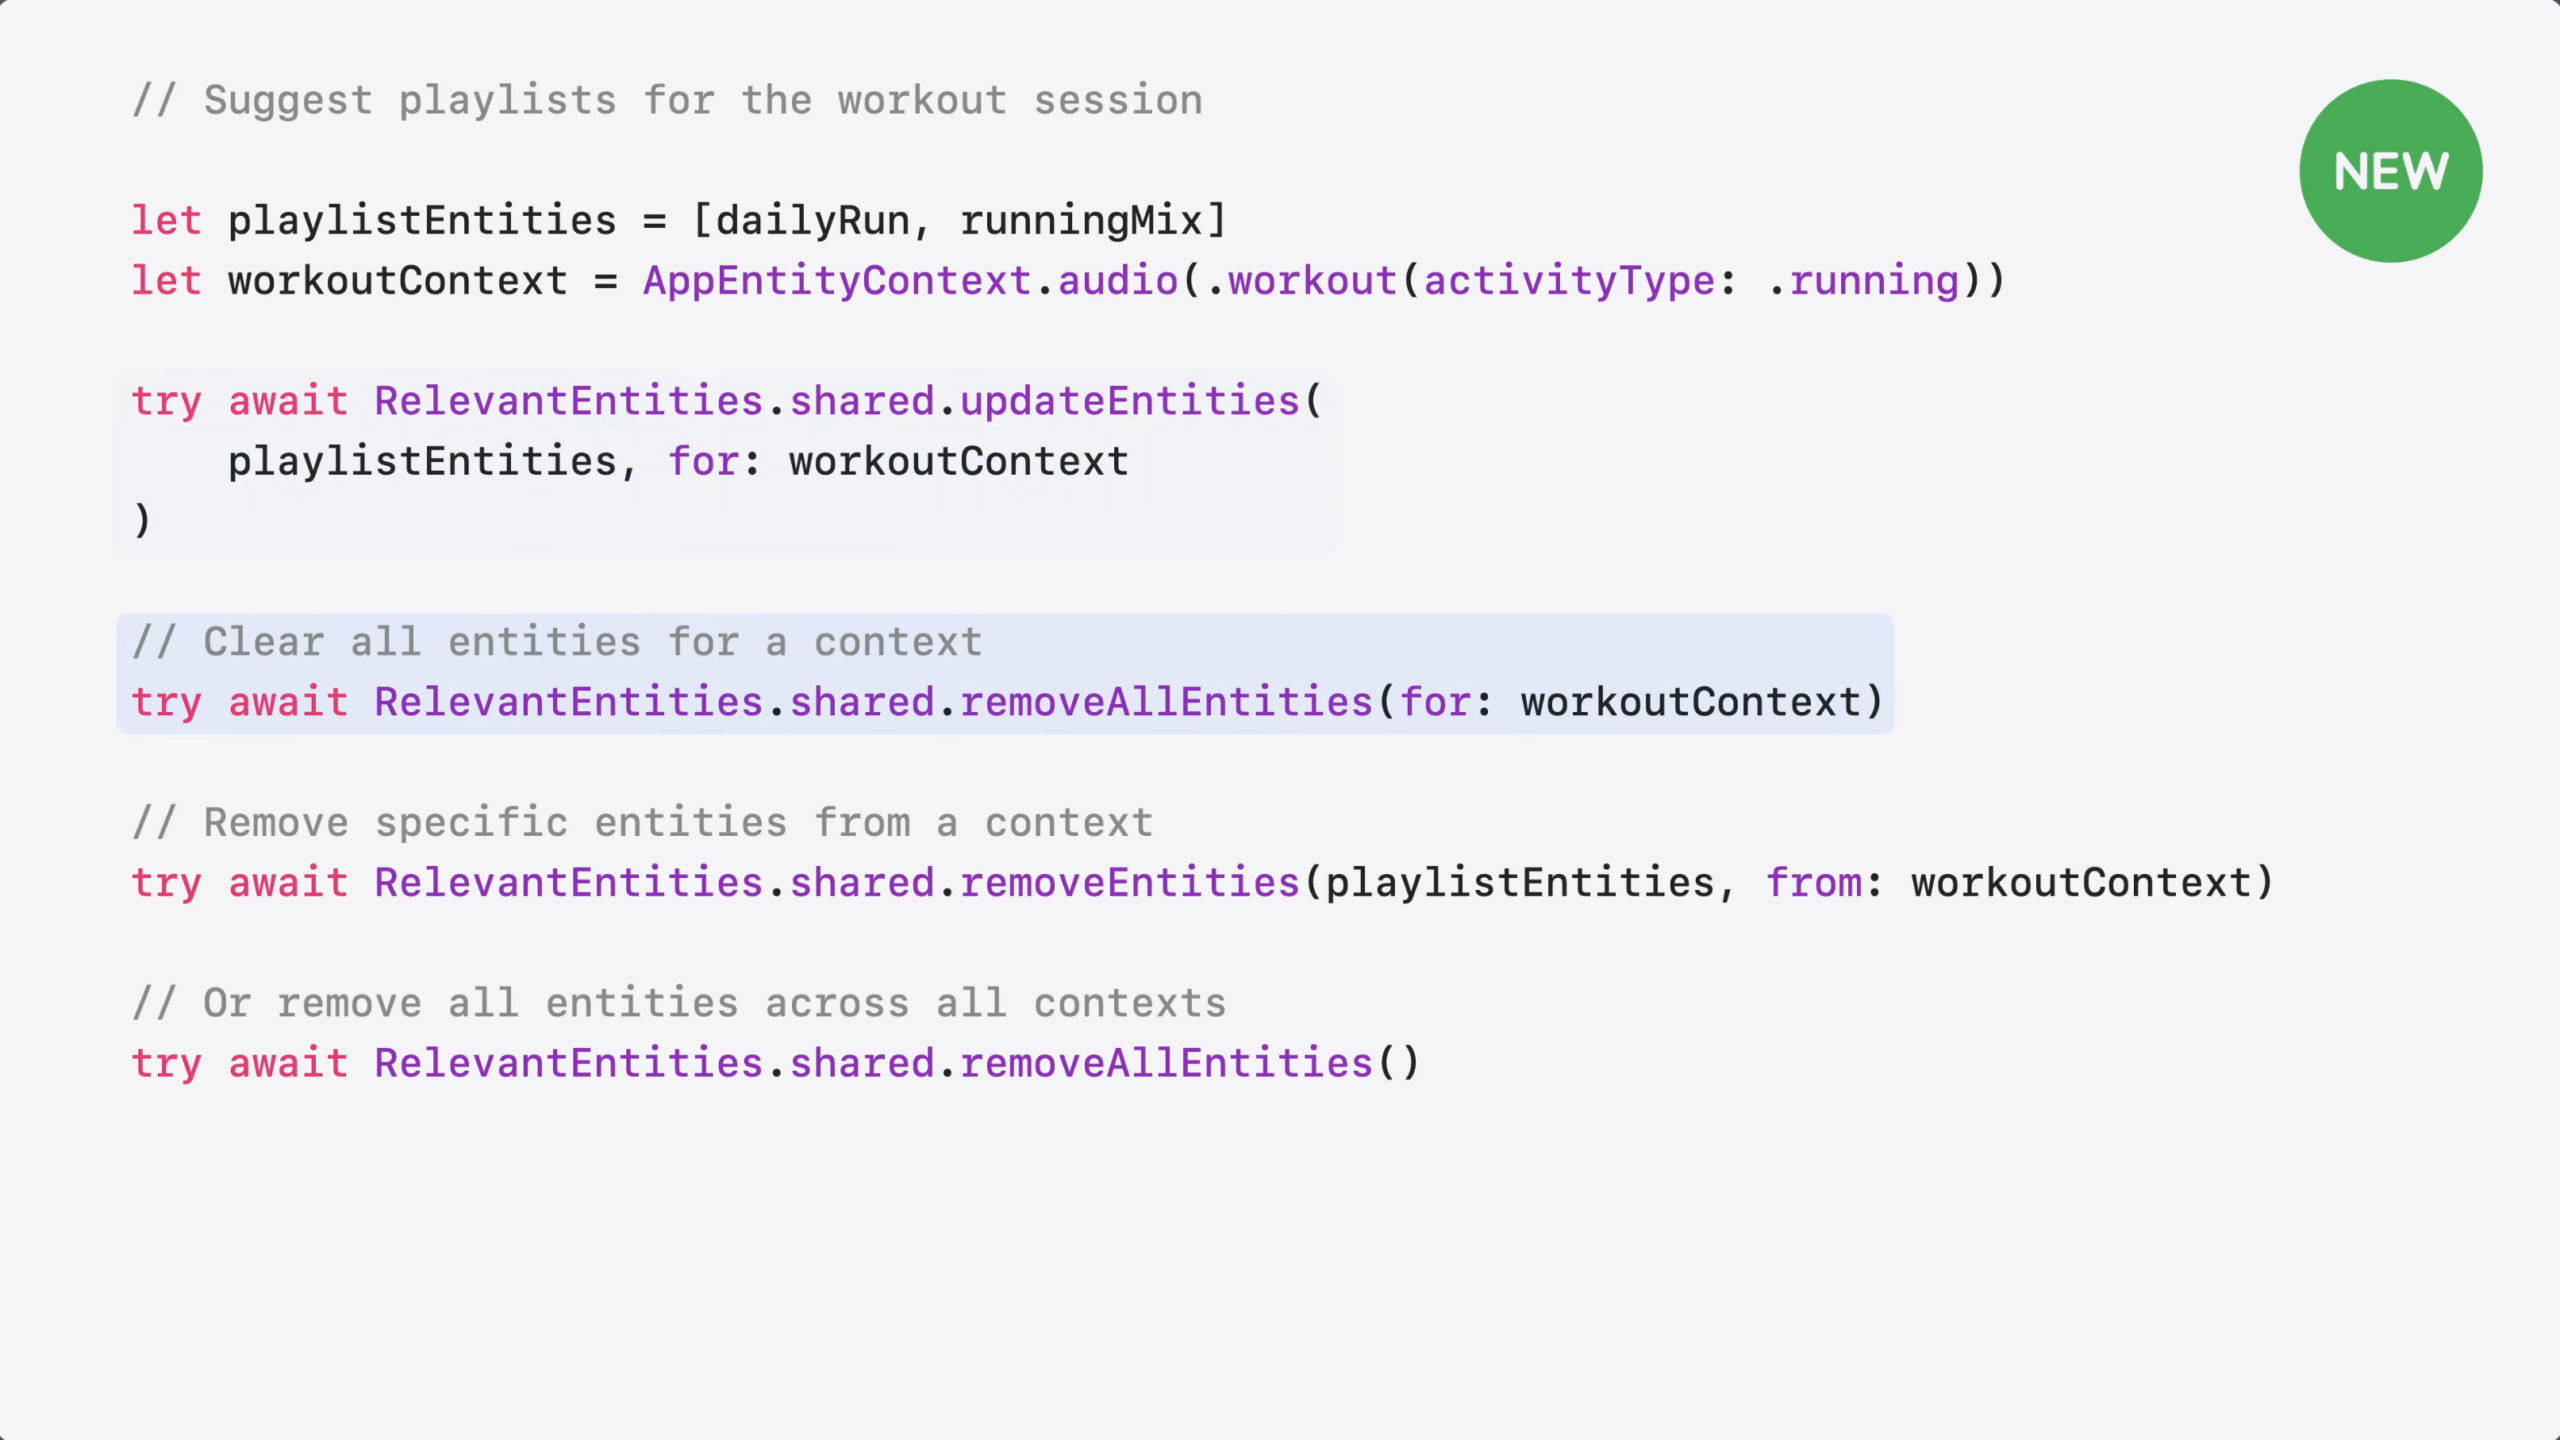
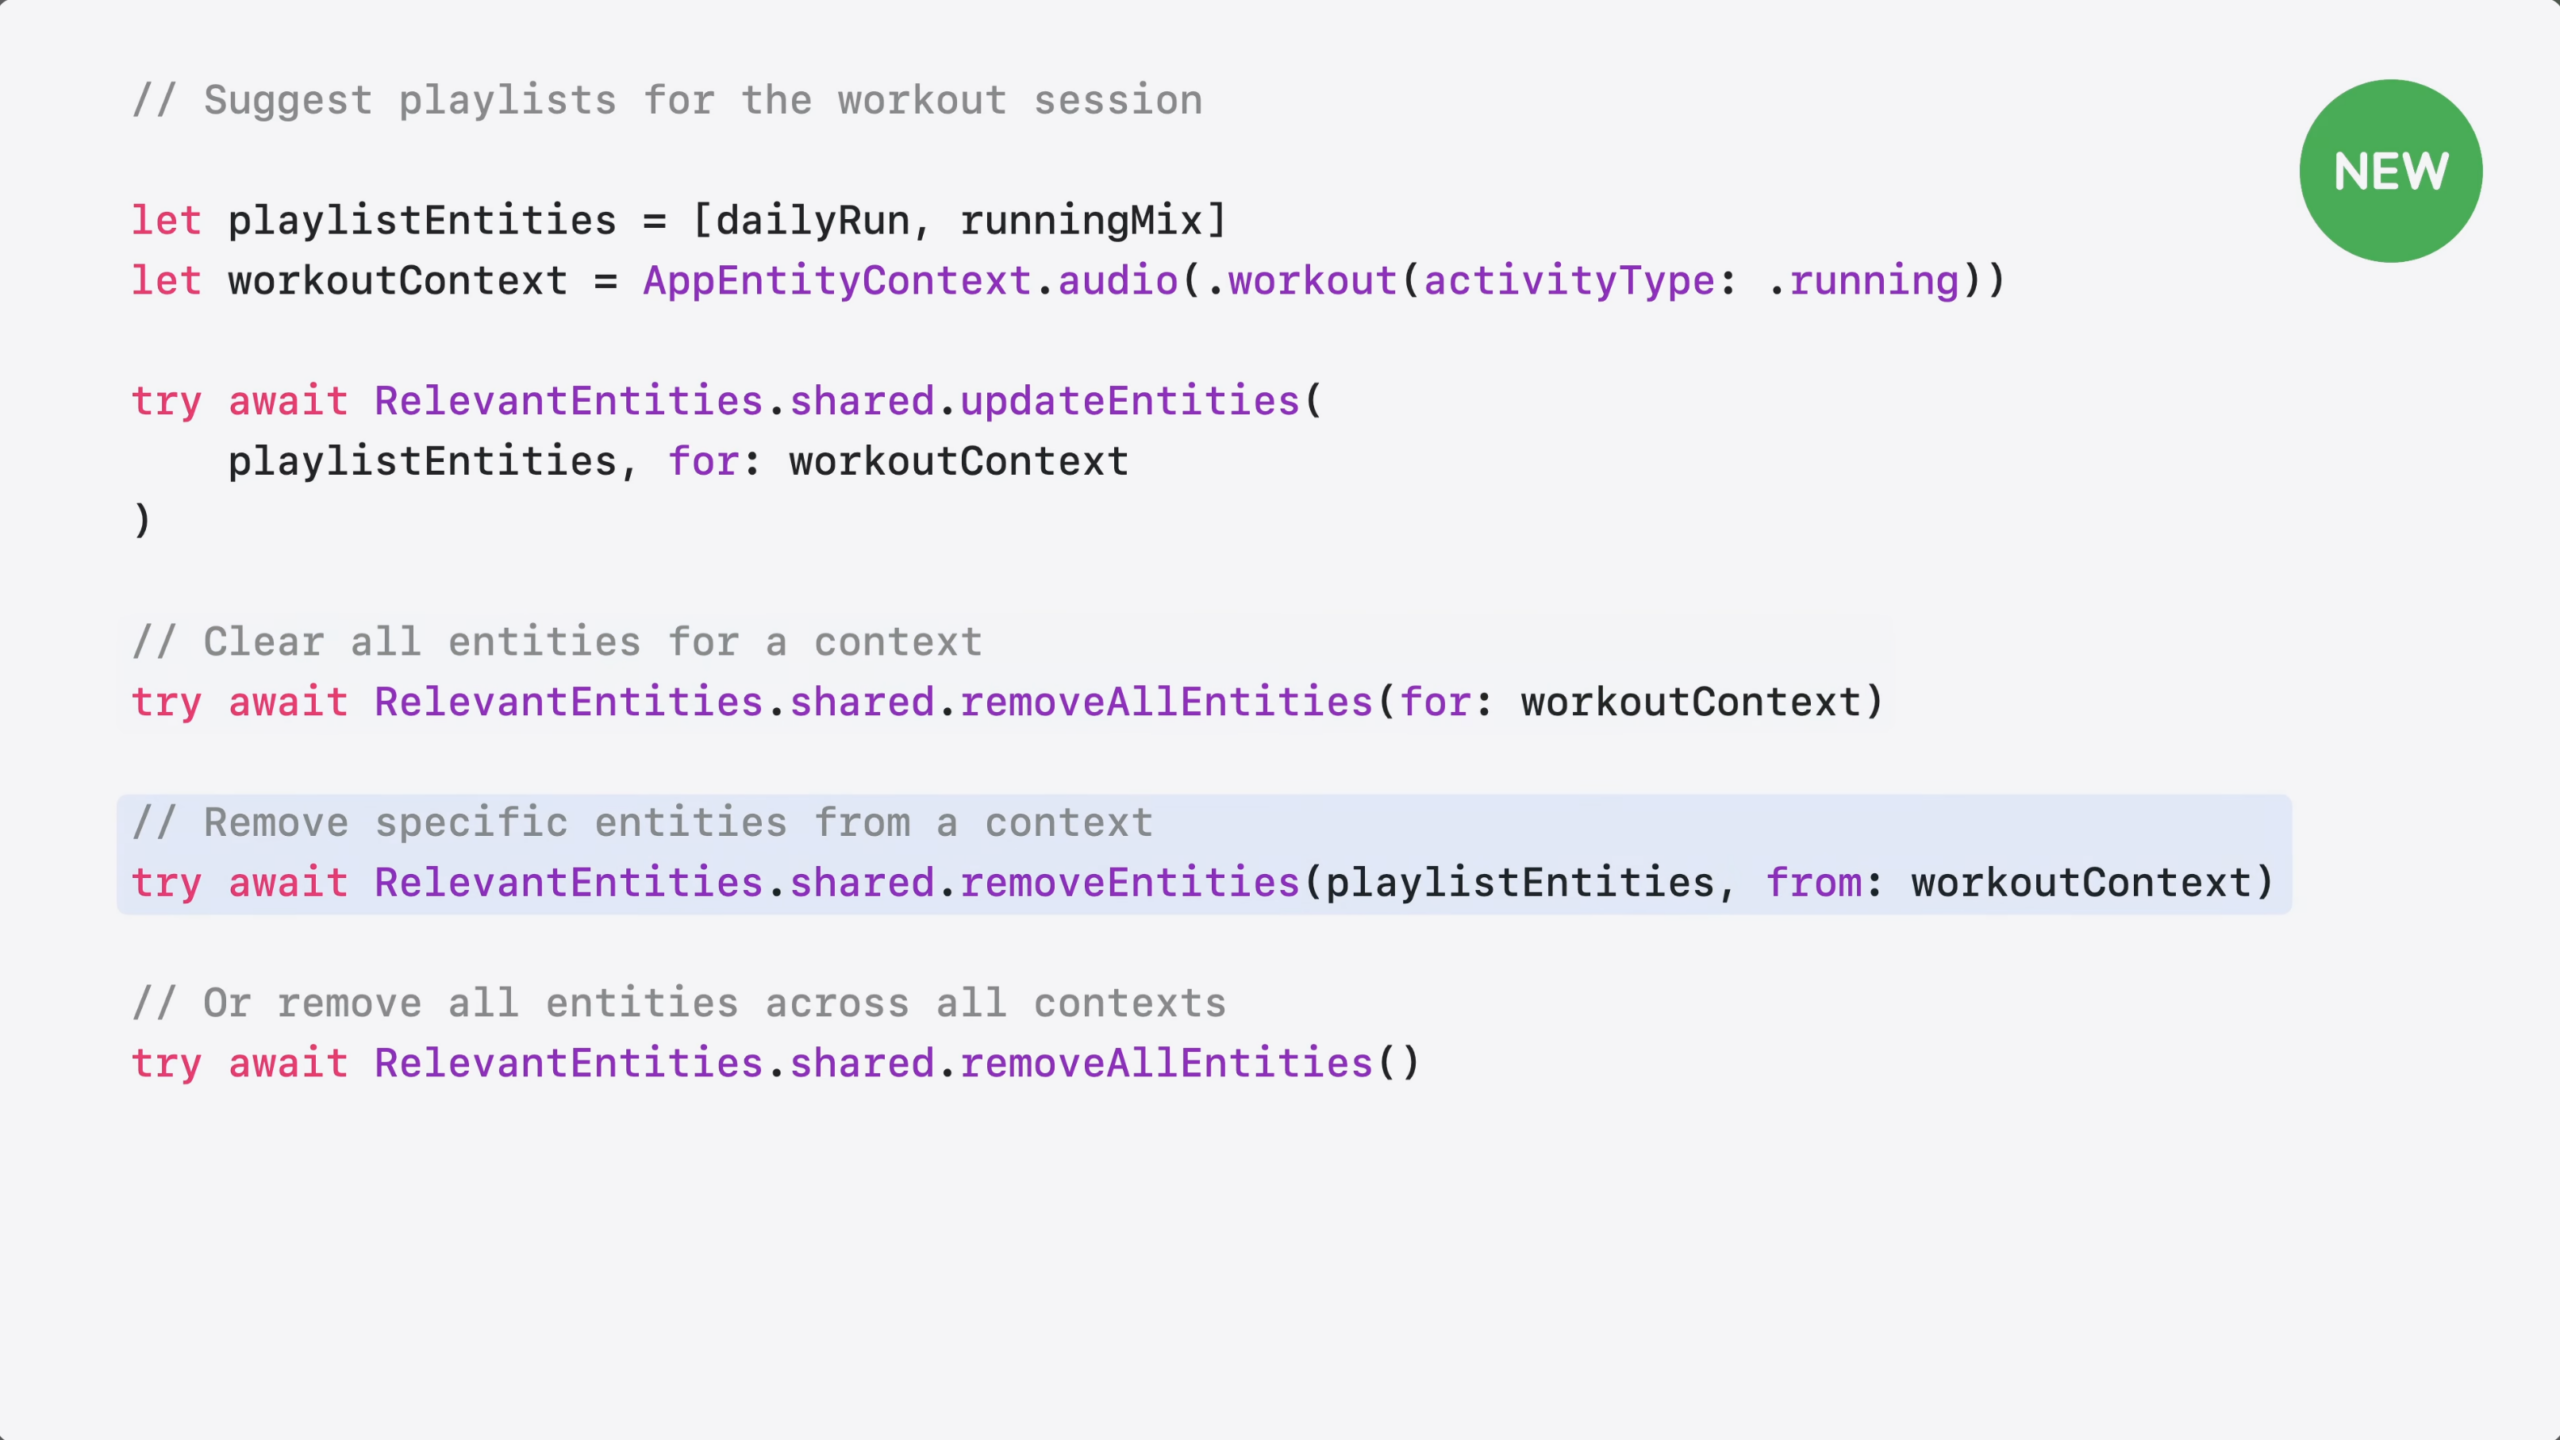
Introducing RelevantEntities. With RelevantEntities, you can suggest entities to the system and provide context about when and why they’re relevant.
Here’s how this works.
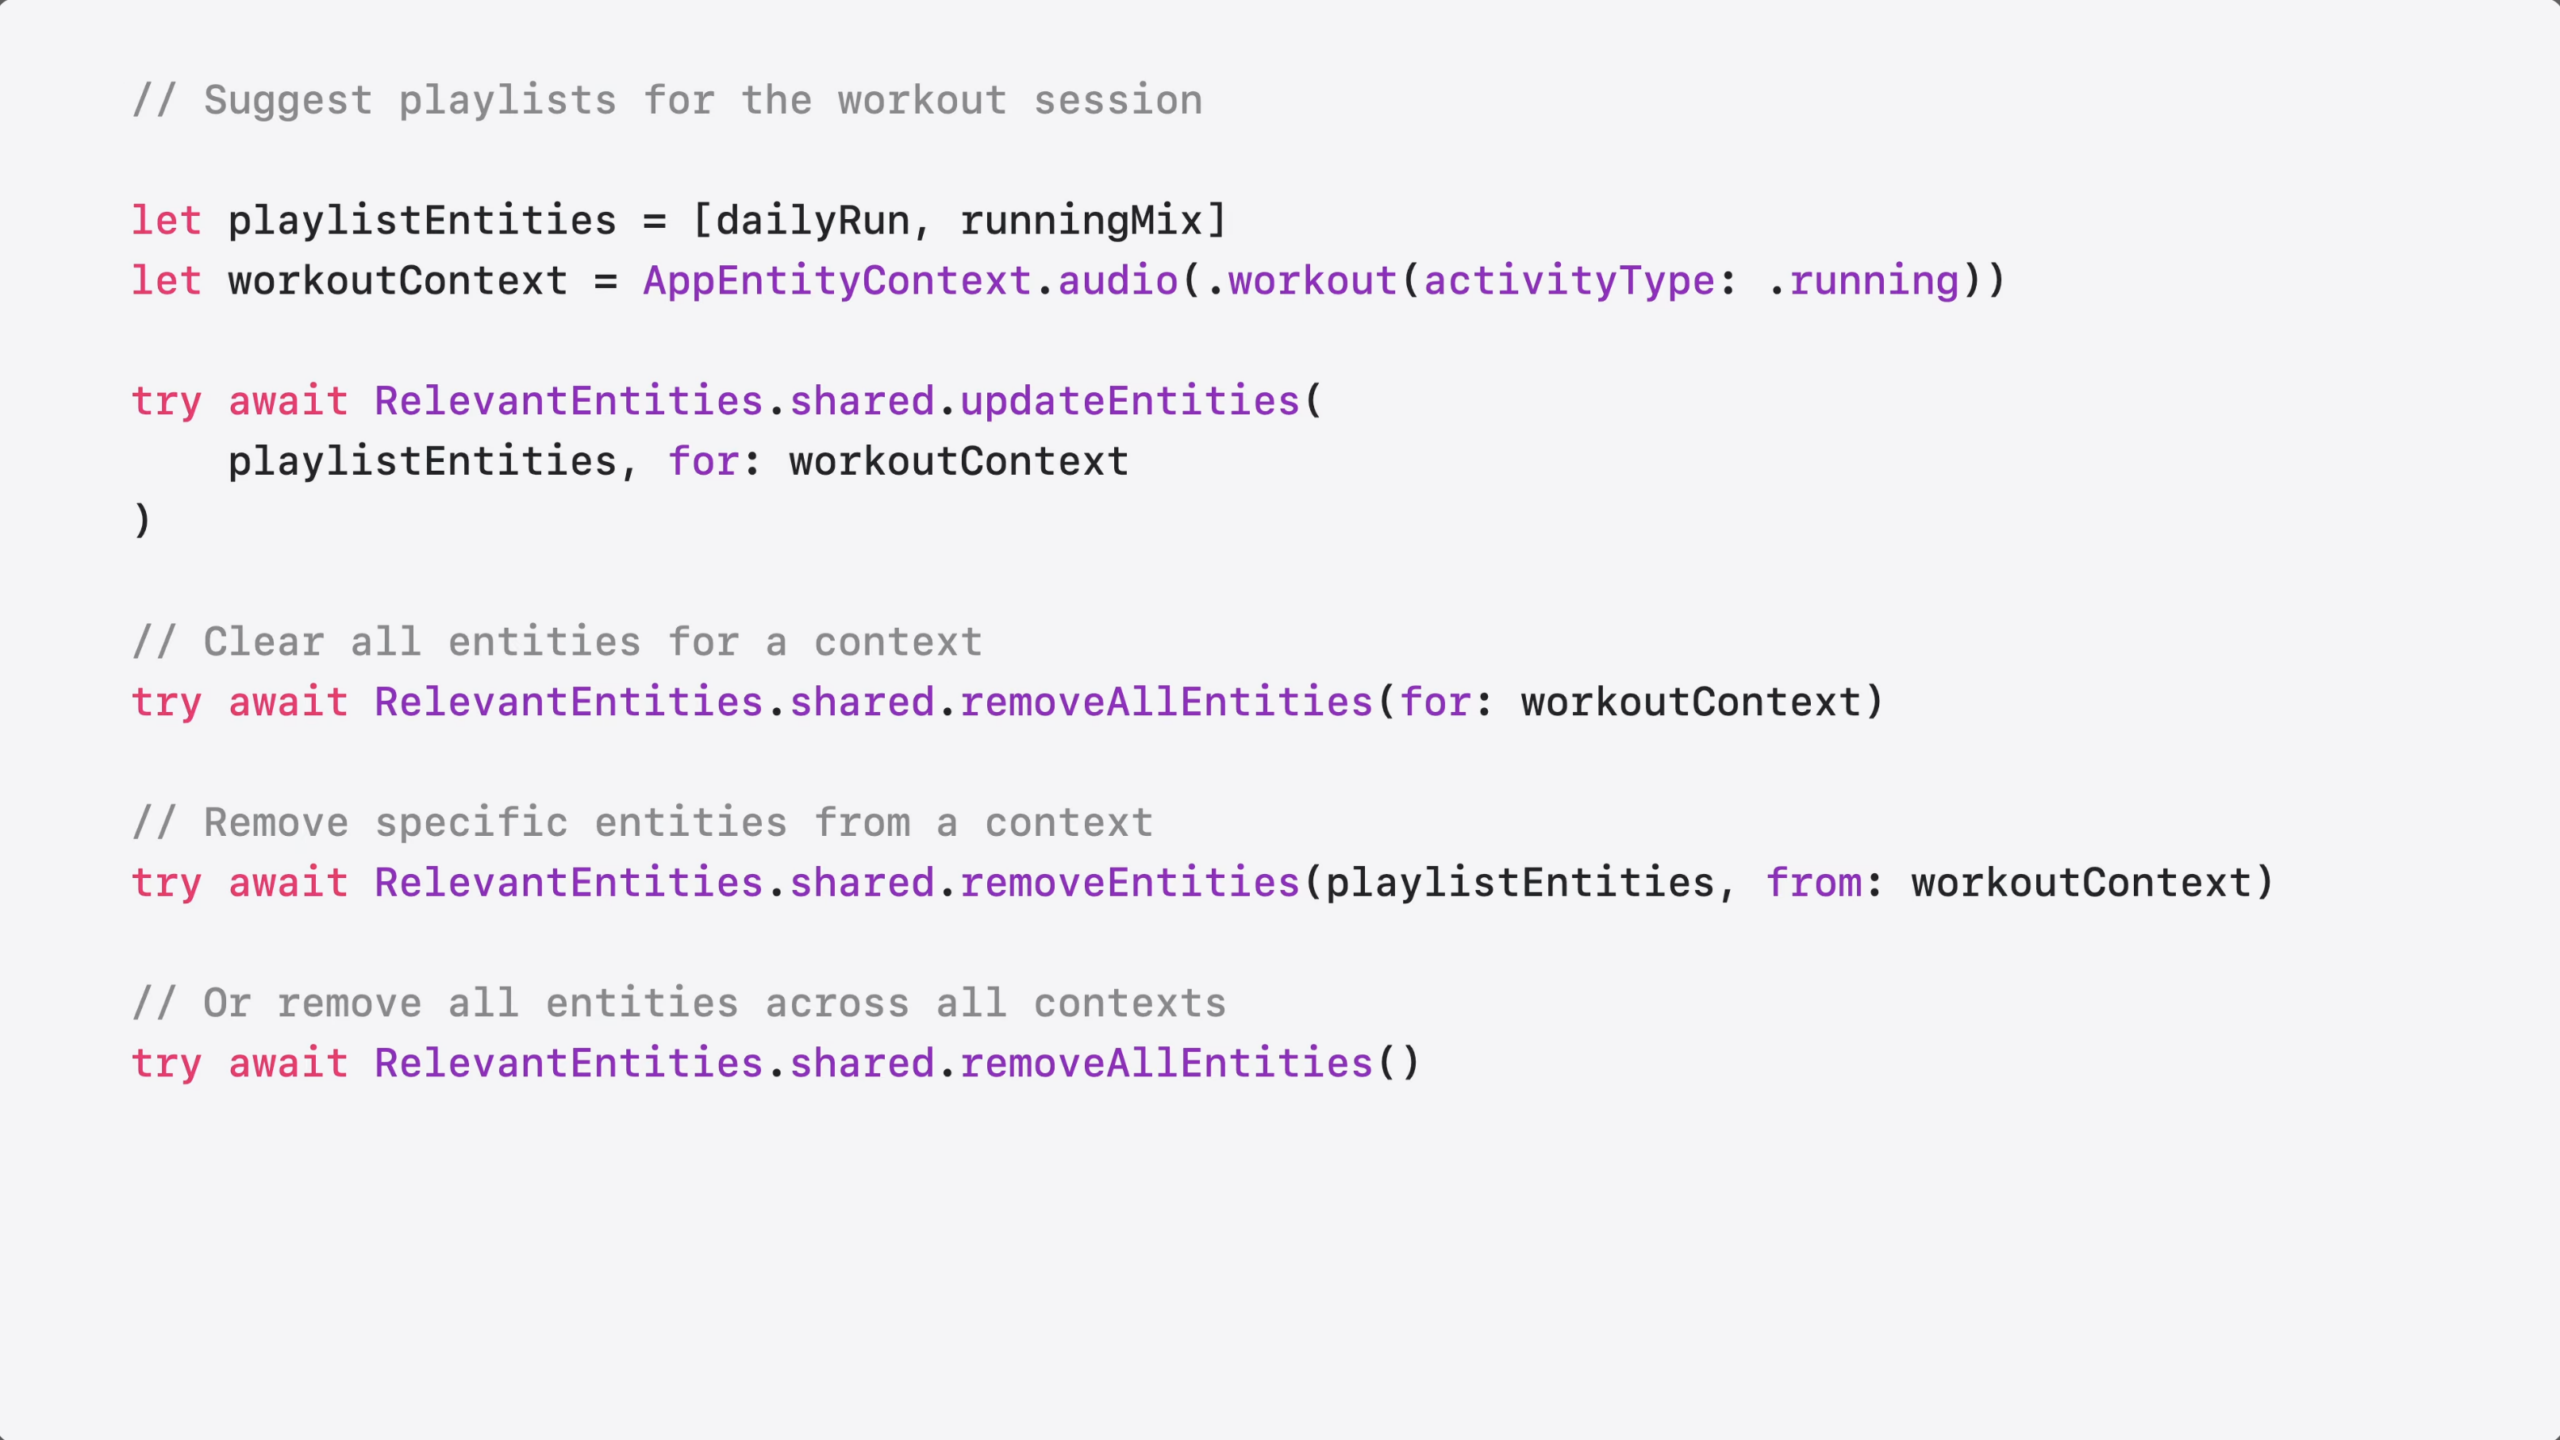
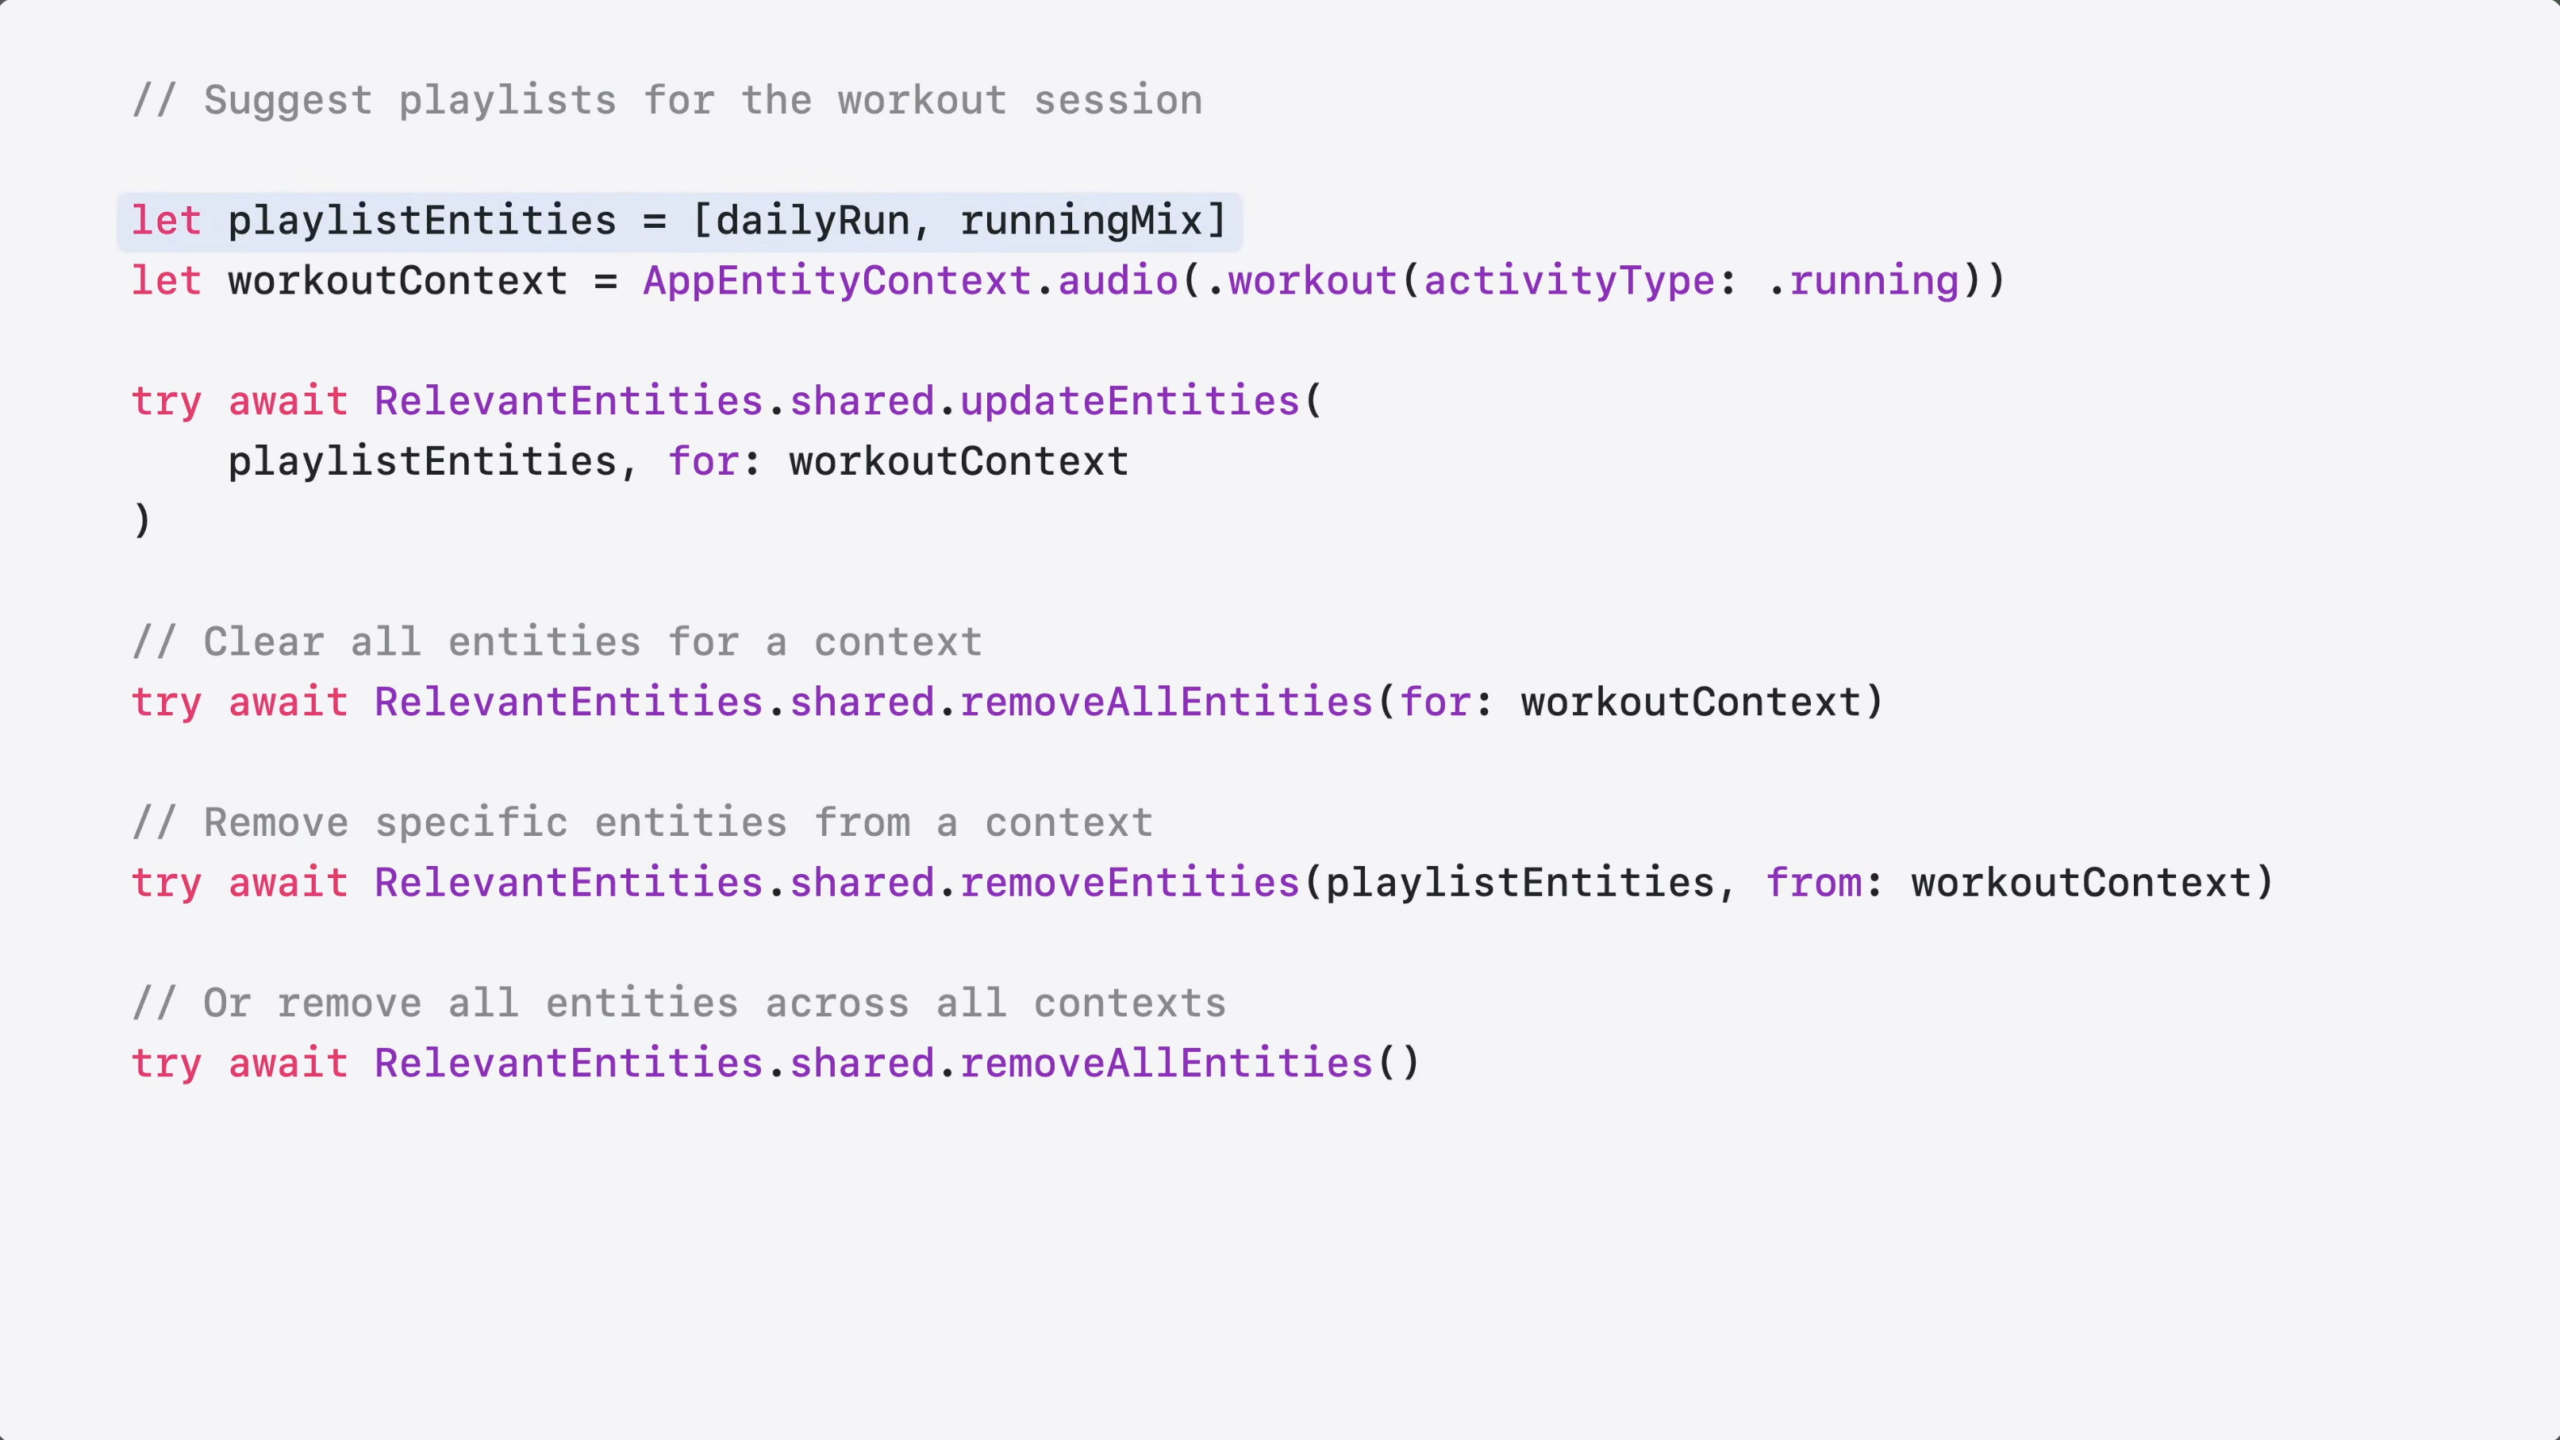
You start by identifying the relevant entities – in this case, your running playlist.
Next, you create a context to tell the system these playlists are relevant when someone starts a run.
Then, you call updateEntities to register them. The system surfaces these playlists as suggestions in the right context – even if they were never played before.
Entities stay registered until you remove them. You can removeAllEntities for a specific context…
…Remove specific entities from a context, or…
Clear all entities across all contexts.
Now you have more options for helping people discover your content. How do you choose between them?
Use Spotlight when you want your content to be searchable and retrievable by Siri.
Use interaction donation to teach Siri and the system how people use your app – so it can identify patterns and suggest actions people may want to repeat.
And use RelevantEntities to hint to the system which content is relevant in specific situations – so the system can suggest it at the right moment.
For more on this topic, check out our new documentation on Spotlight and Interaction Donation.
This means developers now have three ways to tell Siri AI & the system what’s important: Spotlight indexing, interaction donations, ANDRelevantEntities; that’s also not OR – it’s all three.
I’m curious how this overlaps with ValueRepresentation too – can we recommend relevant entities of all types in other apps? The Fitness + Music app example seems to suggest so, but it’s just ambiguous enough given playlists are already a known type. If anyone can test it in their apps or knows the answer, I’ll update this post.
In the WWDC 26 session “Discover new capabilities in the App Intents framework,” App Intents Engineer Moe Mehrabi talks about ValueRepresentation, a way for apps to mark up their structured types that don’t fit into existing file types in such a way that other apps on the system—and, more importantly, Siri AI—can understand them:
Your entities—your app’s content, like a landmark or playlist—live inside your app. But the people using your app don’t. They move between apps all the time.
Let’s go through a pair of examples using Mail and Maps with my travel tracking app.
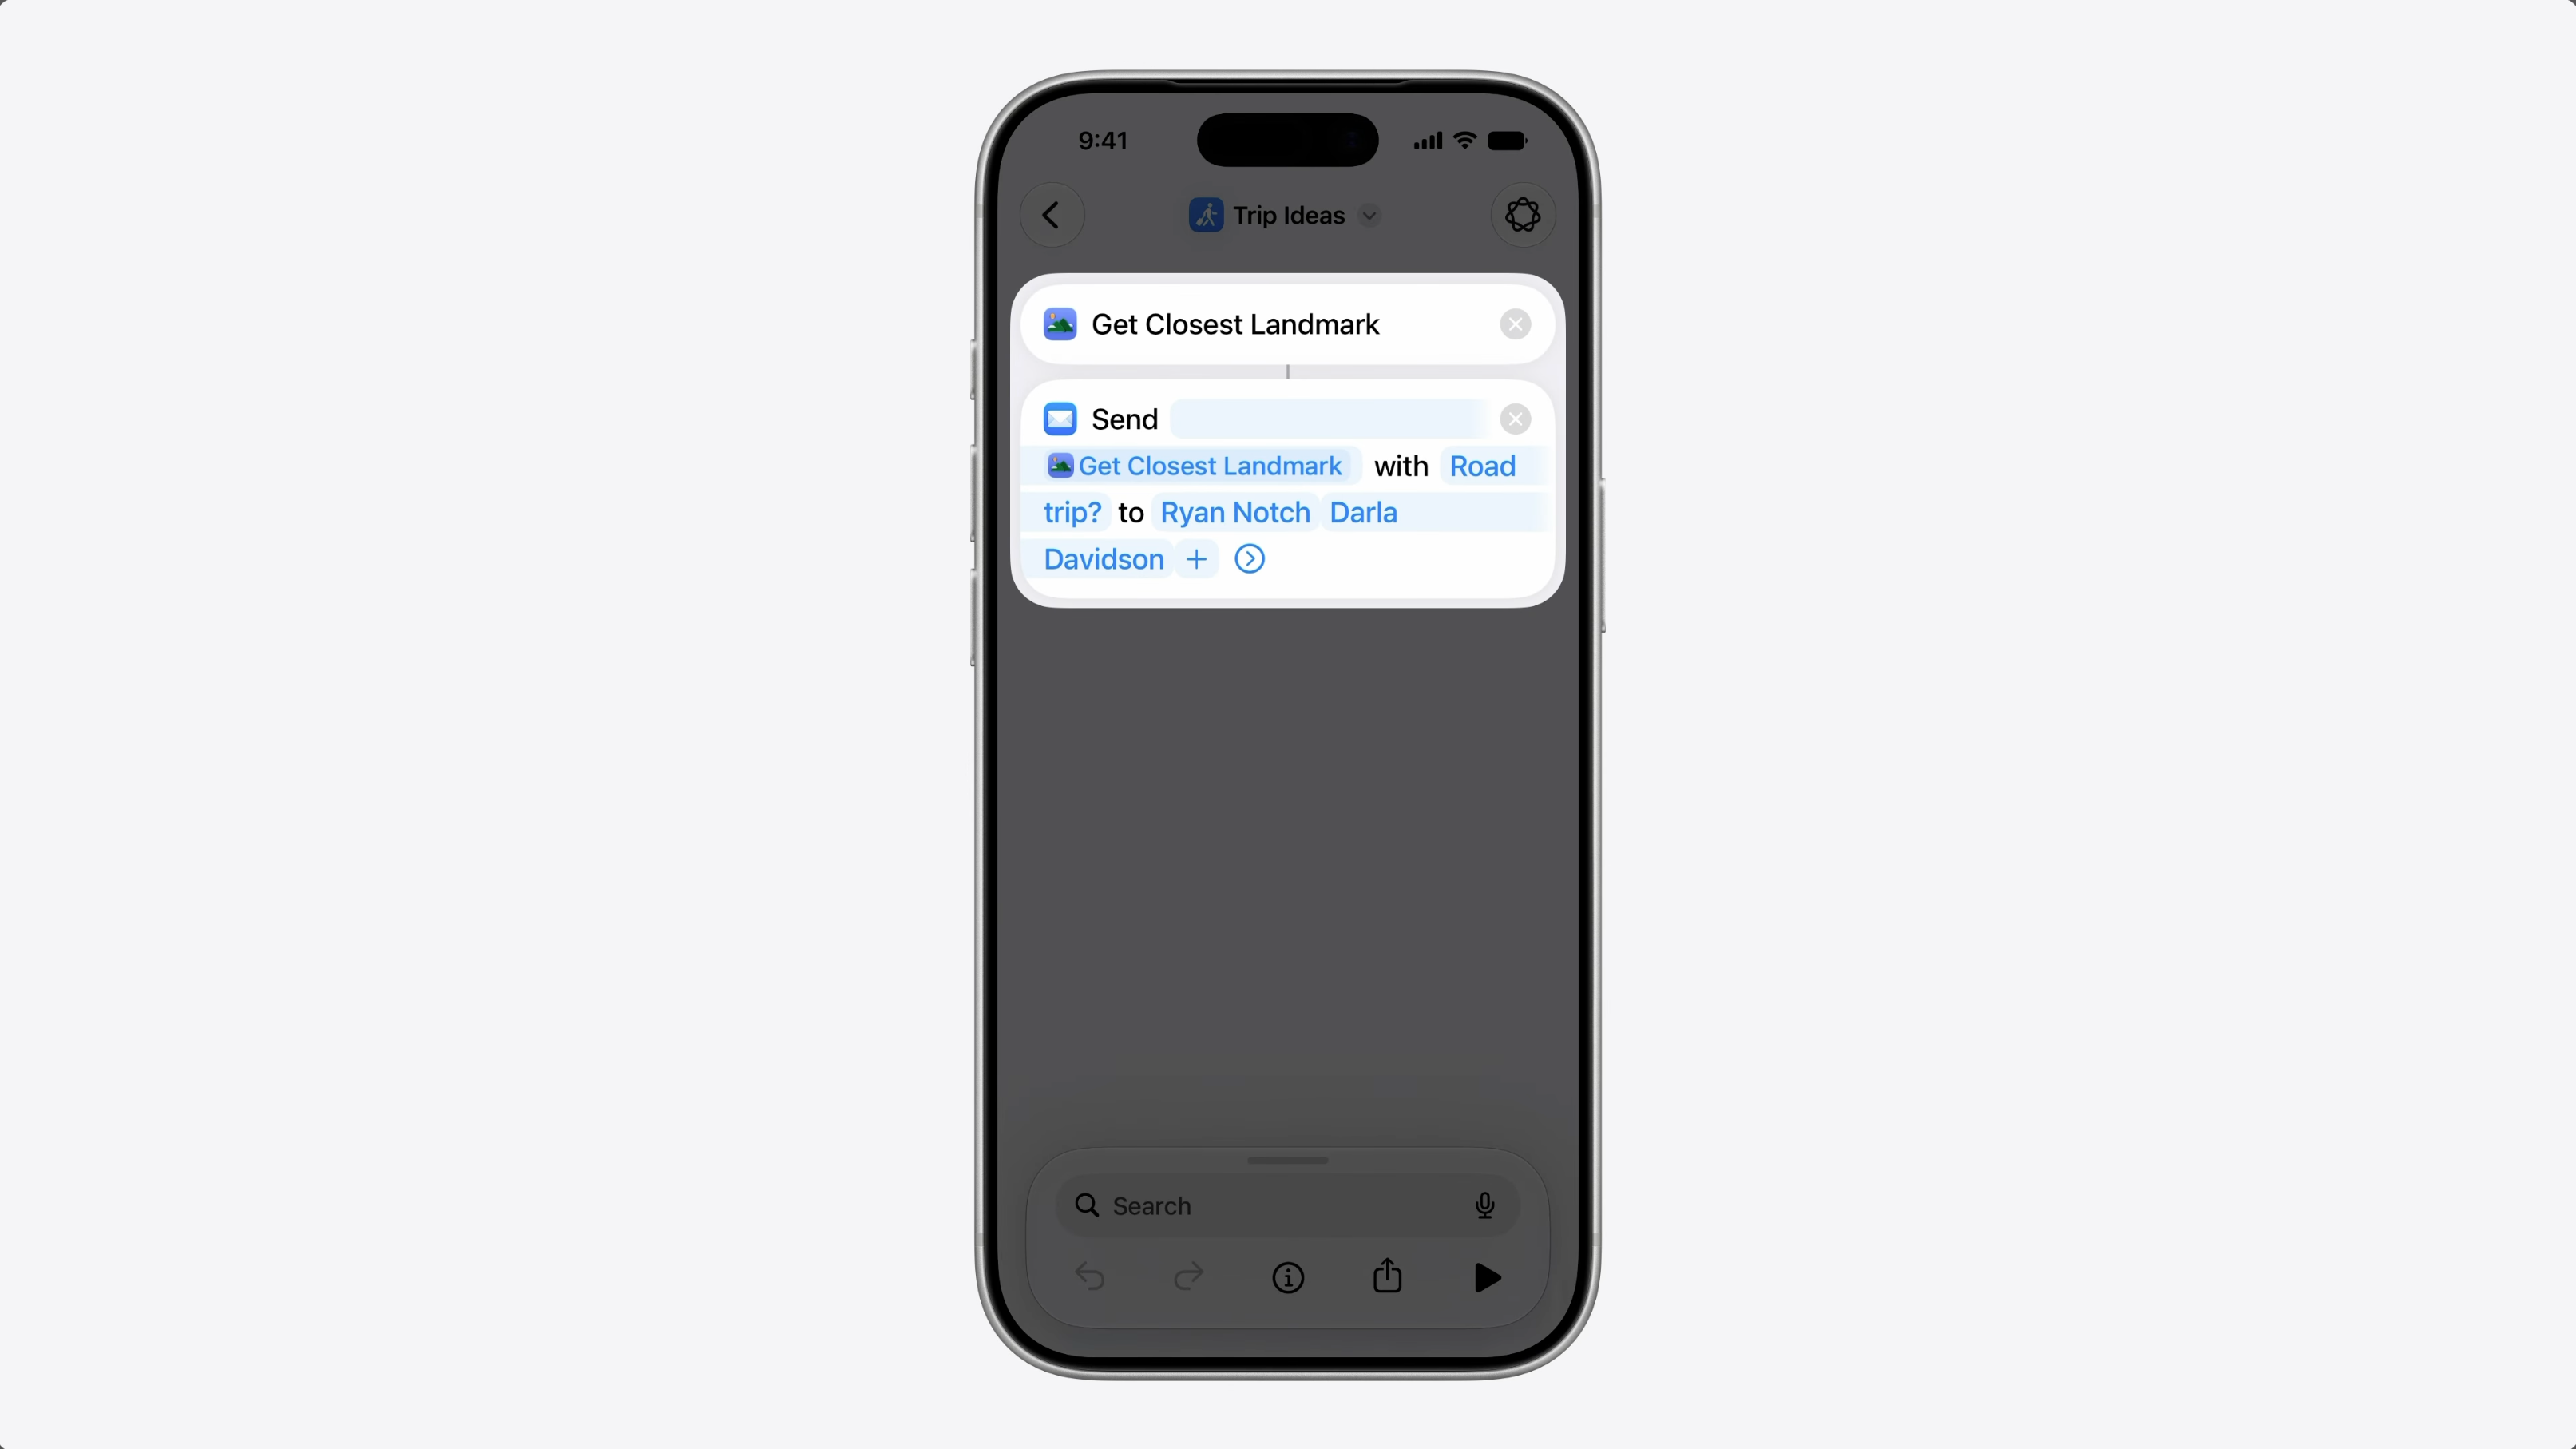
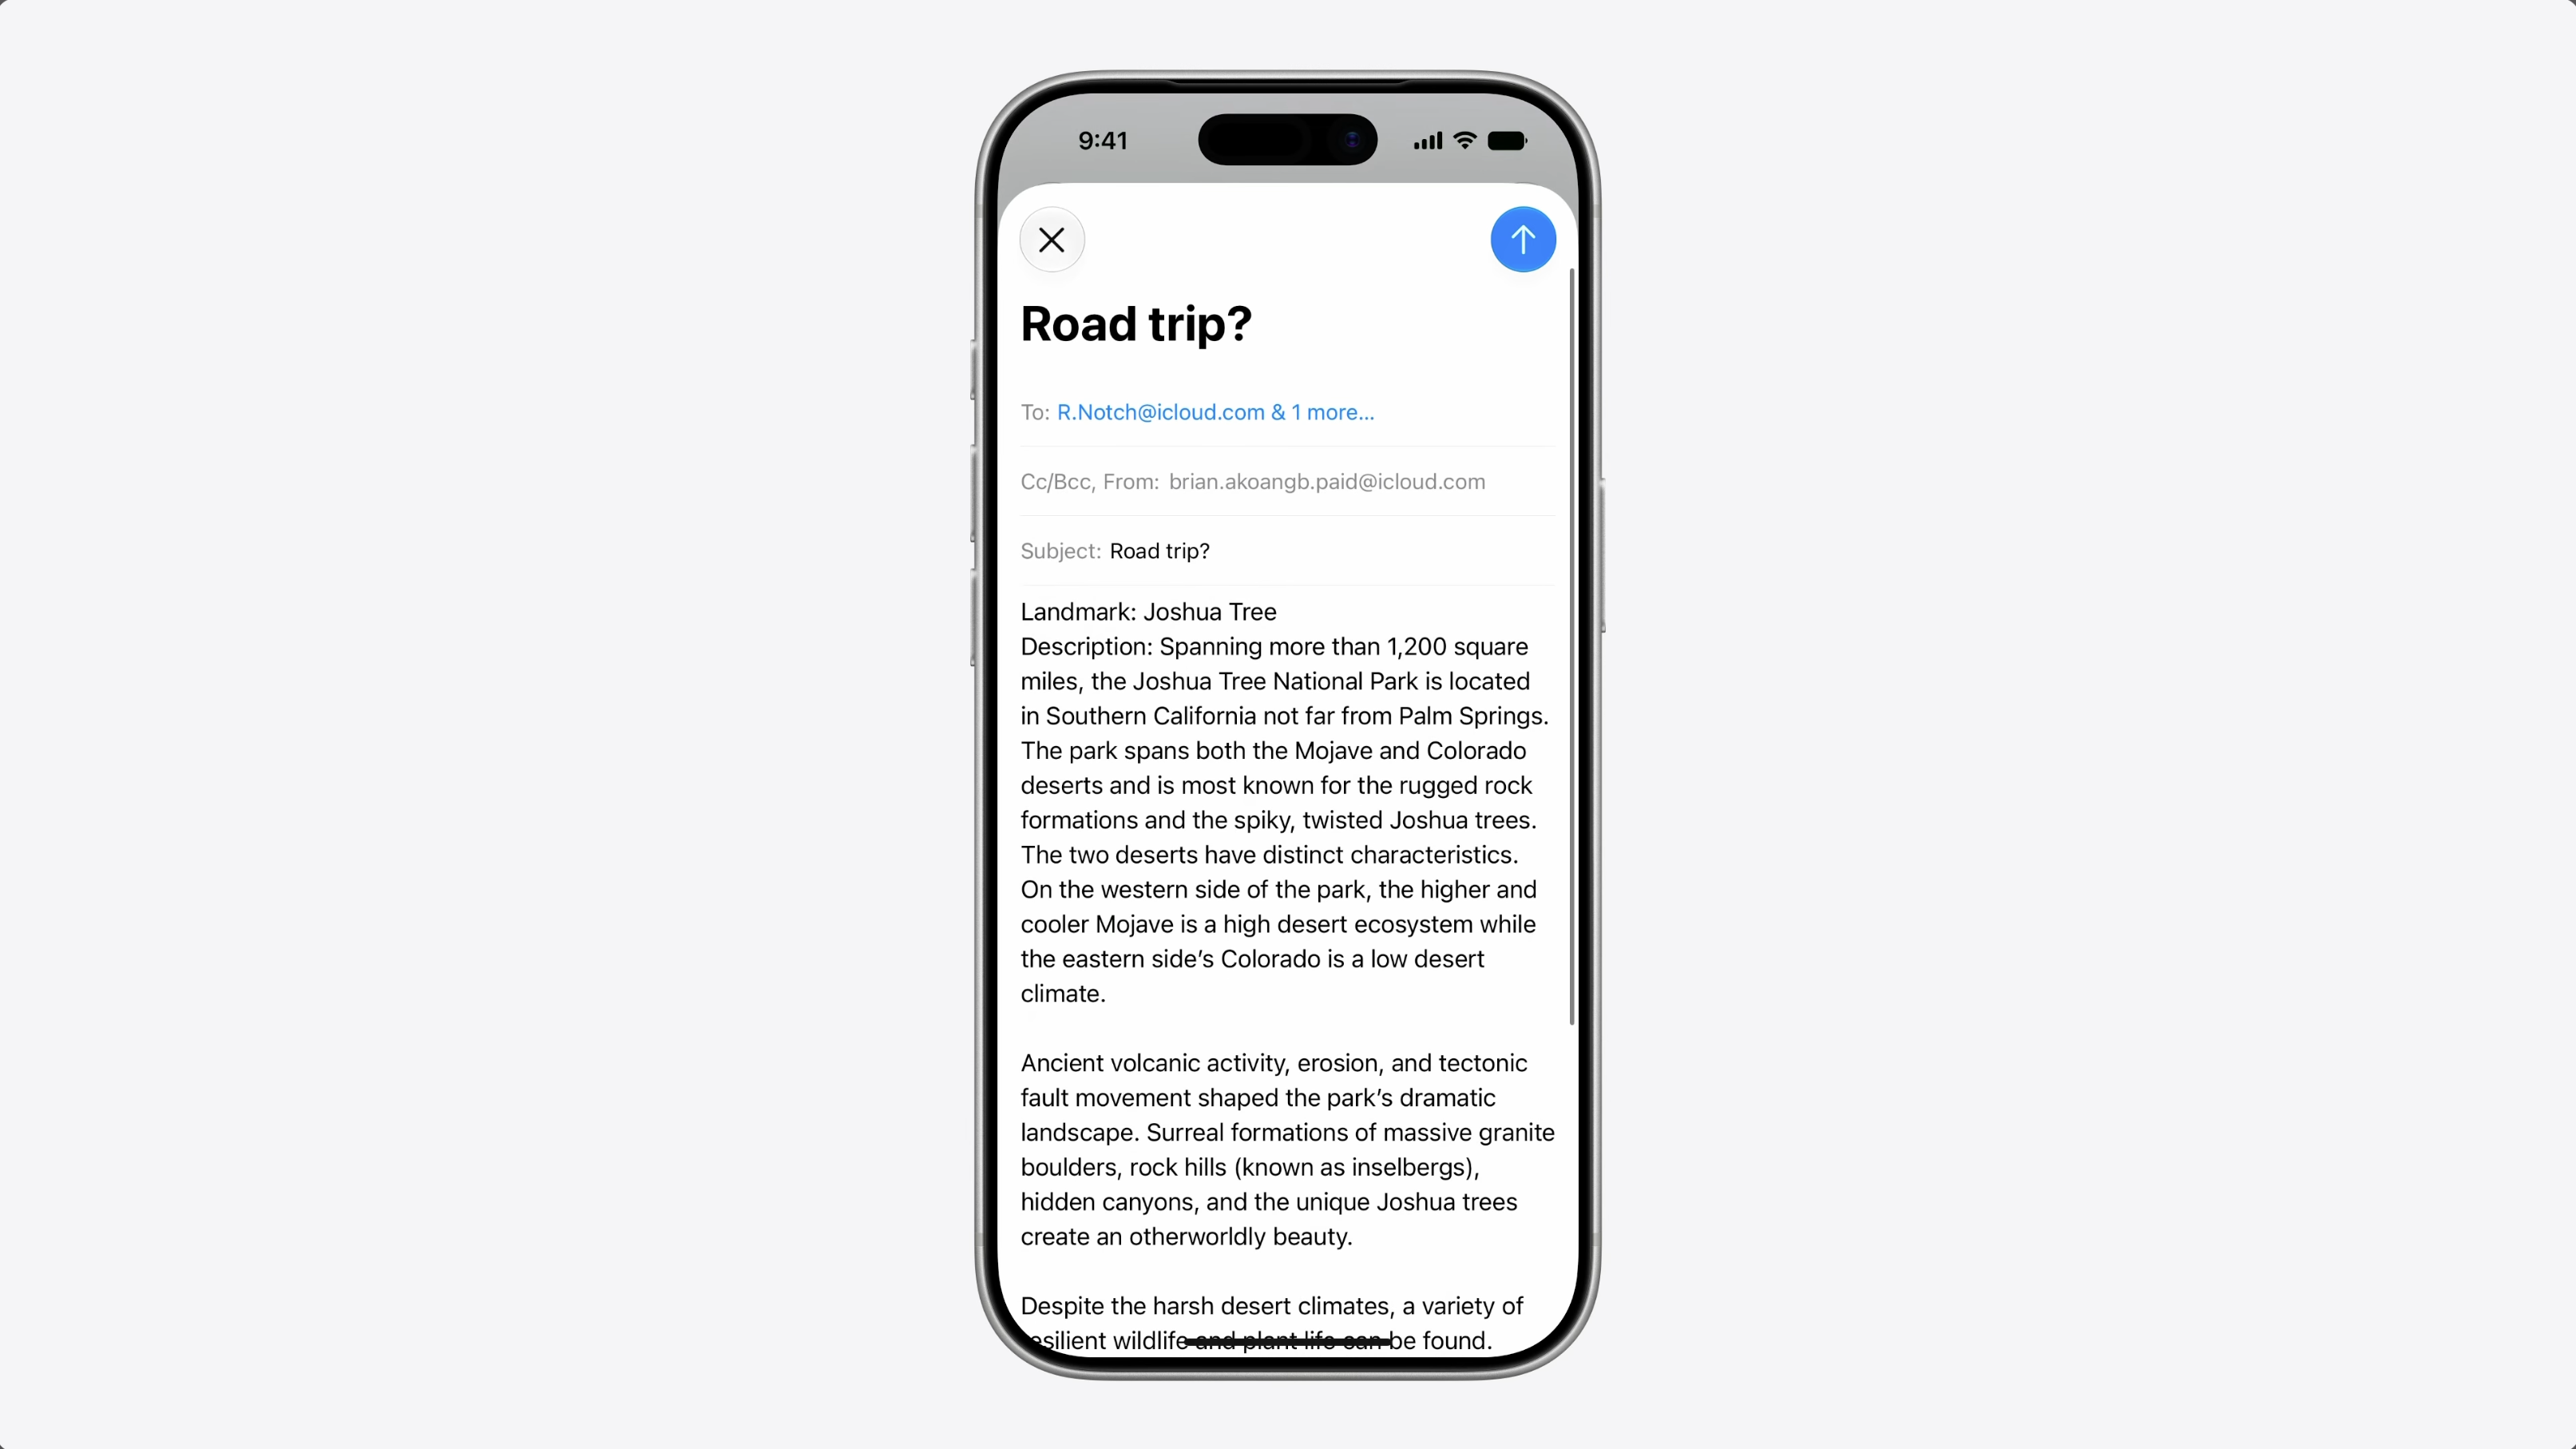
I built a shortcut to share trip ideas with friends. It finds a nearby landmark and its it along with a message. My entity conforms to Transferable from the CoreTransferable framework.
So the shortcut can share it in a format mail can use. And that works great.
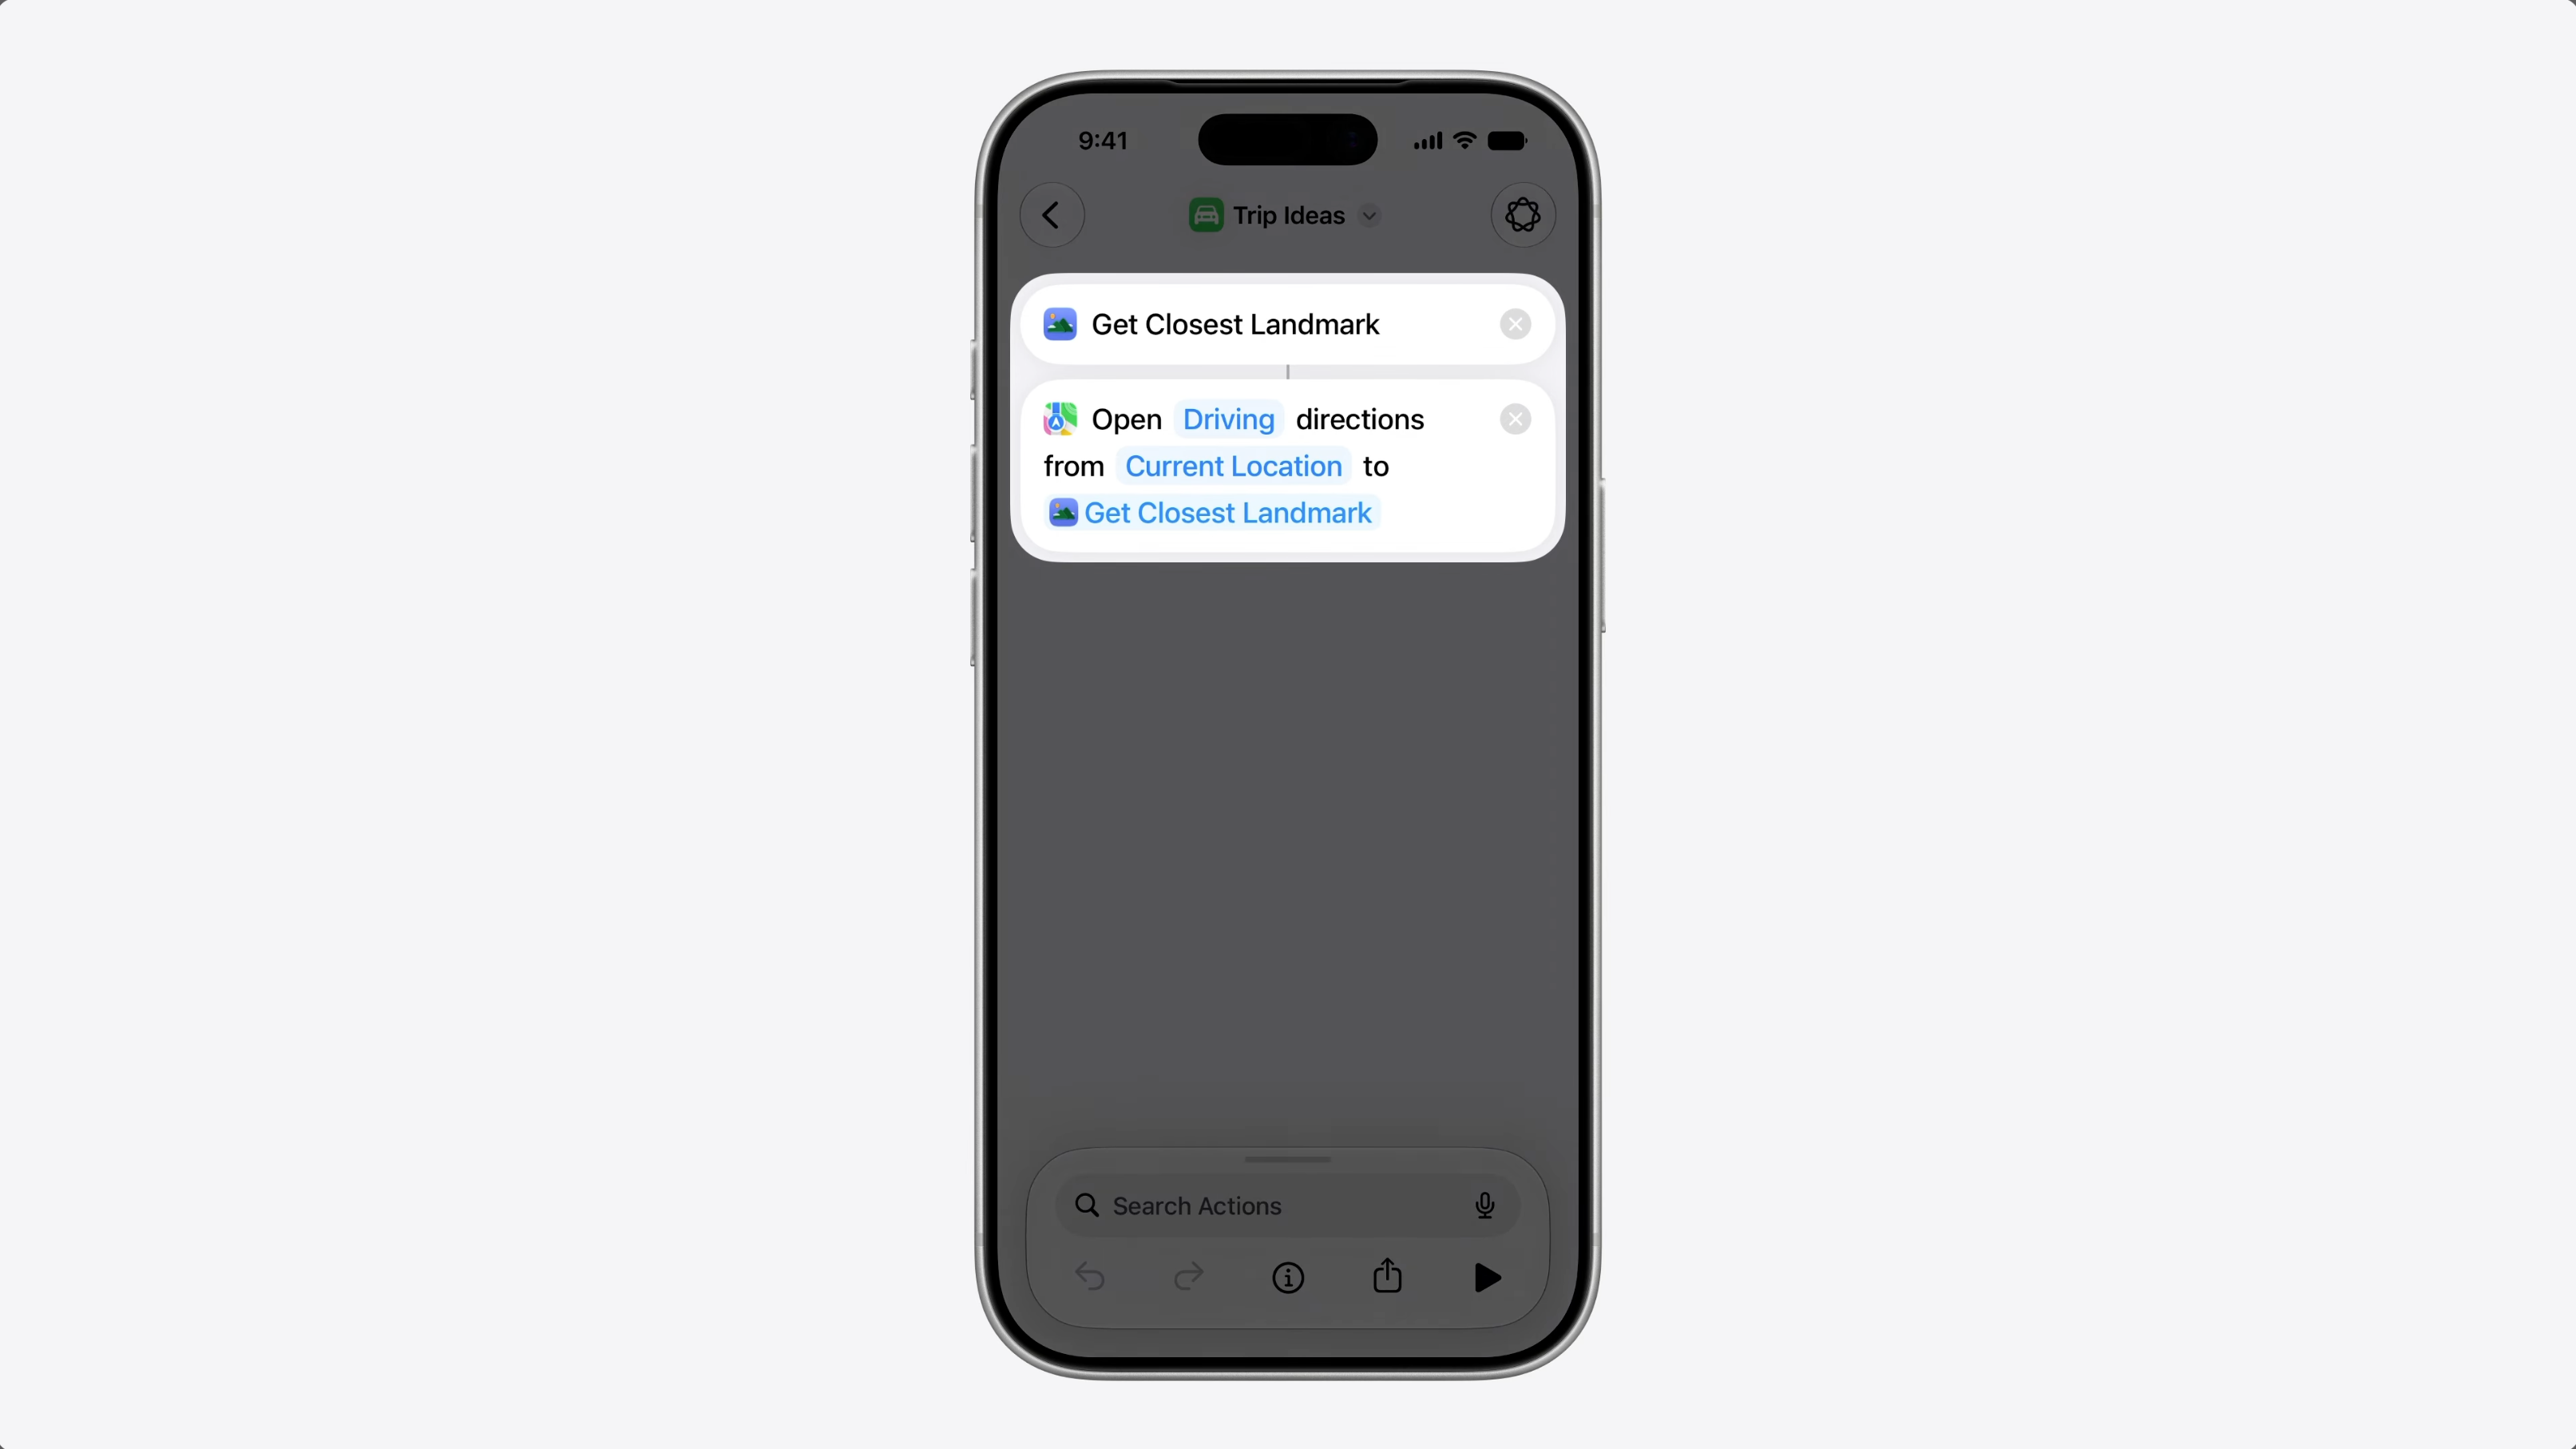
But what if, instead of sending it to a friend, I want to get directions to that landmark? Well, that won’t work.
Maps needs some structured information, a coordinate, an address, or something it can navigate to. But that kind of data doesn’t have an associated format that can be put in a file or data.
The existing file and data representations work great for known formats like PDFs or images – but not for structured types that don’t have any [format].
This is where ValueRepresentation comes in. It’s a new representation that lets you share a structured type that the system already understands.
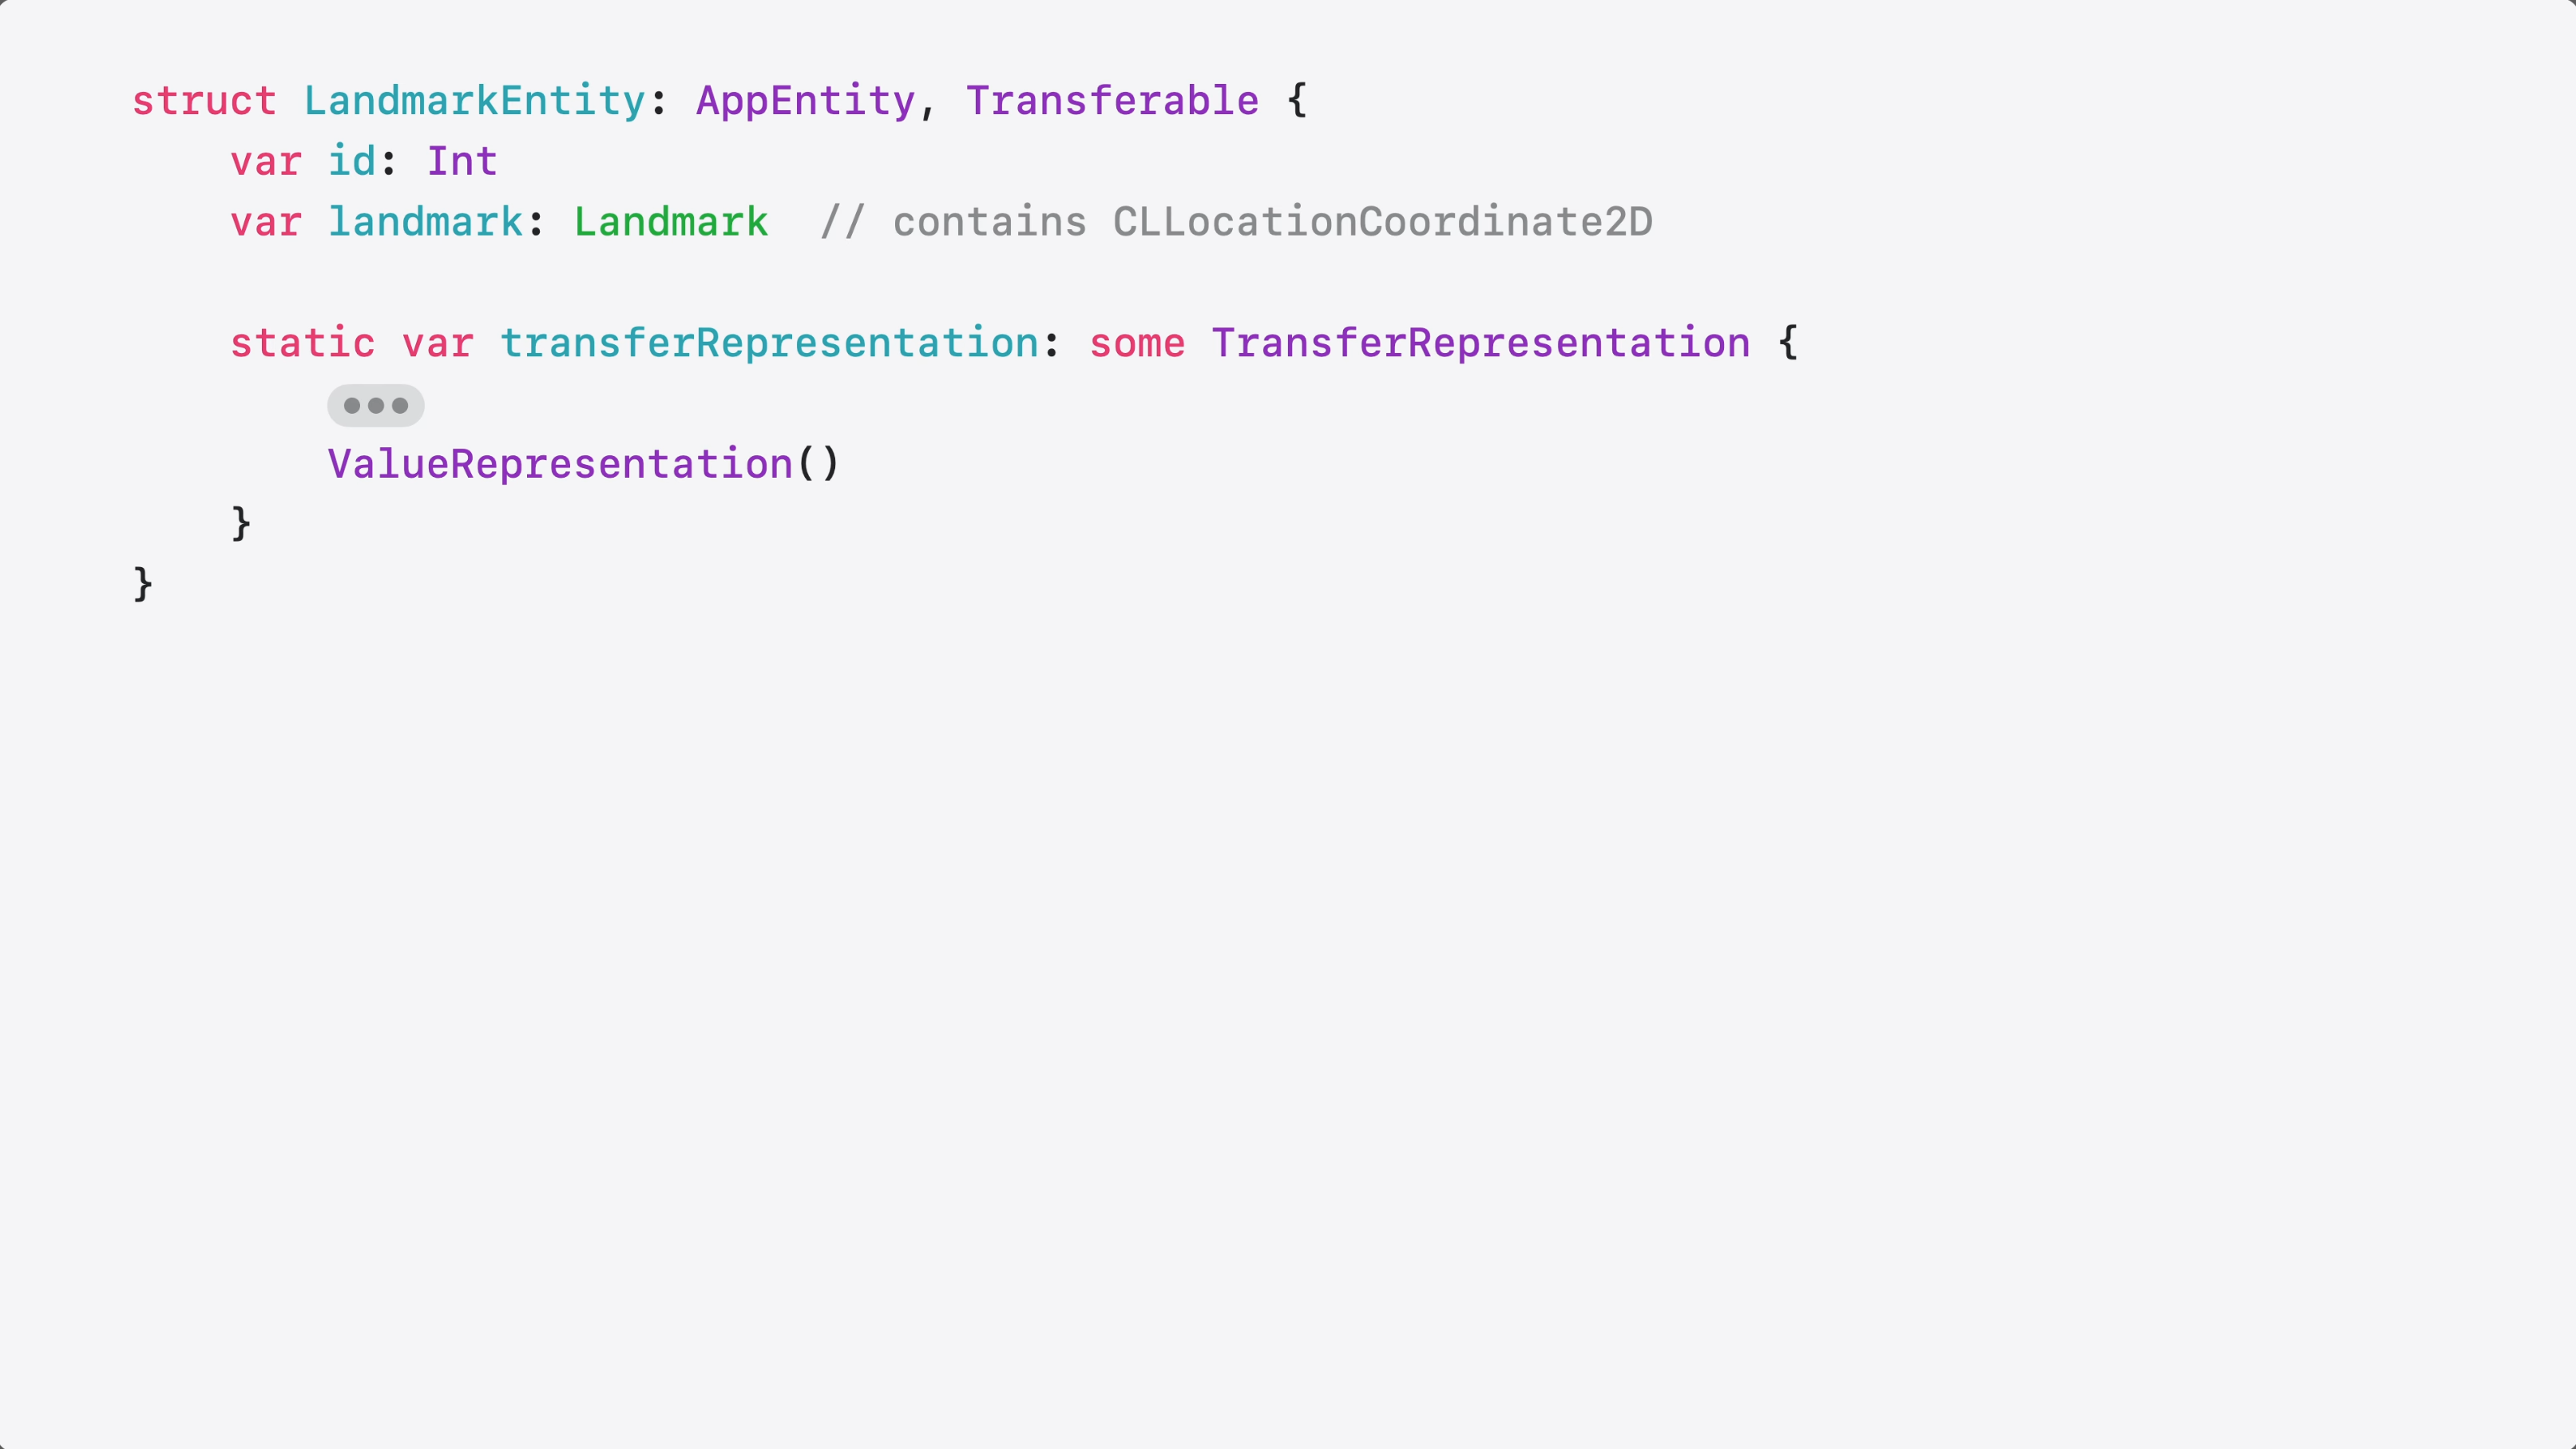
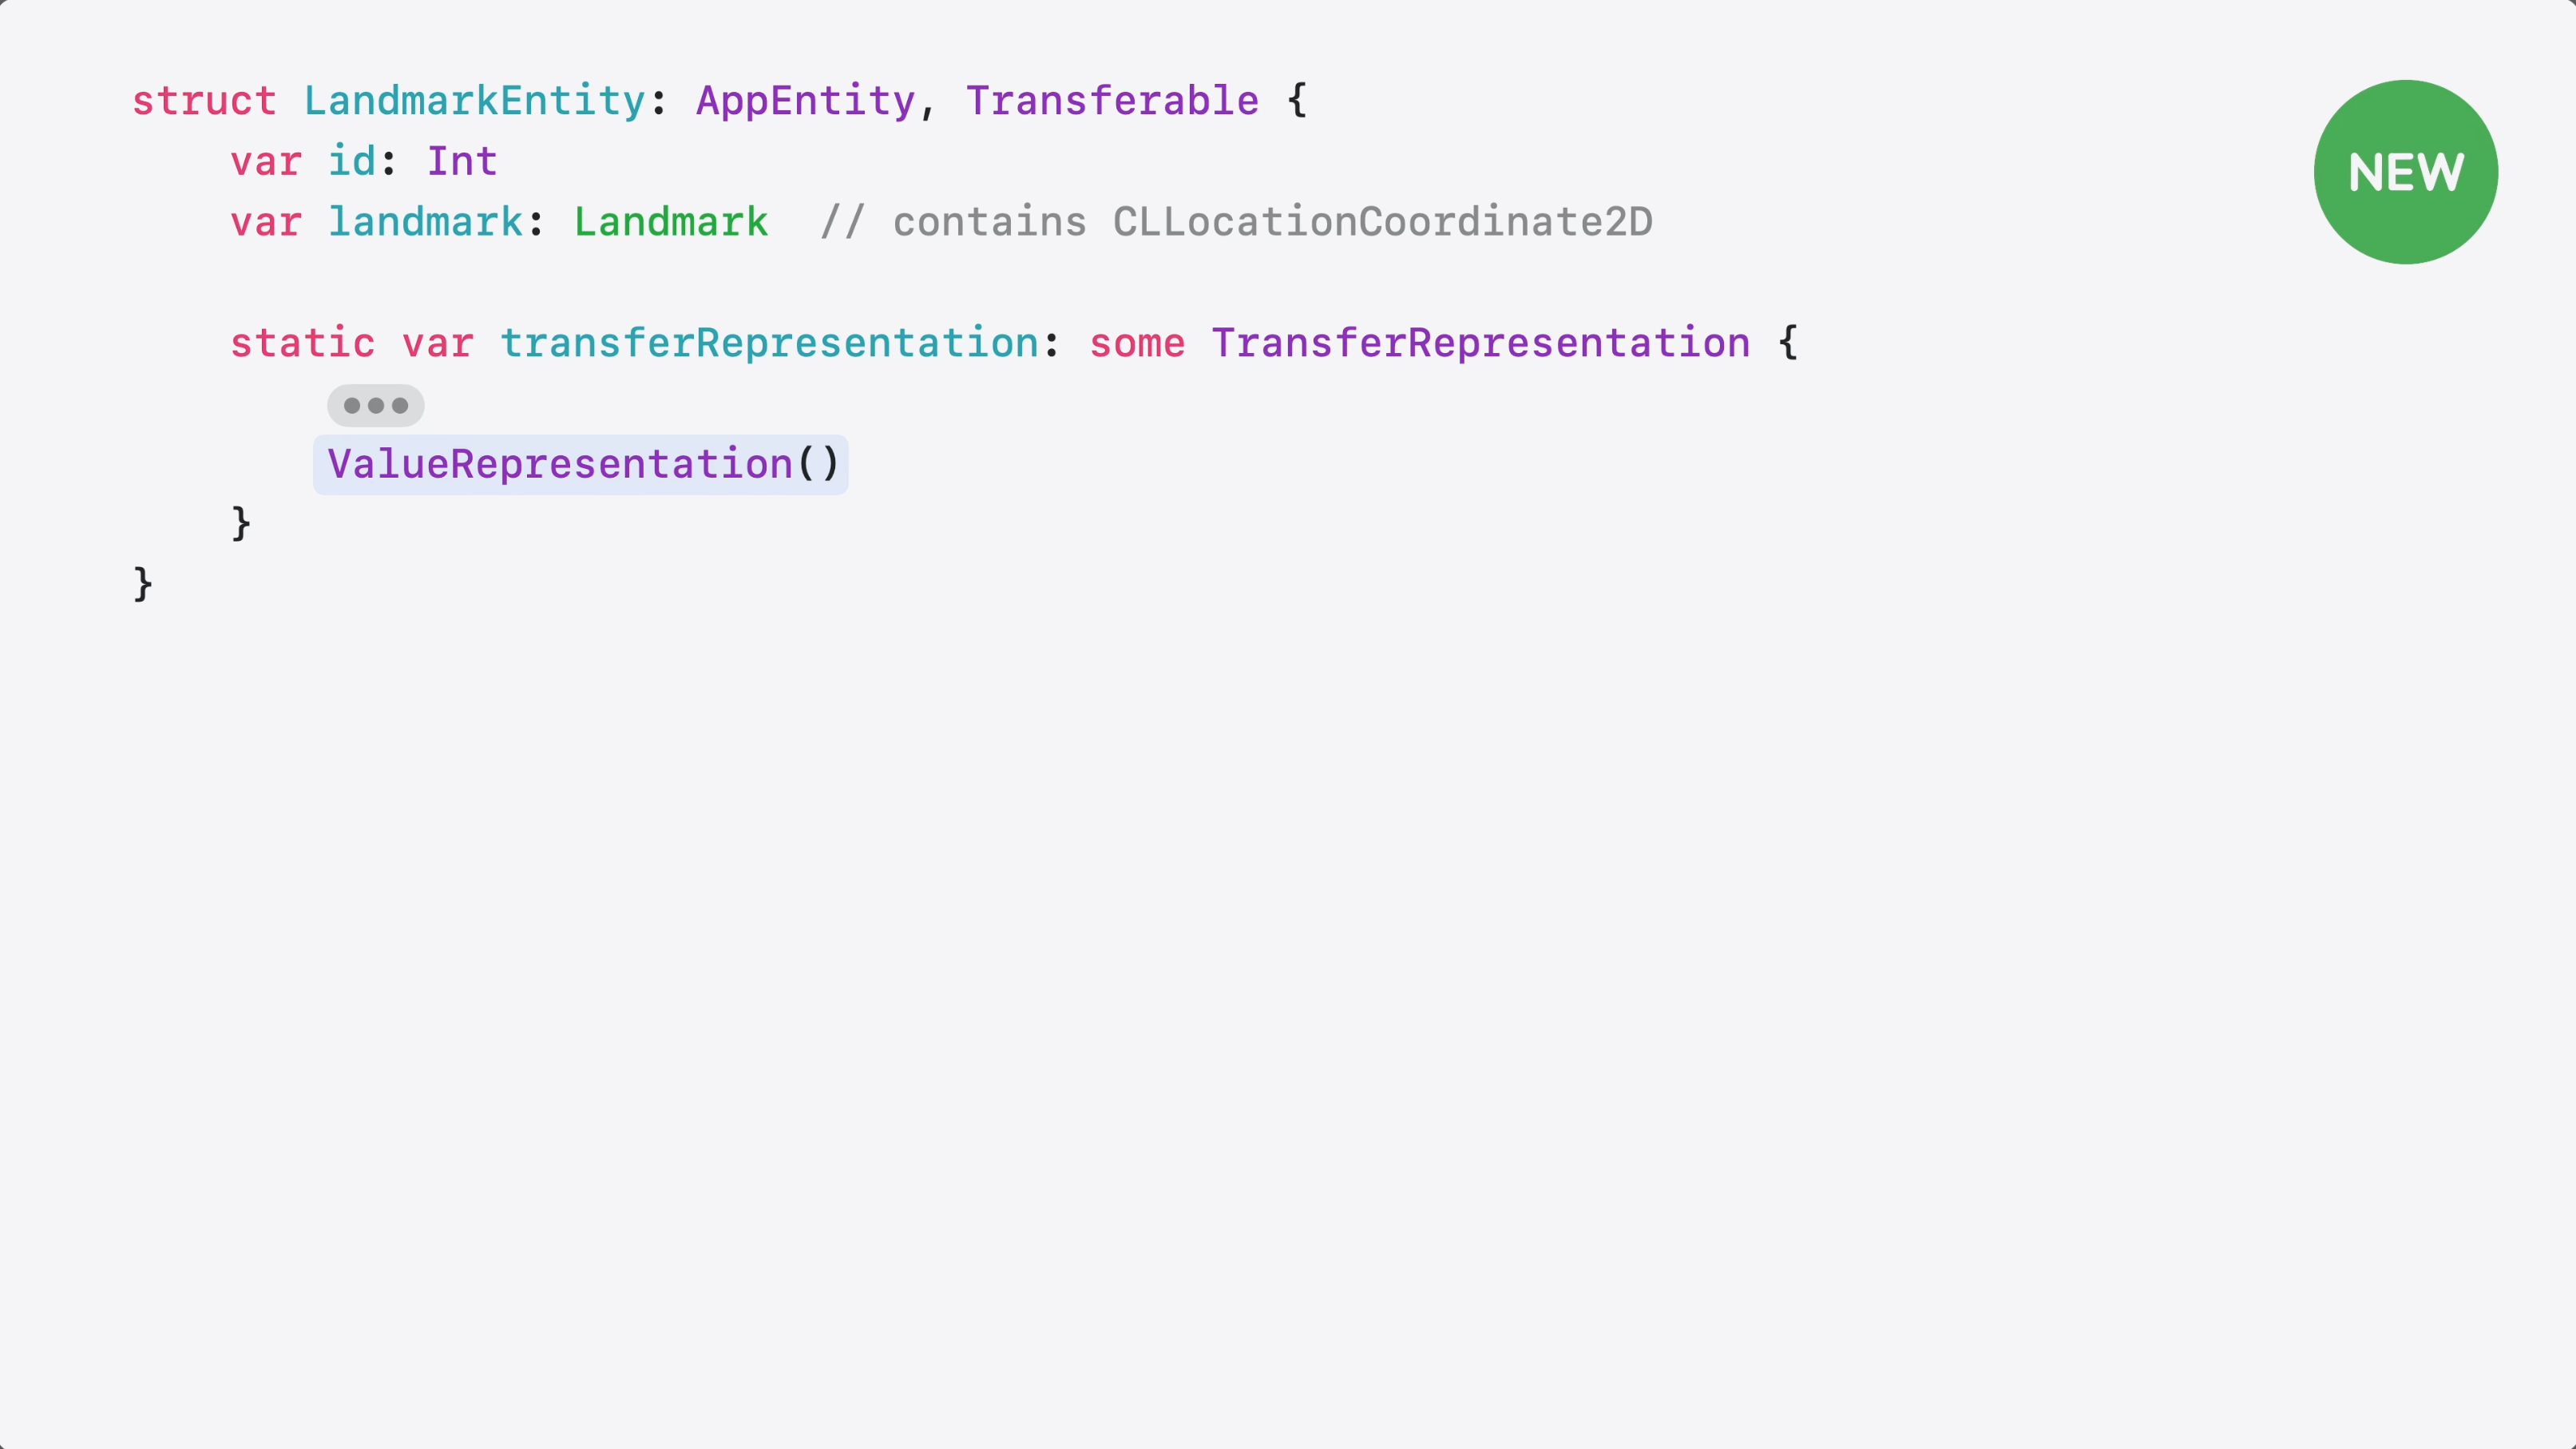
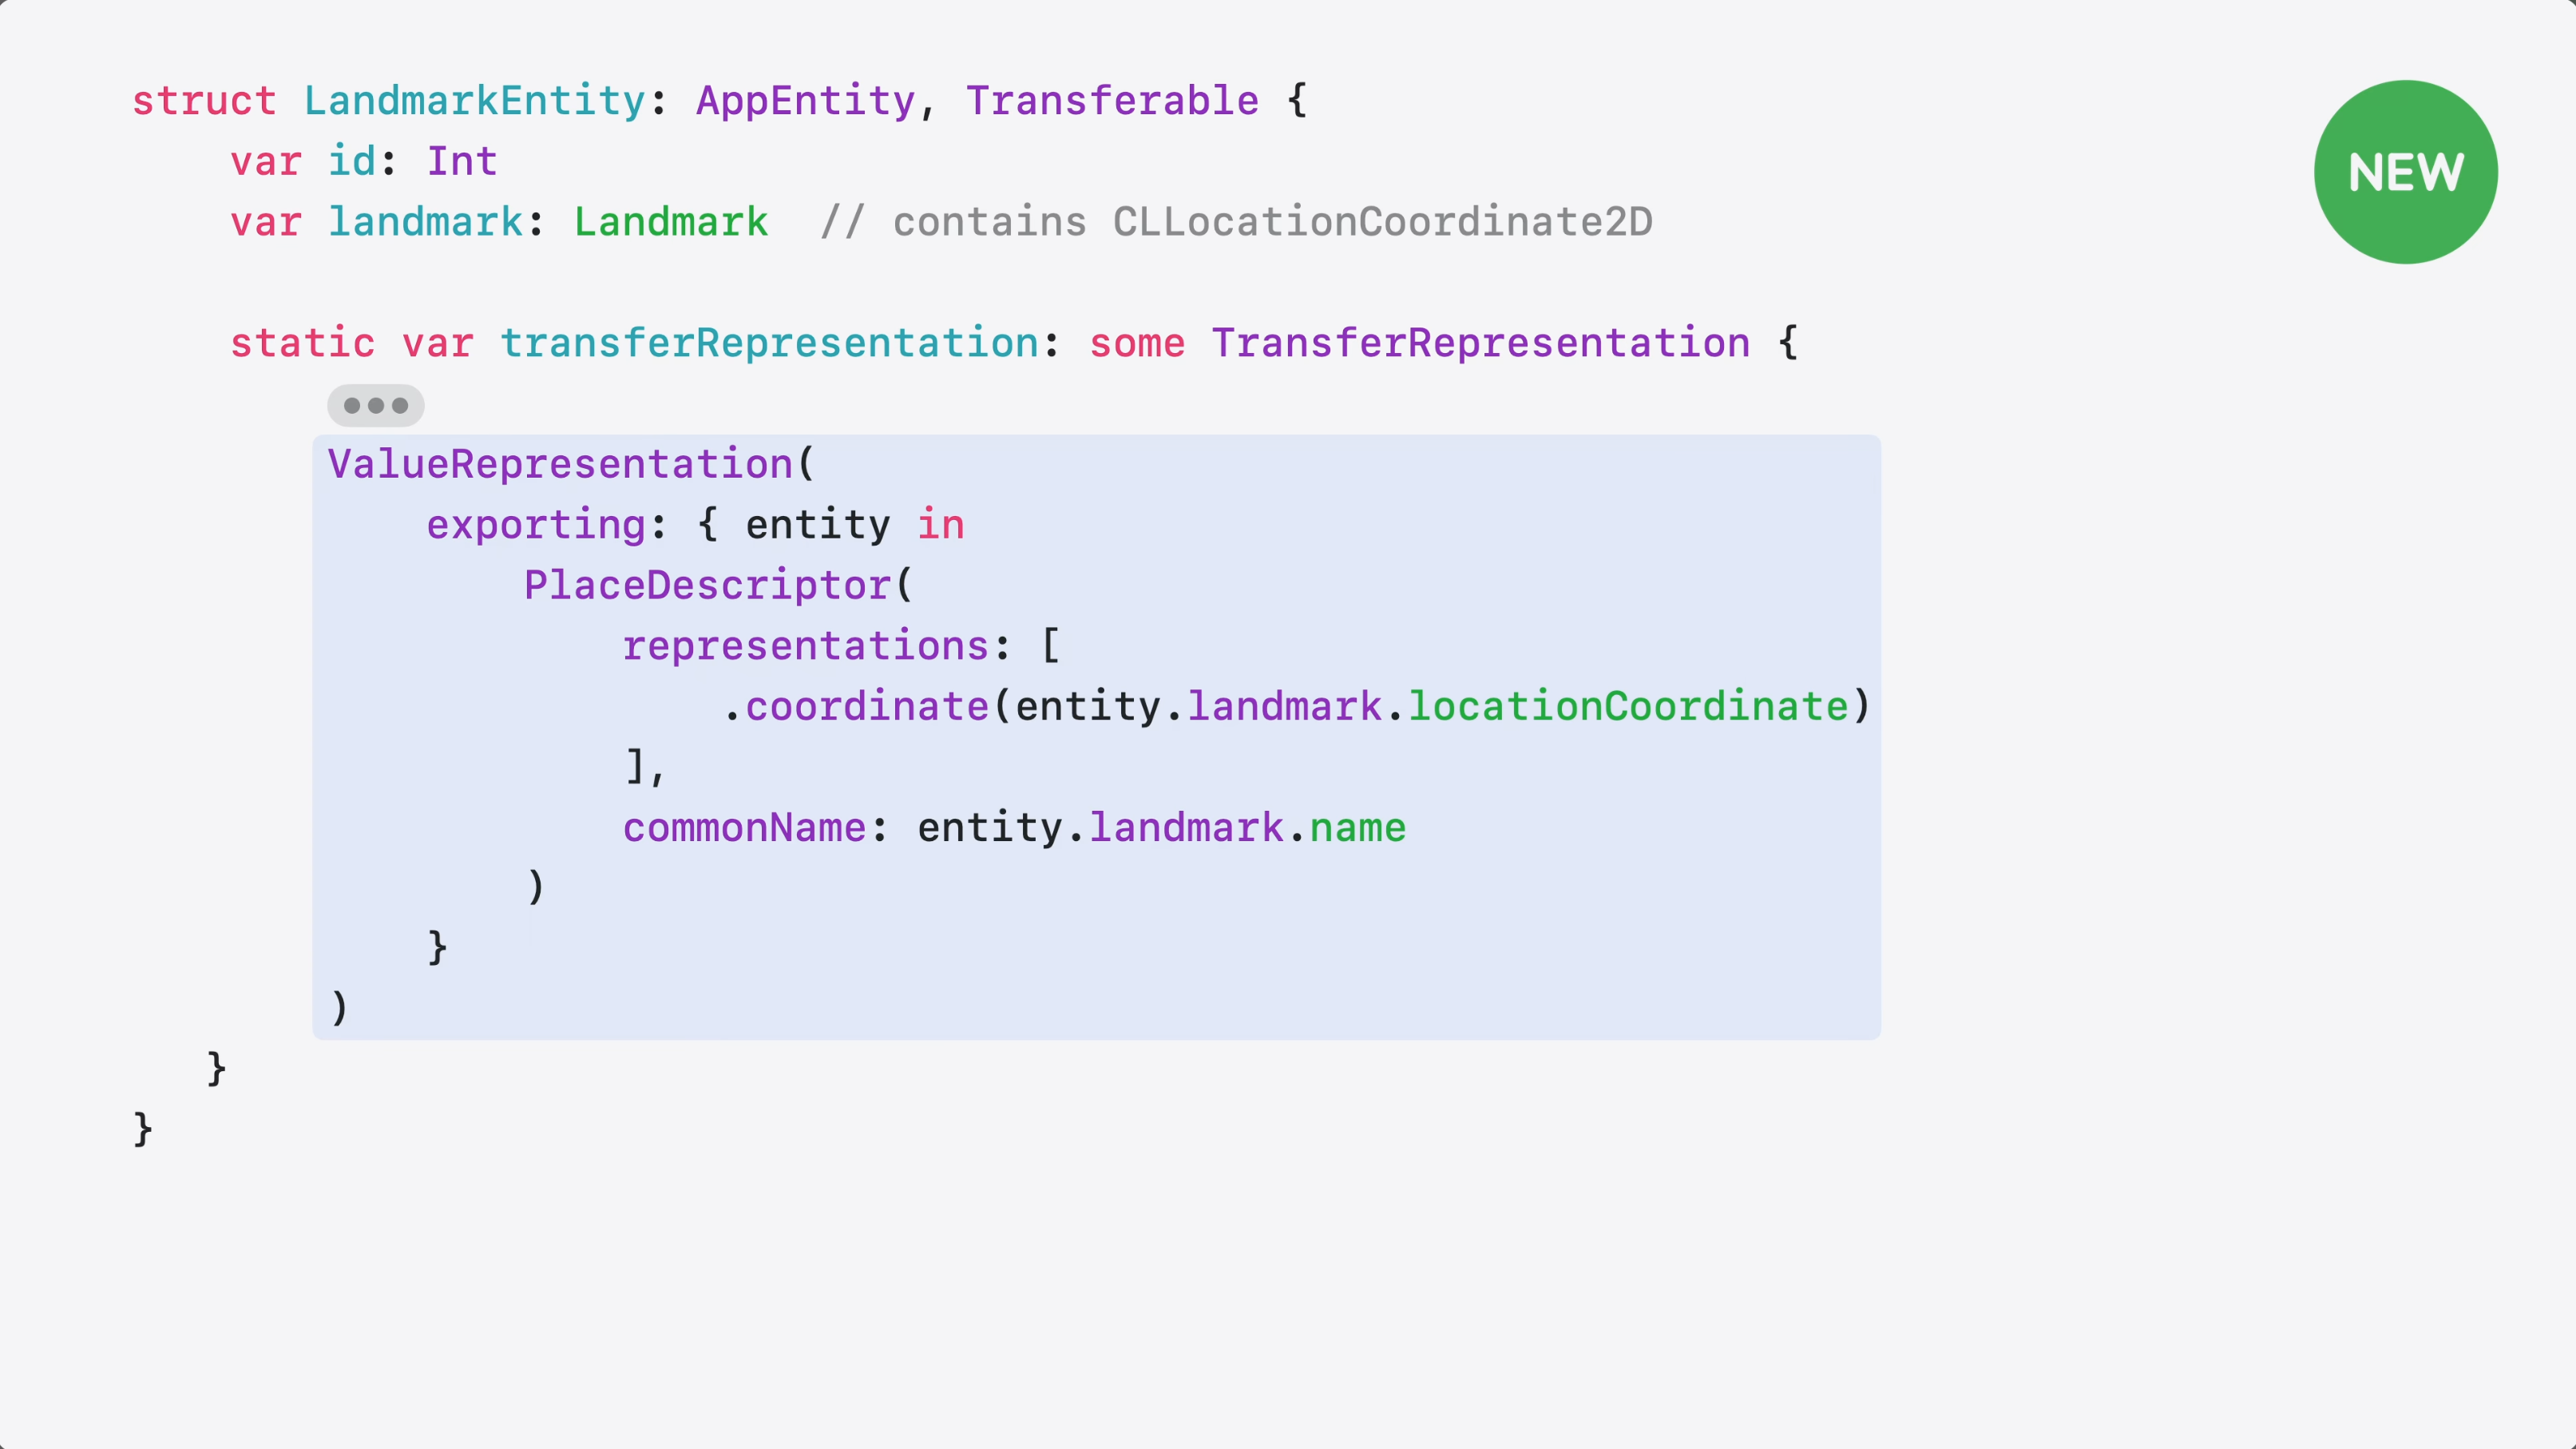
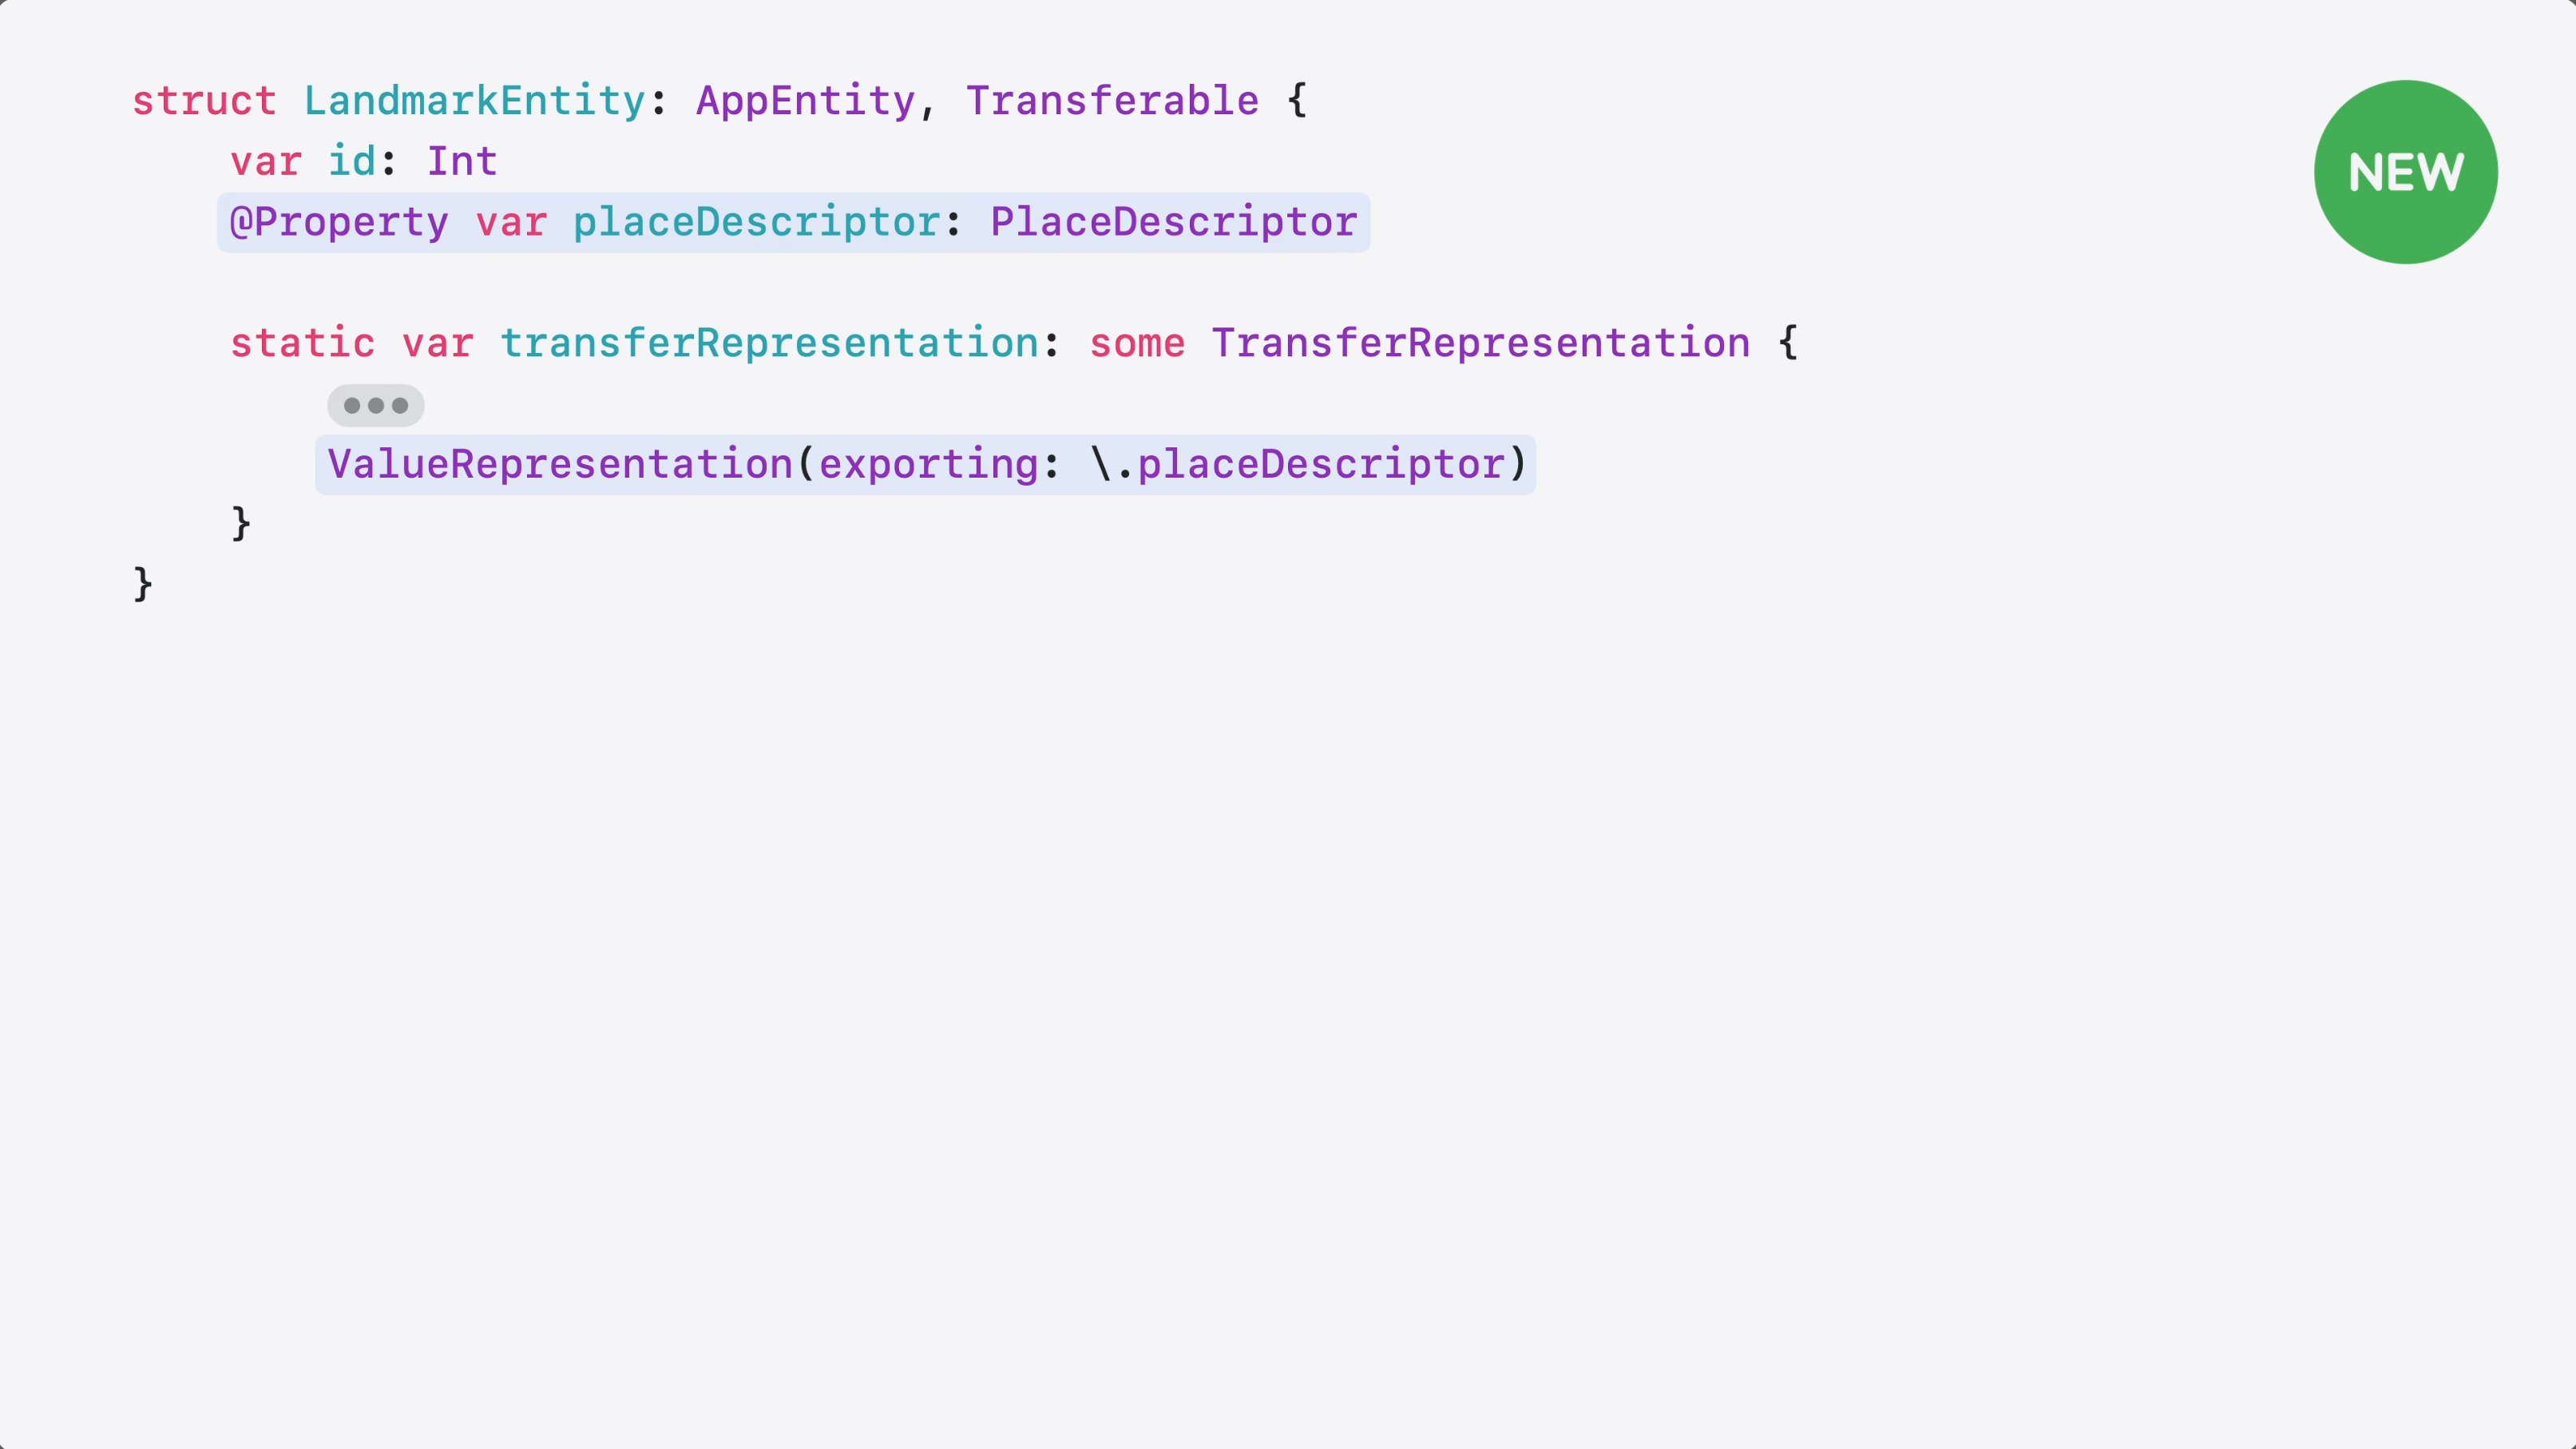
Here’s my Landmark entity. It represents a place in a travel tracking app.
It already conforms to Transferable, so I just need to add a ValueRepresentation alongside any existing representations.
Inside my ValueRepresentation, I export my landmark’s coordinate and name as a PlaceDescriptor from the GeoToolbox framework. PlaceDescriptor carries coordinates and other metadata that Maps needs to navigate.
If my entity already has a PlaceDescriptor @Property, I can skip the closure entirely and use a key-path. Same result, much less code.
So, going back to my shortcut – I tap run, my landmark flows to Maps as a PlaceDescriptor, and Maps opens with directions to the landmark.
Your entities now have more ways to travel across apps.
The core experience here is making sure Siri AI can take your app and connect it with another app, without the content failing to transfer. It’s like Transferable, but for representing unique values rather than known types.
Given this, I’m super intrigued with the idea of apps specifically designed to share their unique types with other apps. What if there was a suite of apps that all knew about each others’ data? What kind of experiences could they create?
Shortcuts already exist in macOS, and they’re awesome. Shortcuts in macOS let you automate repeated actions on your Mac, either with a click, a keyboard shortcut, Siri, the menu bar, Finder, the Share Sheet, or sometimes from inside apps. You can use them to resize images, extract text from PDFs, create calendar events or reminders, and much more.
They can, however, be a little tricky to create. That’s going to change with the new version of Apple’s software. macOS Golden Gate is going to use Apple Intelligence to make creating shortcuts easier. Instead of building fiddly automations manually, you can simply describe what you want using natural language and Shortcuts will build it for you.
On June 23rd, Josh Elman posted that he was leaving Apple to join a16z as a partner:
1/ I’m thrilled to announce that I’m joining @a16z as a partner to help find and support building the next generation of great consumer companies. Let me talk a little about why. https://t.co/vJ2mr3OqDh
What a day! So fun to bring Siri AI, the new power of Apple Intelligence and so many OS features it enables, and a deep new architecture with new models powering them to the world! Links below pic.twitter.com/qlG2iEmUBv
So, you’ve been a part of really every product cycle—the big ones and the small ones. So: Facebook, LinkedIn, and Twitter. […] TikTok (or Musical.ly), Discord, Robinhood. And now, most recently, leading product marketing for a lot of the AI efforts at Apple.
Here’s the episode description:
Anish Acharya sits down with Josh Elman to discuss the future of consumer technology and Josh’s decision to join a16z.
Over the past two decades, Elman has helped shape some of the most important consumer technology products and companies, including LinkedIn, Facebook, Twitter, Robinhood, Discord, Musical.ly, TikTok, and Apple. Drawing on those experiences, he reflects on how technology has evolved from a niche industry into a central force in everyday life.
The conversation explores consumer AI, product design, distribution, social networks, creator ecosystems, and the changing relationship between technology and human behavior. They discuss why AI may unlock an entirely new generation of consumer products, how discovery and distribution are changing, and what founders can learn from previous platform shifts.
Along the way, Elman shares his views on retention, network effects, product-market fit, and the opportunities he believes remain underexplored in consumer technology.
I’ve followed Josh since before his stint at Apple – it will be intriguing to see what kinds of consumer companies a16z invests in with him as a partner.
Definitely intriguing to hear someone from Product Marketing at Apple speaking about the broader state of technology as a whole in a new role.
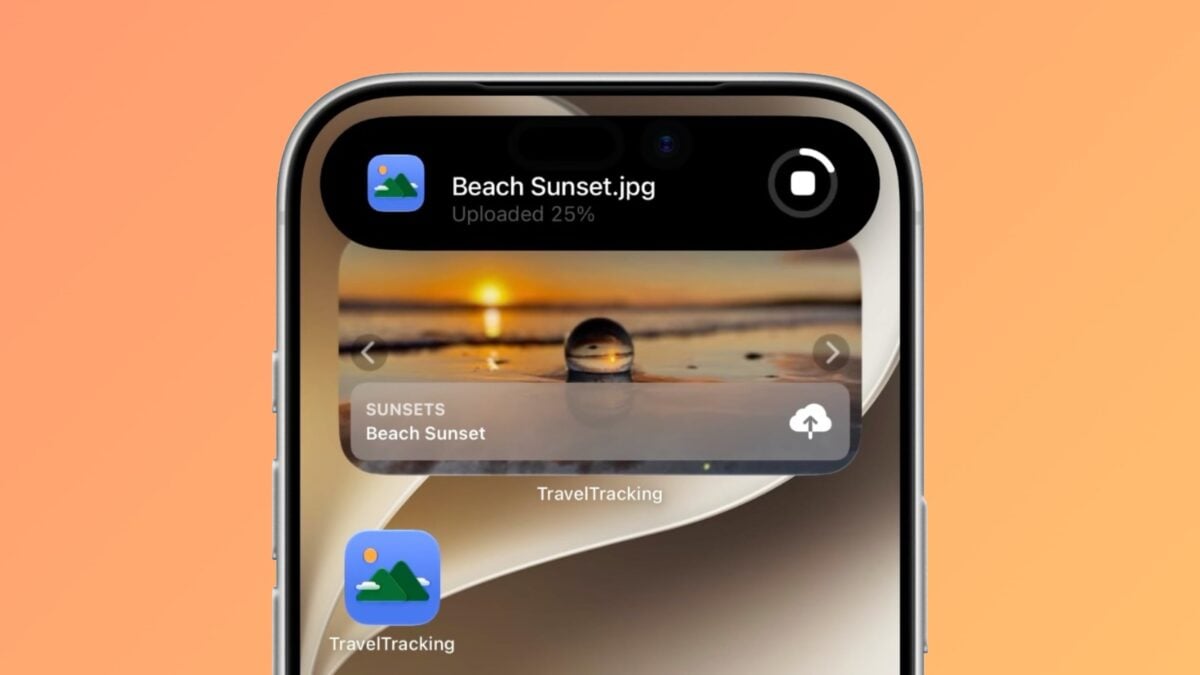
Everything we’ve covered so far makes your entities and parameters more expressive and efficient. Now, let’s talk about execution.
When your intent runs – from Siri, Shortcuts, or any system surface – it only has 30 seconds to finish. That works for most everyday actions, but not every intent is that quick.
Now that my app supports tagging and organizing photos…
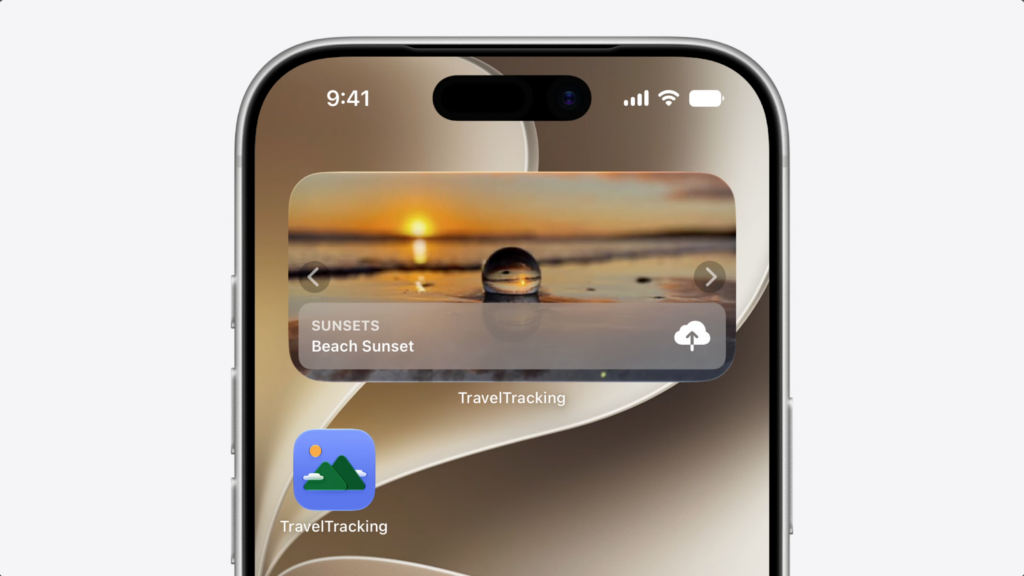
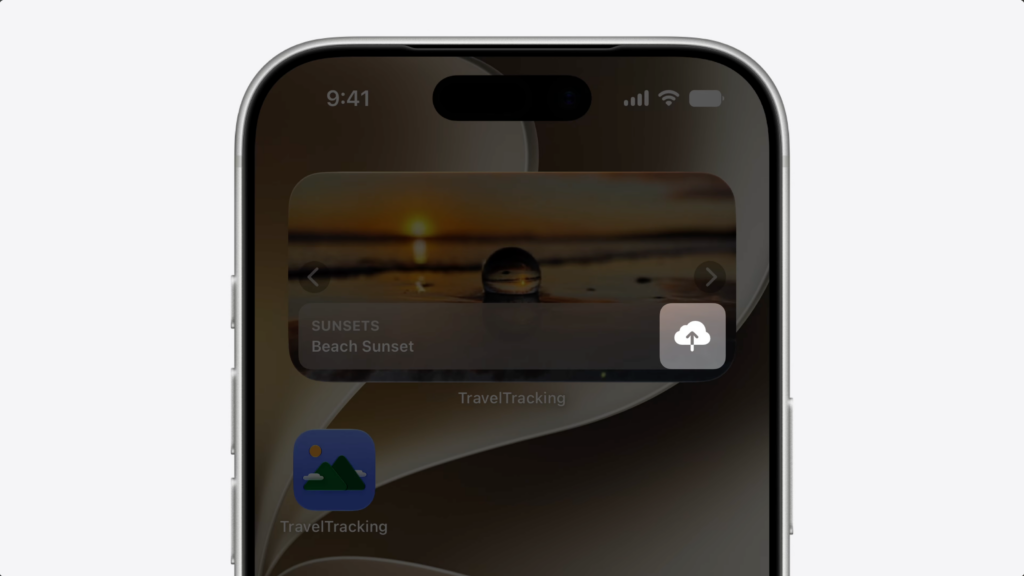
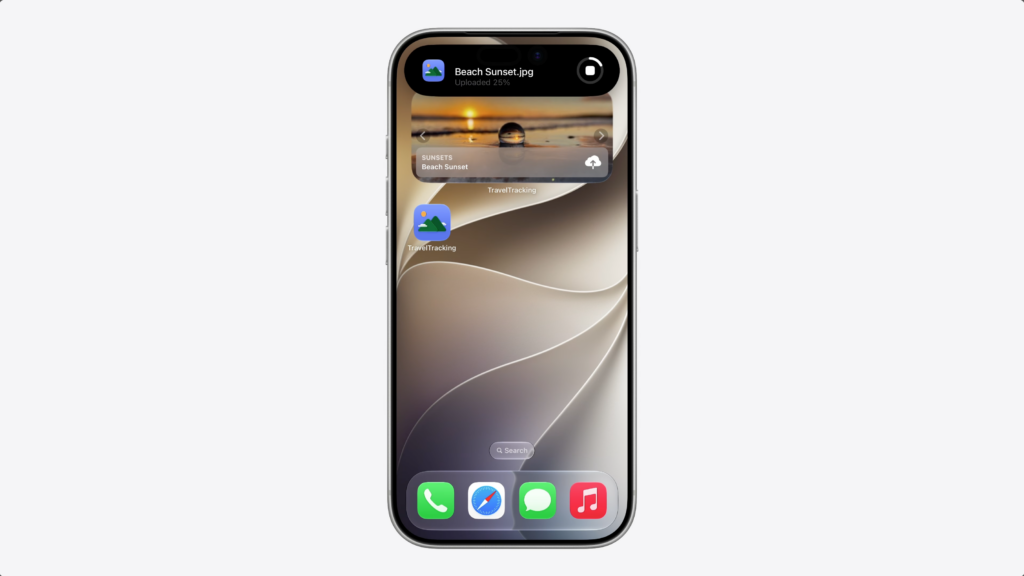
…I wanted to let people share their travel photos – uploading them to a shared album without opening the app.
So I created an upload intent and added a button to my widget to trigger it.
But with large photos, the upload takes time – and the intent kept failing because it couldn’t finish within the 30-second limit.
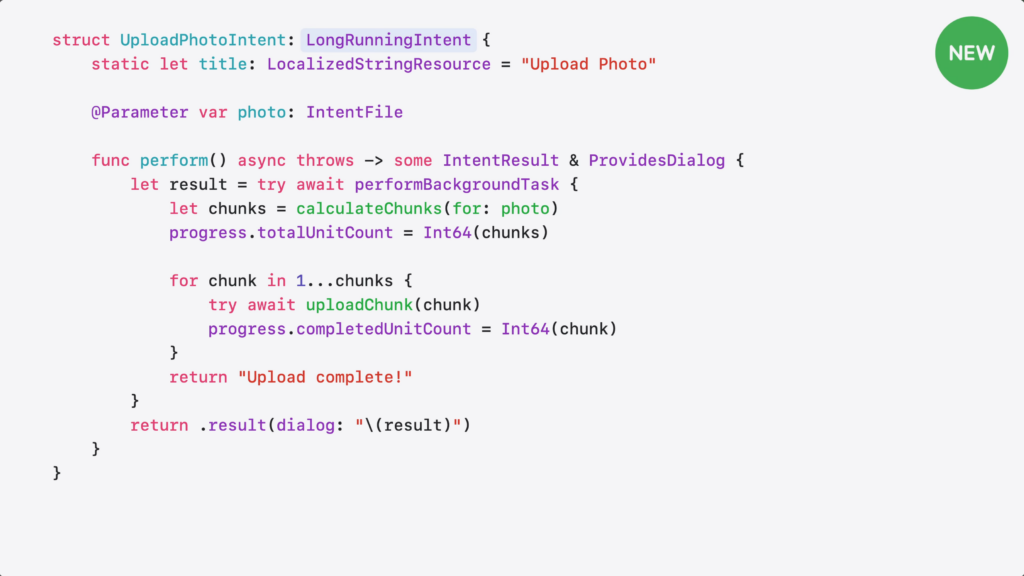
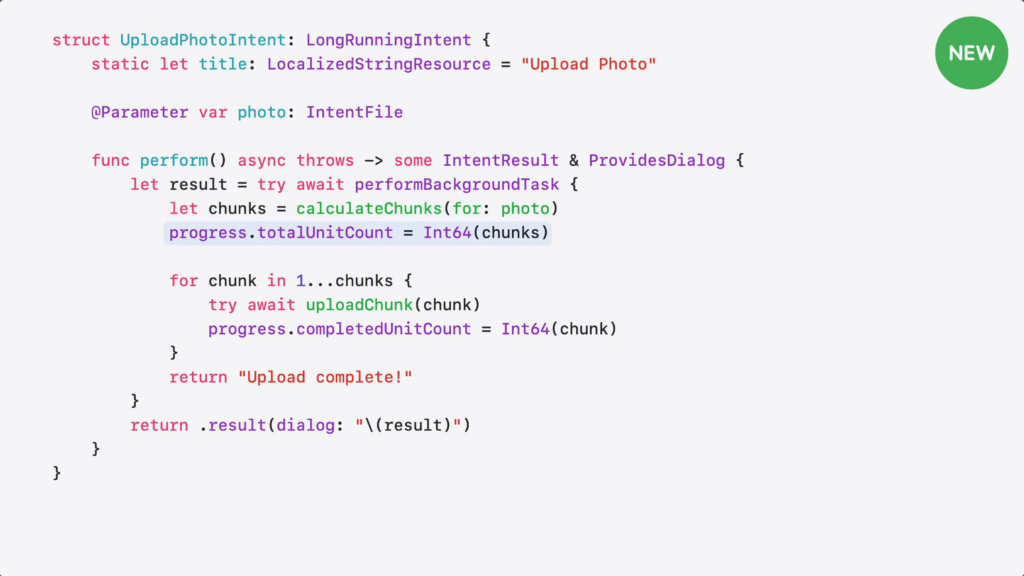
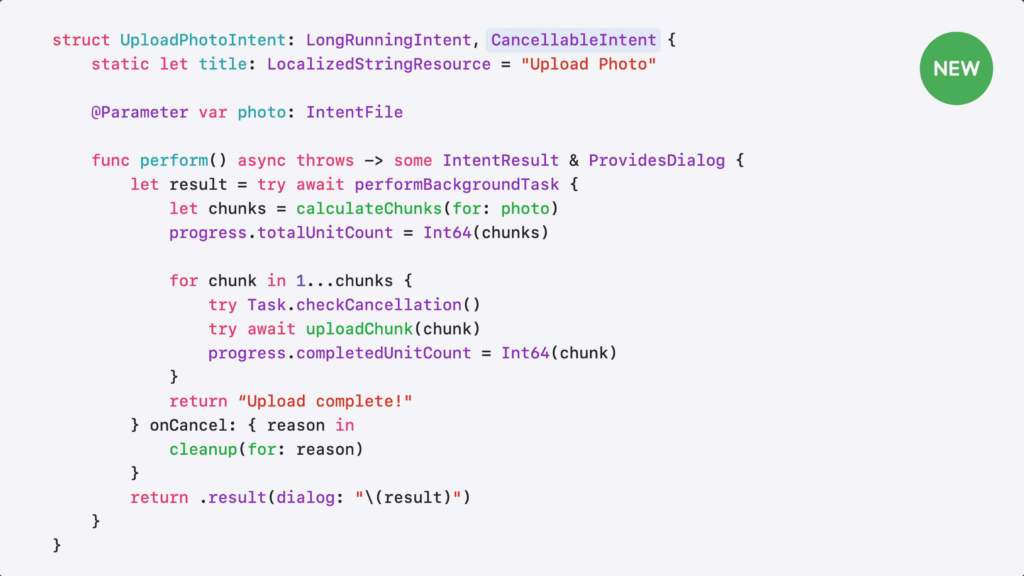
LongRunningIntent fixes this. It lets your intent run beyond the 30-second limit – and manages the background task lifecycle of your app.
And as your intent runs, progress updates appear automatically as a Live Activity.
Now, let’s check out the code.
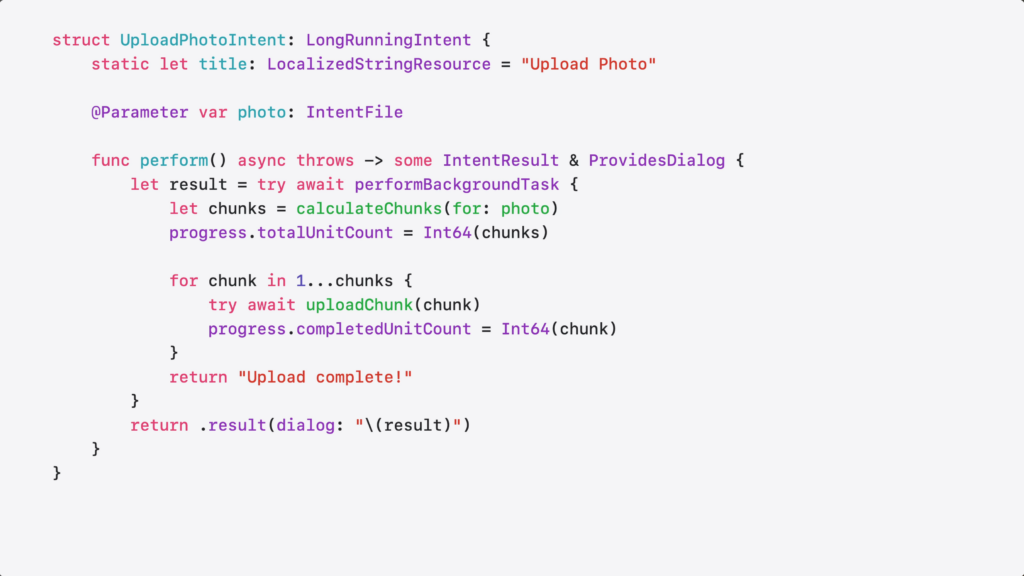
Here’s the intent I wrote to upload my photos.
I’m conforming to LongRunningIntent.
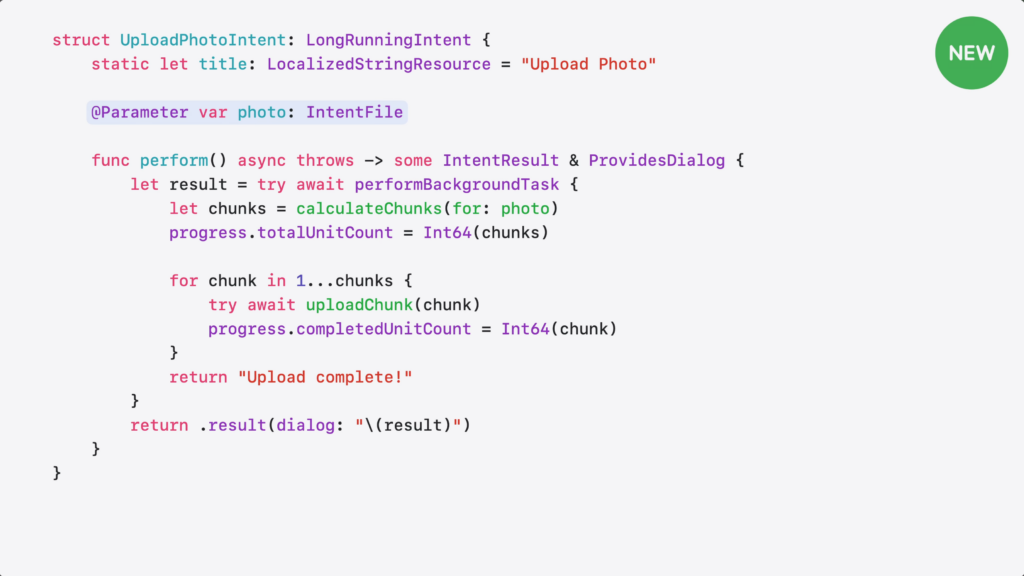
I take a photo file as input.
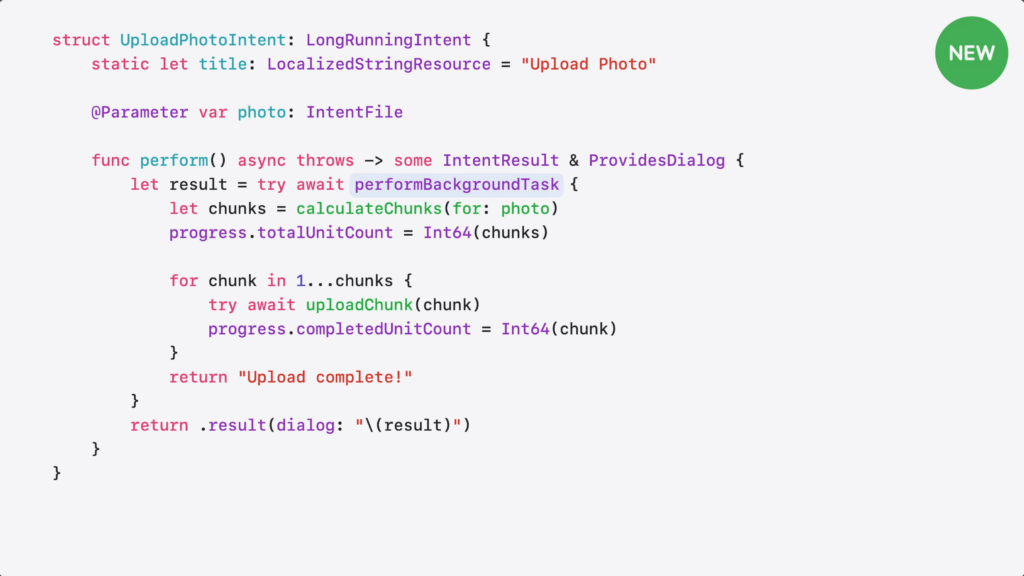
Then, I wrap my work in performBackgroundTask for extended execution.
LongRunnningIntent requires the intent to report progress, so the system knows it’s still working and hasn’t stalled. And because it builds on ProgressReportingIntent, I get a built-in progress object to track my work.
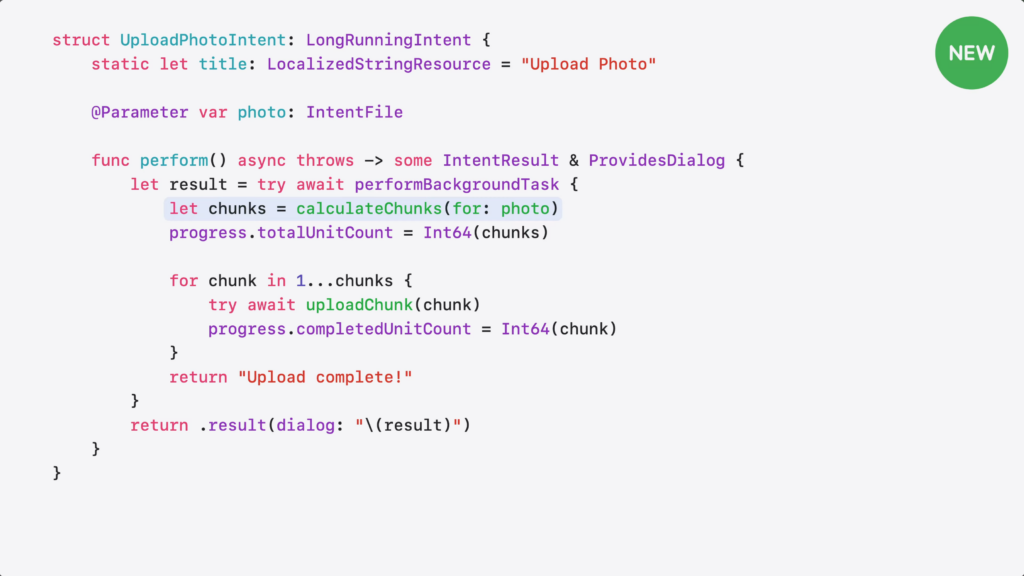
I calculate the number of chunks for the file…
…and set the total count.
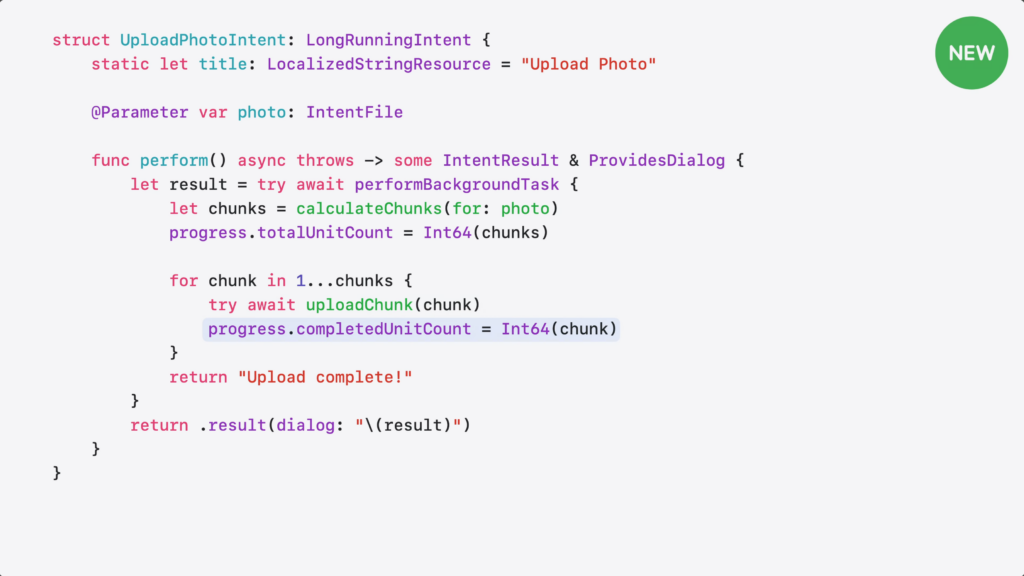
Then, upload each chunk…
…and update the progress as I go.
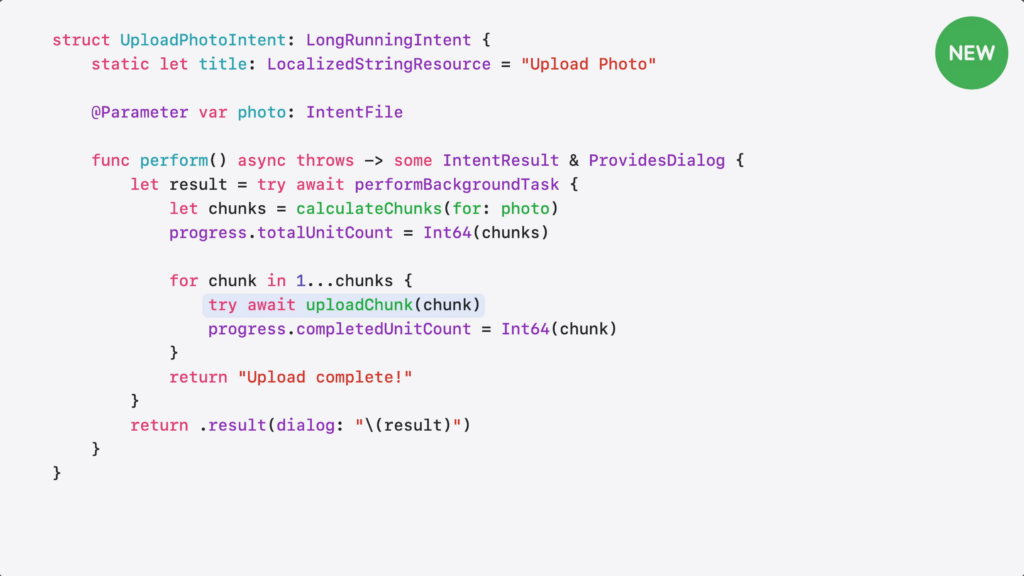
Here’s what happens when my intent runs. It can run longer and there’s a stop button right on the Live Activity, so the person can cancel it at anytime.
Though, it’d be great if my intent got a heads-up before being stopped.
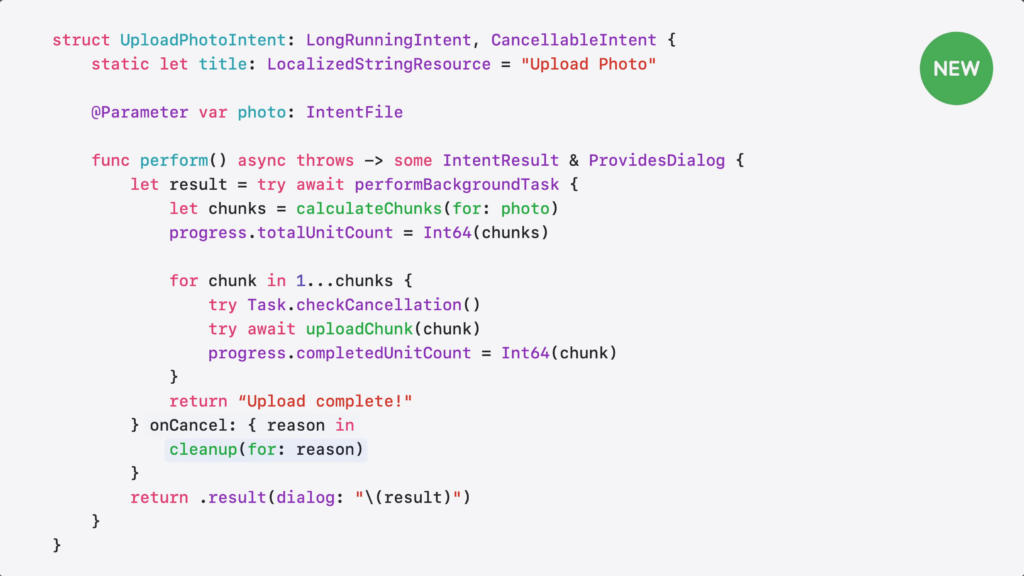
CancellableIntent lets your intent clean up gracefully when cancelled – whether the person tapped cancel, the system timed out, or needed to reclaim resources.
Here’s how I can add cancellation support.
I add CancellableIntent…
…and implement the onCancel handler. When cancellation reason happens, handler gives me the reason…
…and I can use it to clean up partial uploads or cancel in-flight requests.
LongRunningIntent also supports background GPU access on supported devices for tasks like photo processing or on-device inference. Just make sure to add GPU access to your app’s entitlement.
As tasks being handled by App Intents become more and more complex, LongRunningIntent will be helpful in making things run smoothly for developers and users. Plus, it’s especially helpful for agents to finish their responses – like Codex for iOS’ release today.
Cursor is now available as a native iOS app in public beta, so you can build from anywhere.
Until now, developers have worked around the limits of their local machines, keeping laptops half-open and caffeinated everywhere they go.
With Cursor for iOS, you can launch always-on agents in the cloud, or control agents running on your computer from your phone. Kick them off when ideas strike, get notified when work is ready for review, and merge PRs on the go.
Whether your agents are running on your machine or in the cloud, you can move work forward from wherever you are.
App Intents is a framework that lets you express your app’s actions and content to other parts of the system in ways that feels natural and deeply integrated.
From Siri and the Shortcuts app, to Spotlight and Widget, App Intents is the engine behind some of the most delightful experiences on the Apple platform.
And, is now a key pillar of Apple Intelligence.
In our 2027 releases, driven by your feature requests, we’re bringing more control, more flexibility, and a significantly smoother developer experience.
Explaining what App Intents even is to potential clients has always been a challenge, because it’s much more than Shortcuts (which I’m more heavily associated with) – always helpful to have clear language from Apple to use.
Level up your App Intents adoption with advanced features to make it faster, more flexible, and more relevant. Find out how ValueRepresentation and RelevantEntities make your content more discoverable and allow it to travel across apps, EntityCollection improves performance, and SyncableEntity let you scale across devices. Explore richer parameter types including union values and long-running intents that handle cancellation gracefully.
0:00 – Introduction The 2027 App Intents updates — more control, flexibility, and a smoother developer experience across Siri, Shortcuts, Spotlight, Widgets, and Apple Intelligence. Three areas: entity enhancements, richer parameters, and intent execution, built on the Landmarks Travel Tracking sample.
2:40 – Share entities across apps with ValueRepresentation Beyond Transferable’s File and Data representations, the new ValueRepresentation shares structured types the system understands, for example exporting a landmark as a PlaceDescriptor (GeoToolbox) so it flows to Maps for directions. Use a key-path if the entity already has the property.
3:45 – Register relevant entities with RelevantEntities Spotlight indexing and interaction donation can’t surface never-seen, never-used content. RelevantEntities lets you suggest entities with a context (such as running playlists when a workout starts) via updateEntities, and remove them by context, by entity, or entirely.
7:05 – Handle entities efficiently with EntityCollection Resolving every entity before an intent runs is costly at scale (tagging thousands of photos). EntityCollection passes just identifiers to perform() without full resolution, a one-line parameter-type change that made tagging 1000 photos nearly instant.
8:55 – Use entities across devices with SyncableEntity Siri conversations now continue across devices, but local IDs differ per device. SyncableEntity declares a stable ID (server UUID or CloudKit record ID); when you only have local IDs, SyncableEntityIdentifier pairs a local and a stable ID so on-device code uses local and the system uses stable.
11:01 – Richer parameter types Declaring a @Parameter gives a native picker, Siri understanding, and localization for free, now extended to more native types like Duration (no custom time pickers) and PersonNameComponents, working across Siri, Shortcuts, and Widgets.
12:38 – Union value parameters A @UnionValue enum lets one parameter accept multiple types, for example a single widget showing photos from either a landmark collection or a photo album. The macro generates type info, case metadata, and picker support (typeDisplayRepresentation, caseDisplayRepresentations), and works everywhere including Shortcuts.
13:26 – Extend execution with LongRunningIntent Intents normally have 30 seconds; LongRunningIntent runs beyond it, manages the background task lifecycle, and shows progress as a Live Activity. Wrap work in performBackgroundTask and report progress (it builds on ProgressReportingIntent). Add CancellableIntent’s onCancel to clean up gracefully; it also supports background GPU access.
15:27 – Target the right process with ExecutionTargets When intents live in a shared package linked by the app and extensions, the system picks a process by heuristics, not always right (for example a widget favorite button needs the writing main app). ExecutionTargets overrides this to target the main app, an App Intents extension, a WidgetKit extension, or any combination.
17:14 – Next steps Add ValueRepresentation to carry structured data, register relevant content, adopt EntityCollection for large entity sets, and add LongRunningIntent for work over 30 seconds. See “Code-along: Make your app available to Siri” and “Validate your App Intents adoption with AppIntentsTesting.”
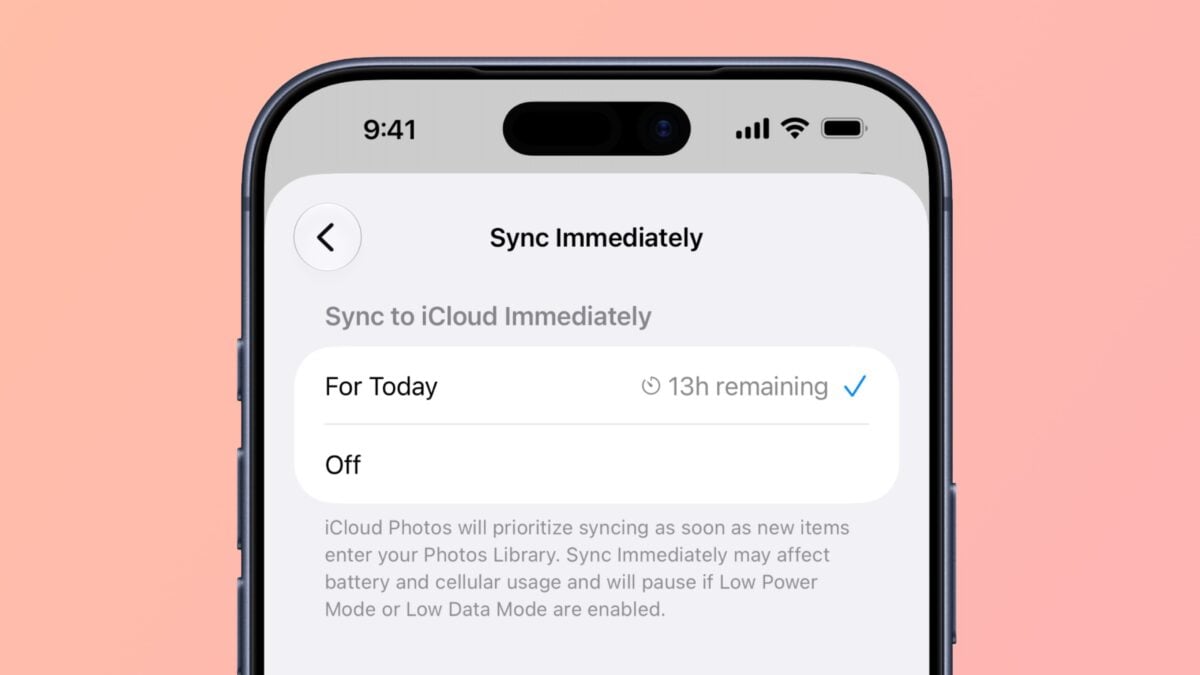
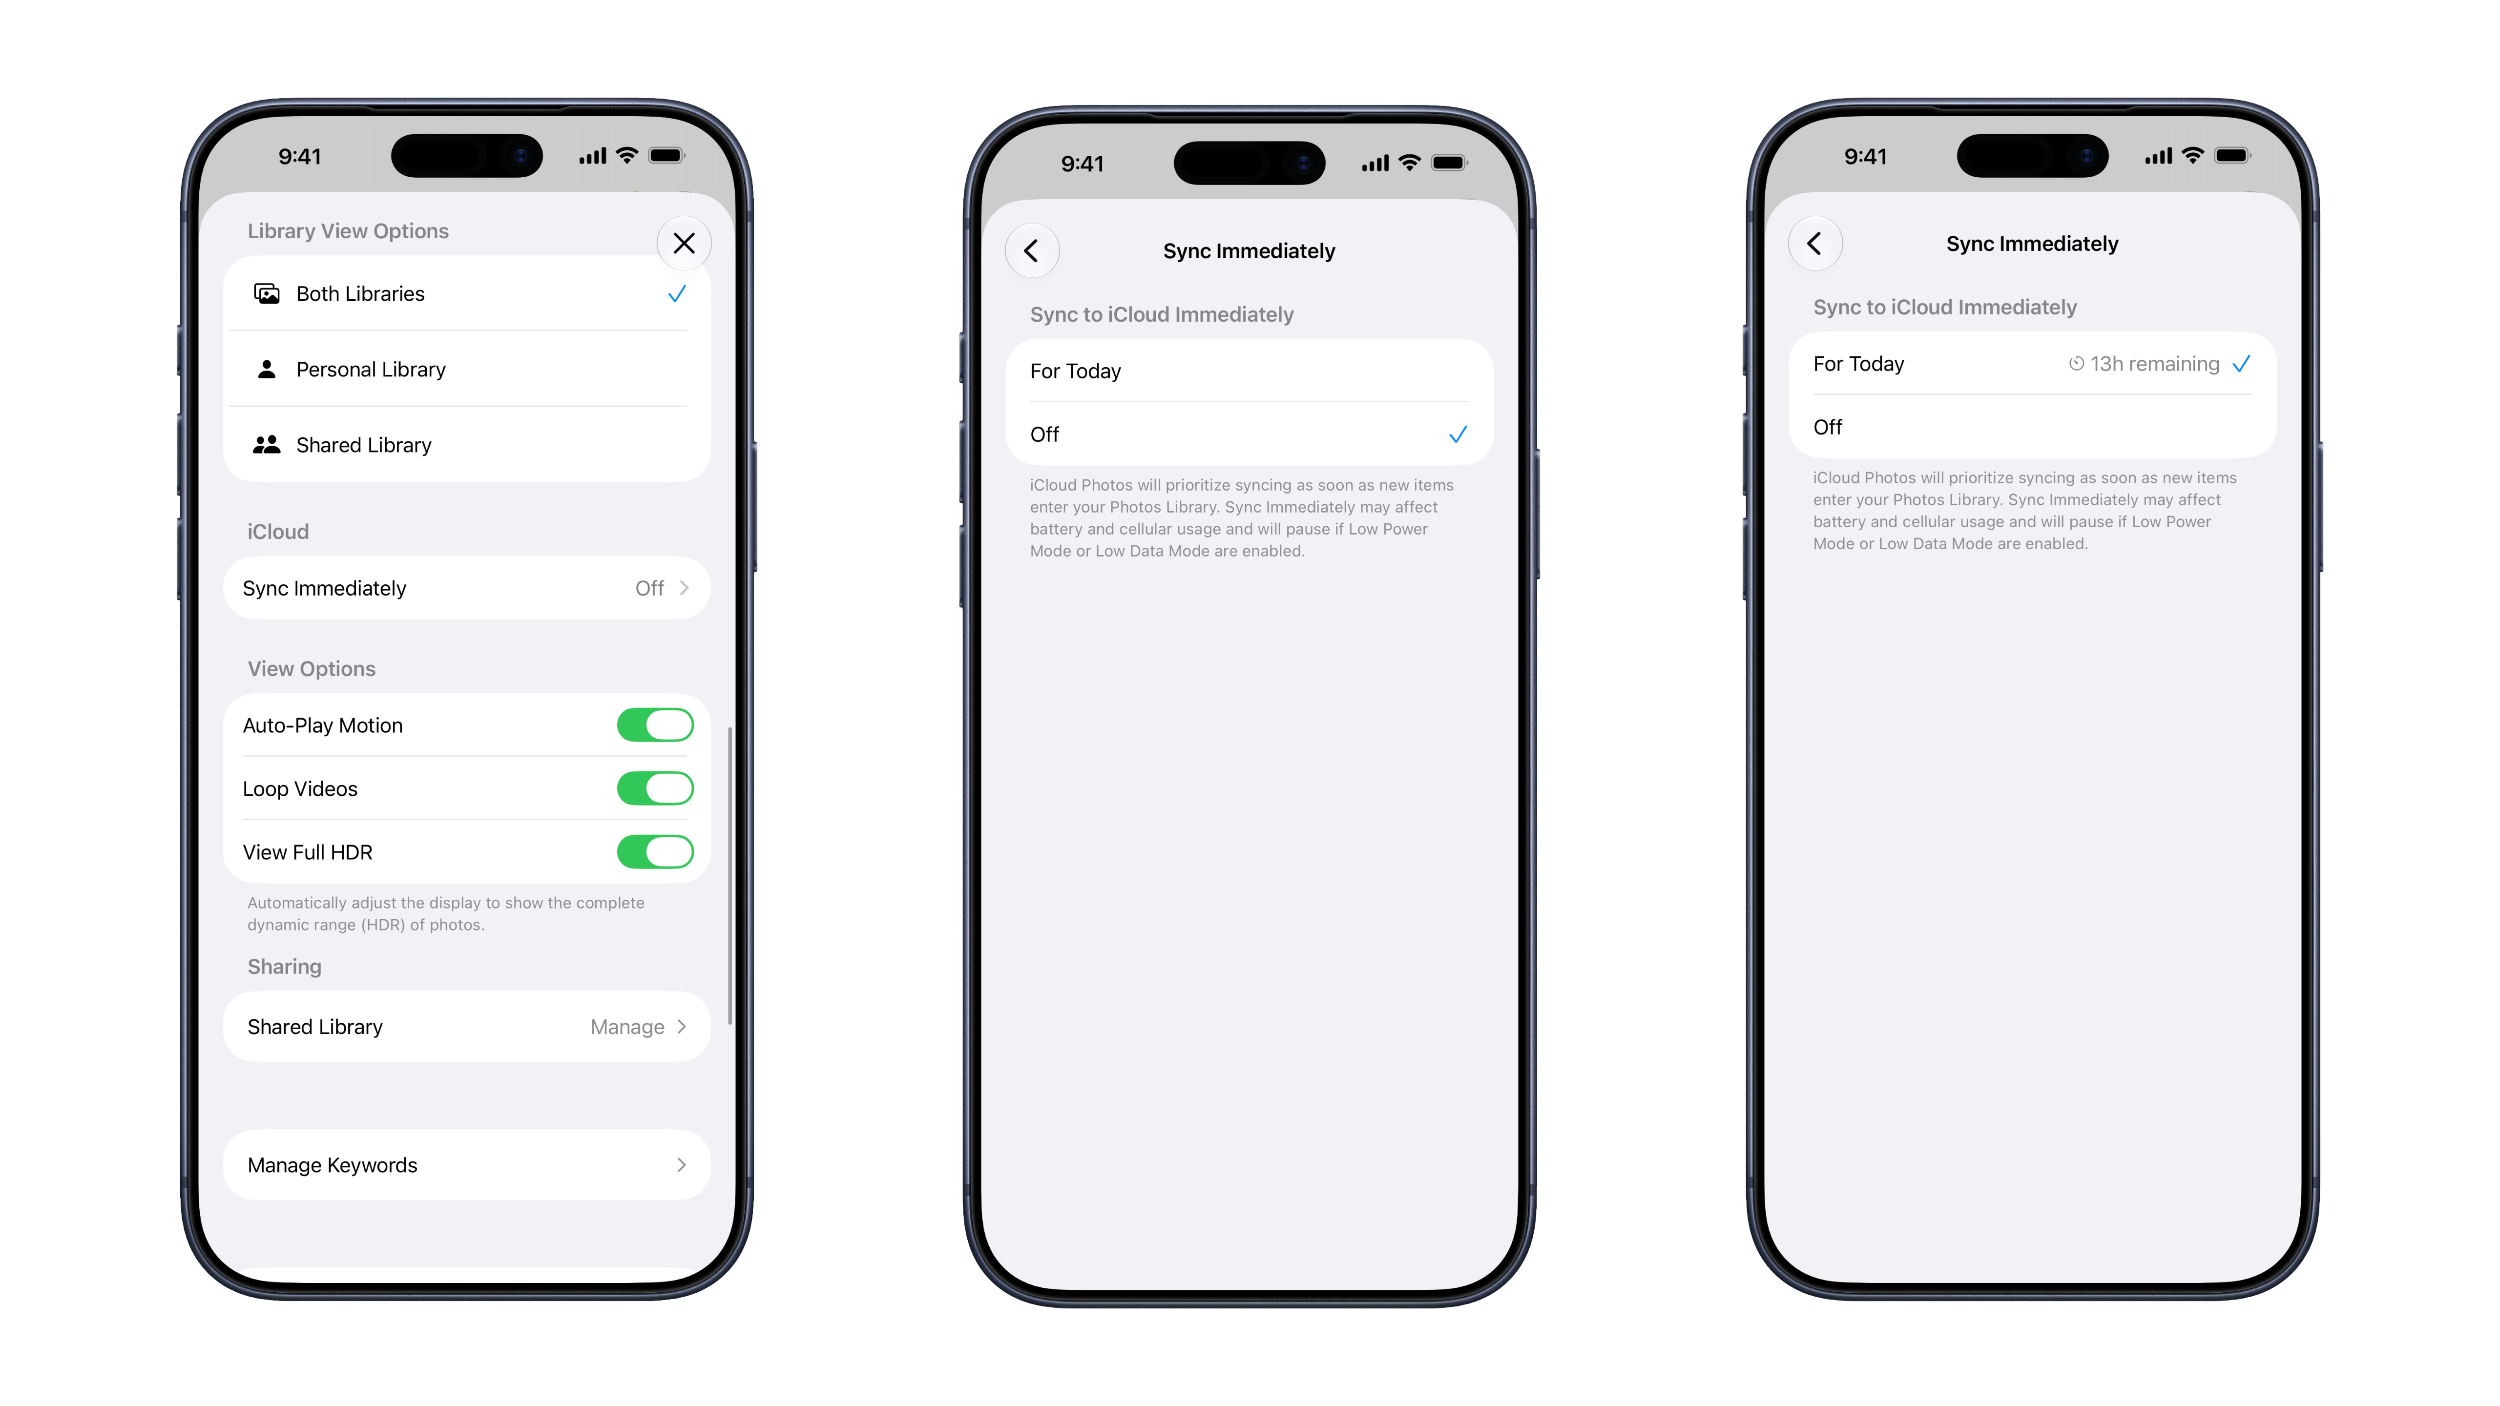
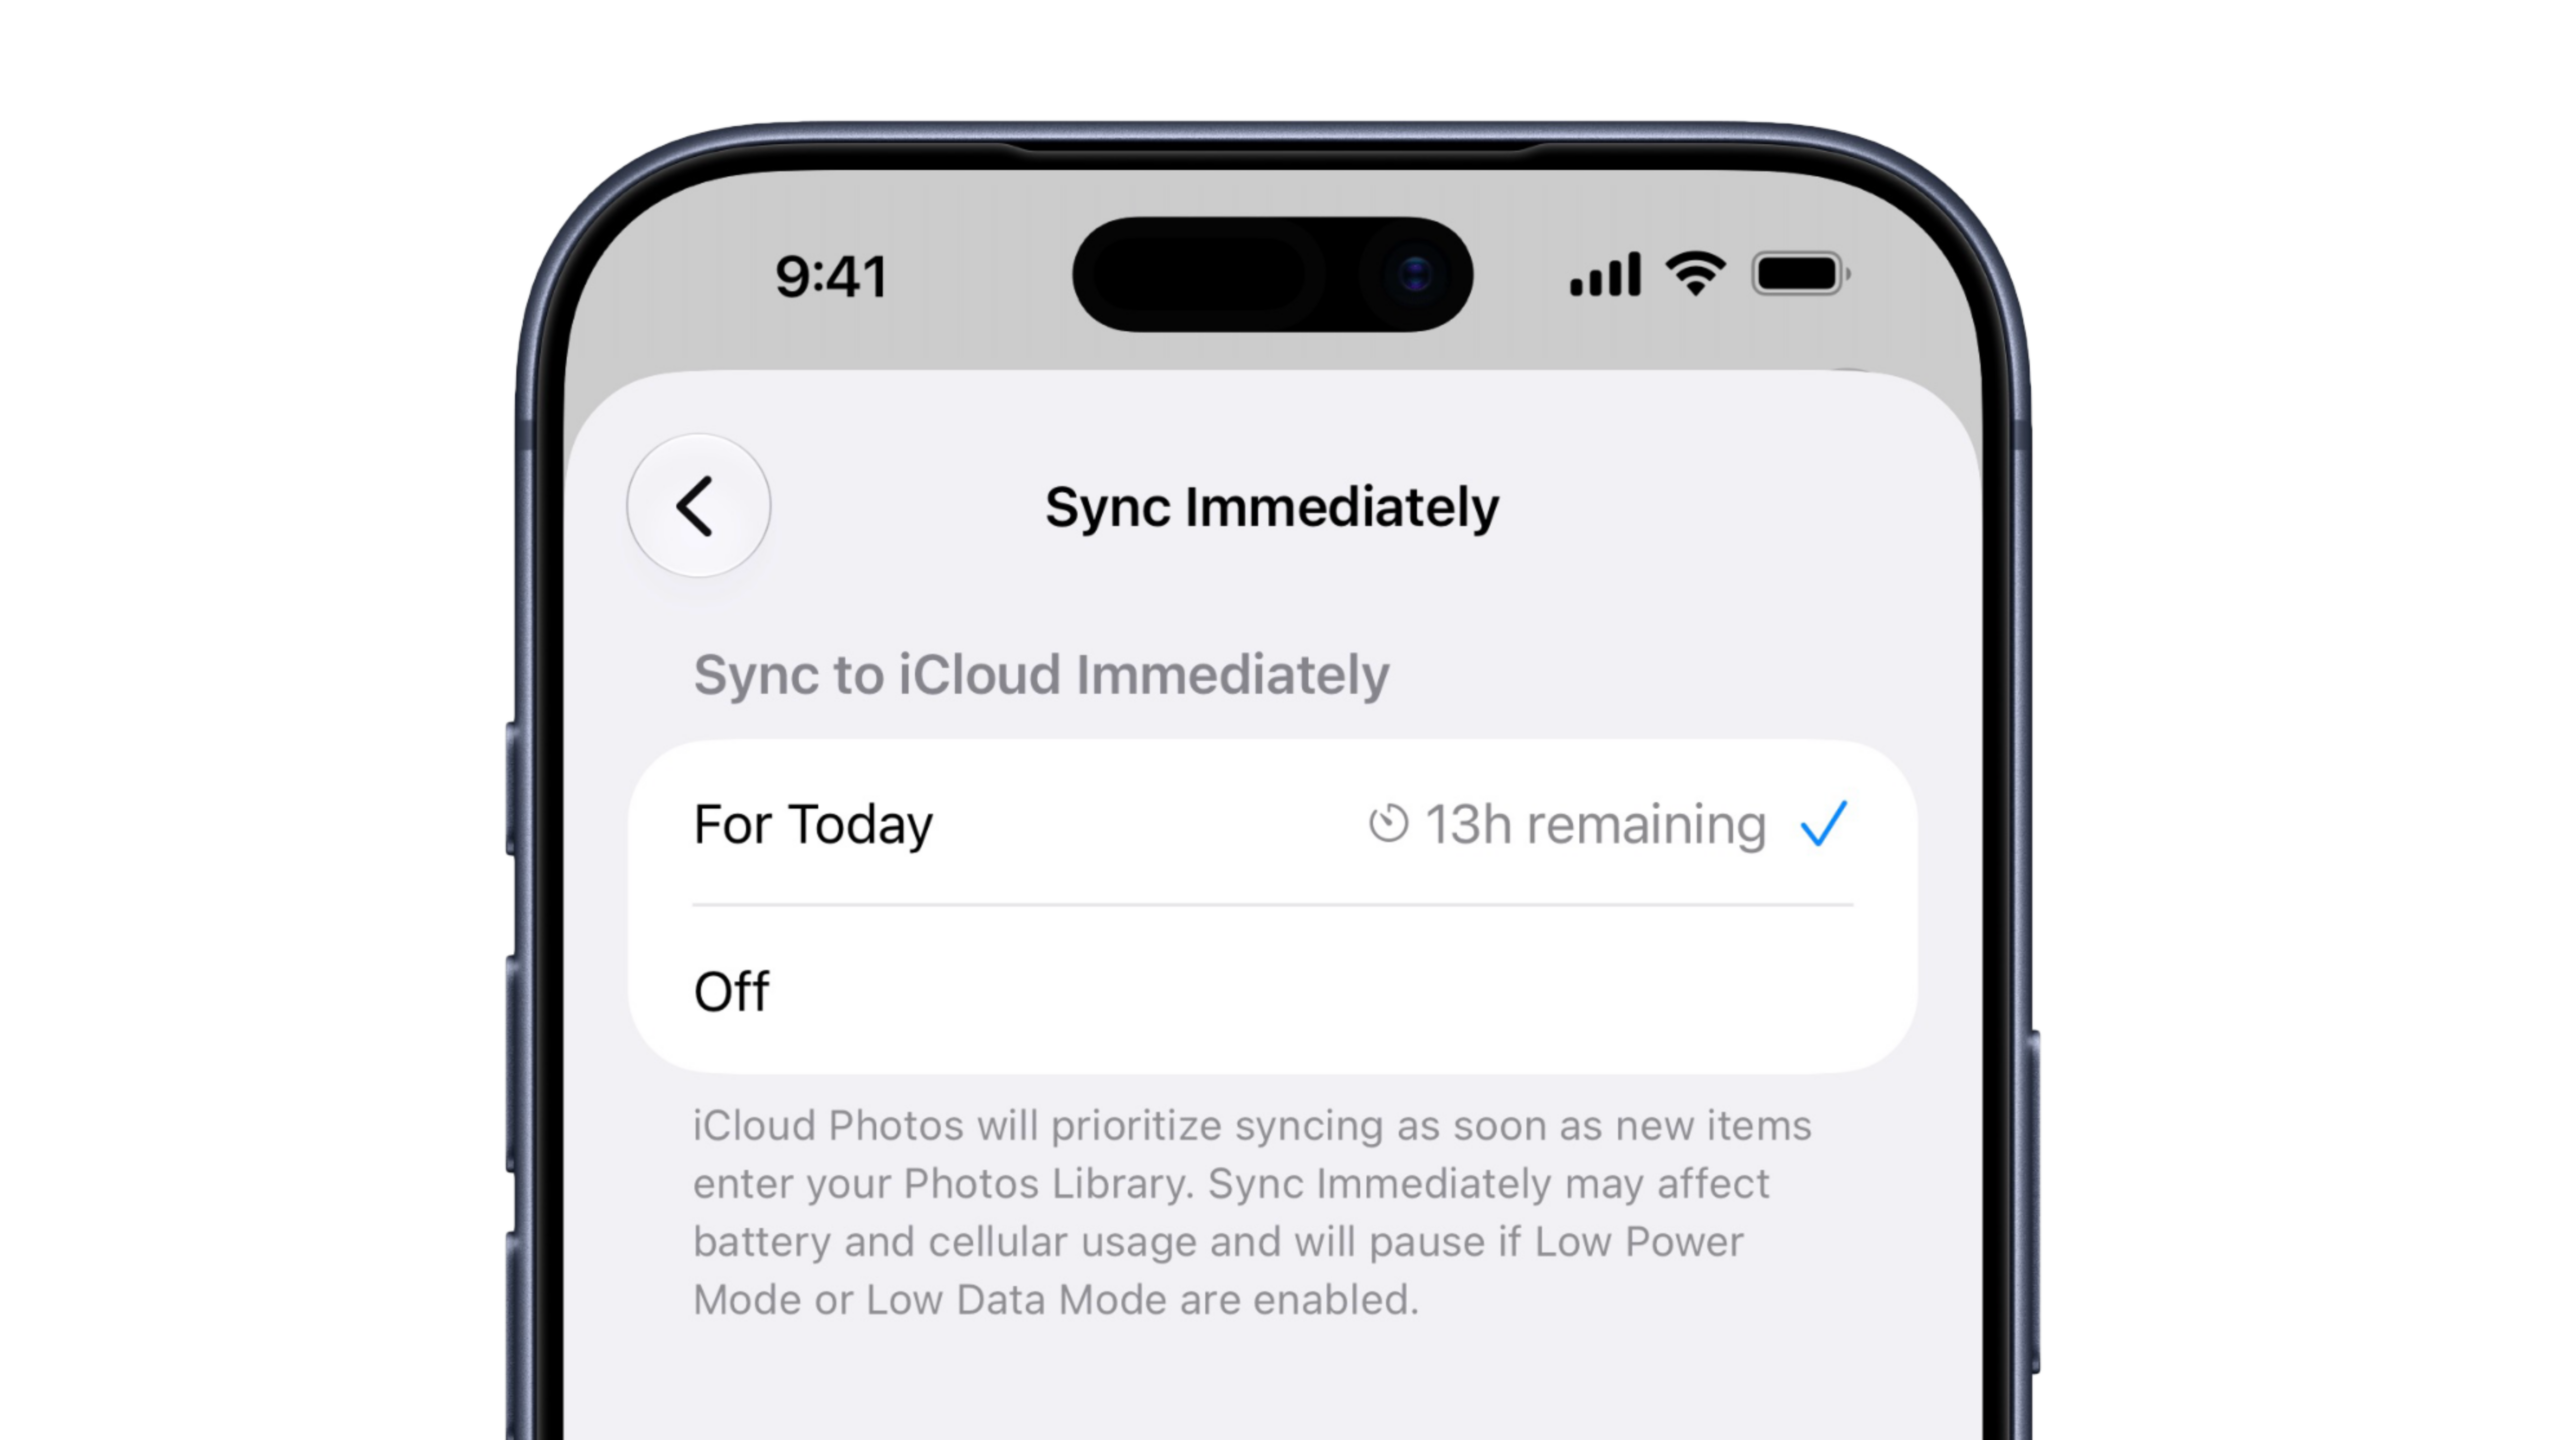
In iOS 27, Apple has added a new “Sync Immediately” option in the Photos app that allows you to bypass the normal process of waiting to sync layer on Wi-Fi or while charging – for the rest of the day.
New “Sync Immediately” button in Photos in iOS 27
Located in Photos > Profile > iCloud, the setting label describes the feature as follows:
iCloud Photos will prioritize syncing as soon as new items enter your Photos Library. Sync Immediately may affect battery and cellular usage and will pause if Low Power Mode or Low Data Mode are enabled.
The option isn’t a toggle, however, but a selection between Off and For Today. When selected, the effect intentionally doesn’t last indefinitely – instead, Apple starts a countdown timer until midnight, showing “[Time] remaining” on the setting until it wears off.
Sync Immediately vs Reasons syncing with iCloud is Paused
Optimizing Battery Power, Optimizing System Performance, or Poor Network Connection
Low Battery
[Device] Needs to Cool Down
This new Sync Immediately setting does appear to override these optimizations as well as low battery, but not overheating – which makes perfect sense (nor Low Data or Low Power modes, as mentioned above).
No More “iCloud Syncing is Paused”
Waiting for Photos to sync is a common complain for photographers, videographers, and bloggers taking screenshots – you’ll often find yourself capturing, then waiting for Photos to sync from your iPhone to your Mac so you can redownload there.
Often times you’d finish your work, get to your main computer, and be presented with “iCloud syncing is paused” and a Sync Now button – rather than having everything already ready to go.
Now, creators can turn on the Photos setting when they start working and make sure everything gets uploaded for the remainder of the current day.
Hey Siri, Sync Immediately
Sync Immediately is a welcome addition to the Photos setup and makes sense for a single-day excursion, so you don’t end up draining your device first thing the next morning or hammering your cell plan while traveling. Plus, when capturing photos, videos, or screenshots from my studio, I’ll set this up so everything syncs while I’m working instead of waiting for it all to move over after I’m already finished.
My last remaining wish would be for Apple to add a Shortcuts action for Photos to Sync Immediately with the For Today option – I’d love to Ask Siri to start syncing when I’m in creator mode, or set up Automations to sync immediately when I get back to my hotel, for example.
The Shortcuts app can be intimidating to casual iPhone users, but with iOS 27, it’s a lot easier to use. With Apple Intelligence integration, shortcuts can be created using natural language, and they’re much more accessible to the average person.
We talked about the fact that the overall keynote was very short compared to the previous one.
It’s hard to imagine them ever having a WWDC keynote that would be less time, but… … …I’m pausing for effect, because that included a lot of really long pauses for the demo.”
[Laughter]
“Because, as you said Joanna, they shot them as though they were on tape – but they were, like, live to tape.”
“And there was no doubt when you were watching – you were just like, ‘Okay, that’s a long pause because that is the real-time demo.’
Which was absolutely a reaction to watch happened to two years ago, and they wanted none of that.
And even as Nilay would say – it is not a joke how many times they said, ‘We want you to go download the software. We want you to go try it. We want you to know that what we showed was real and now we want you to experience it.’
[…] Yeah. But you could see – they were nervous. Even though you knew that this was a pretty canned live demo and that they knew what they were going to ask.
[…]
They weren’t taking requests from us in the audience, but they seemed nervous.
[…]
Even in that moment, that guy seemed nervous. There’s this weird silence.
It’s weird to sit with the silence of Siri.
Such a poetic way to put it – it struck me while watching live in the audience, so much so that I wrote it down so I’d remember to post it here.
Recorded in front of a live audience at The California Theatre in San Jose on Tuesday 9 June 2026, special guests Joanna Stern and Nilay Patel join John Gruber to discuss Apple’s announcements at WWDC 2026.
I’m 10 days late to posting this, but this was a good conversation – I was there live, and the header image for this is an 8x photo I took from the audience.