This afternoon, @kcjokes asked for a shortcut that can play a podcast based on the time of day:
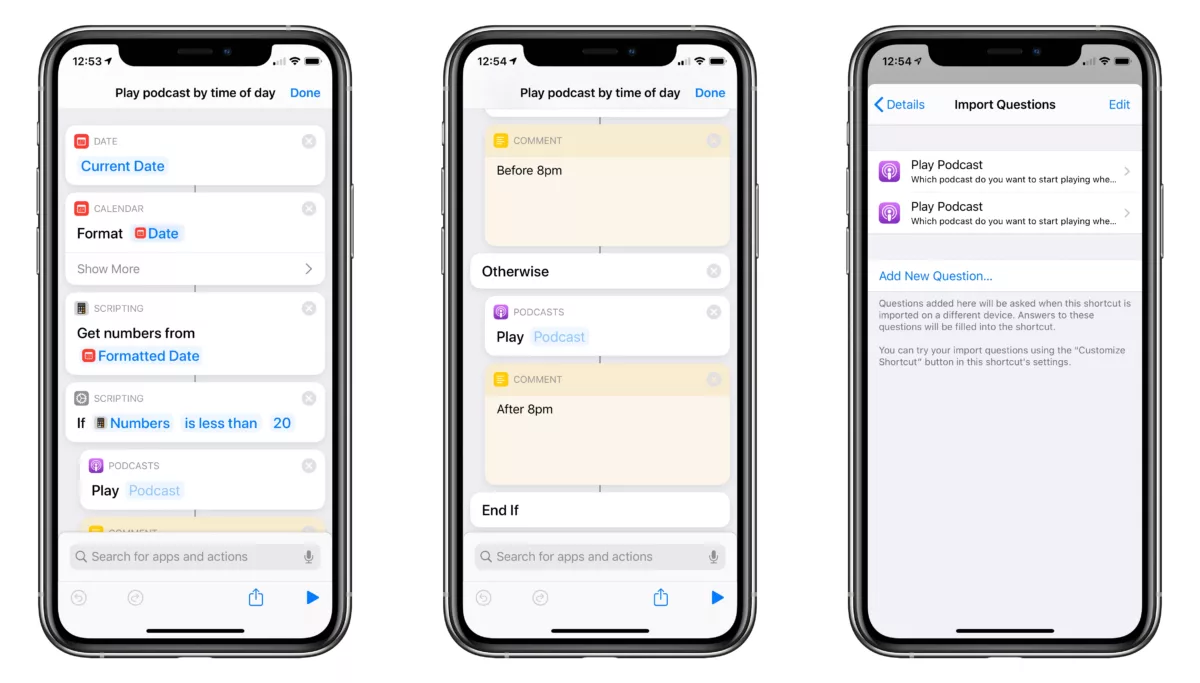
This afternoon, @kcjokes asked for a shortcut that can play a podcast based on the time of day:
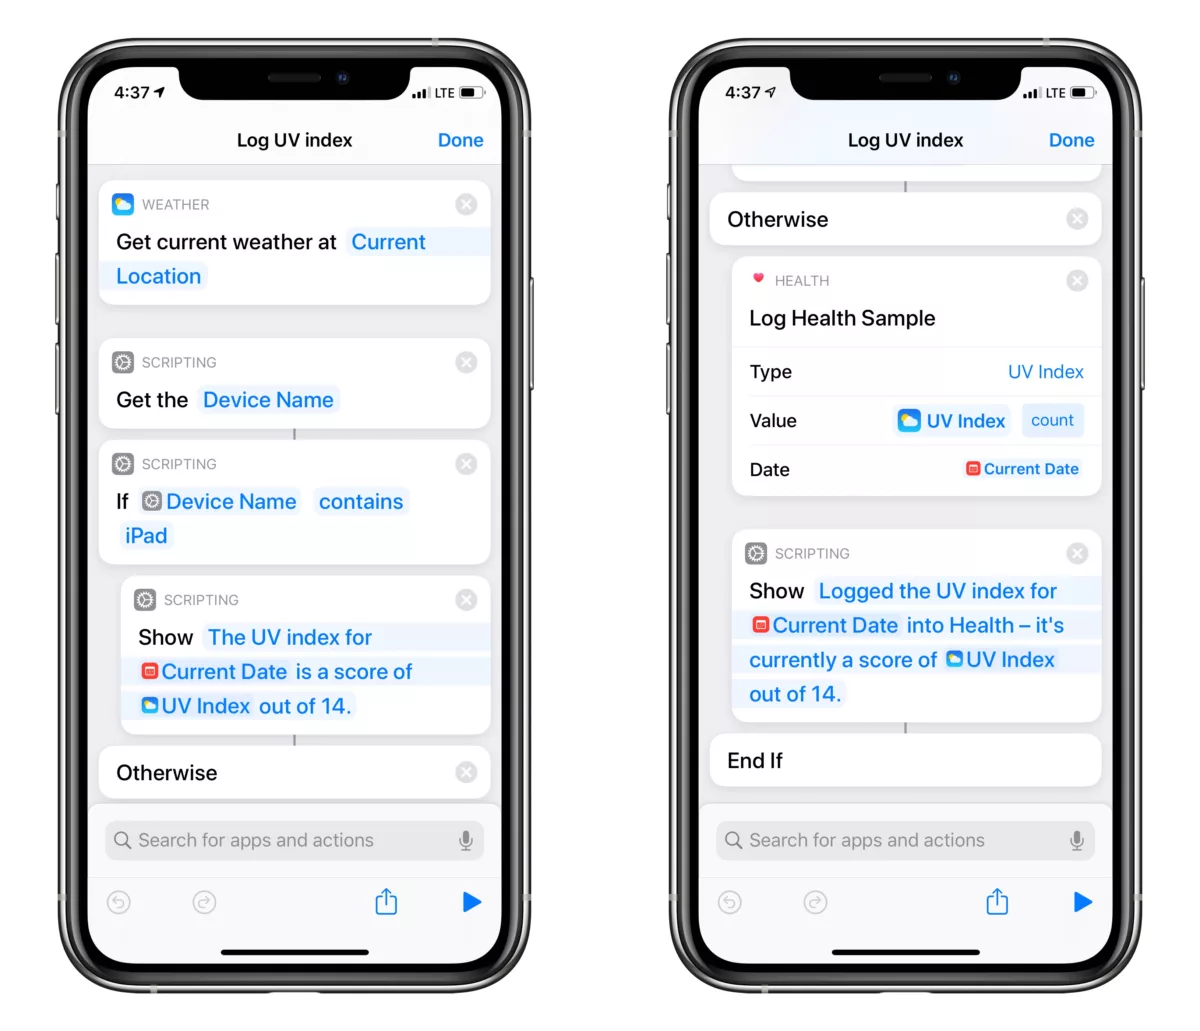
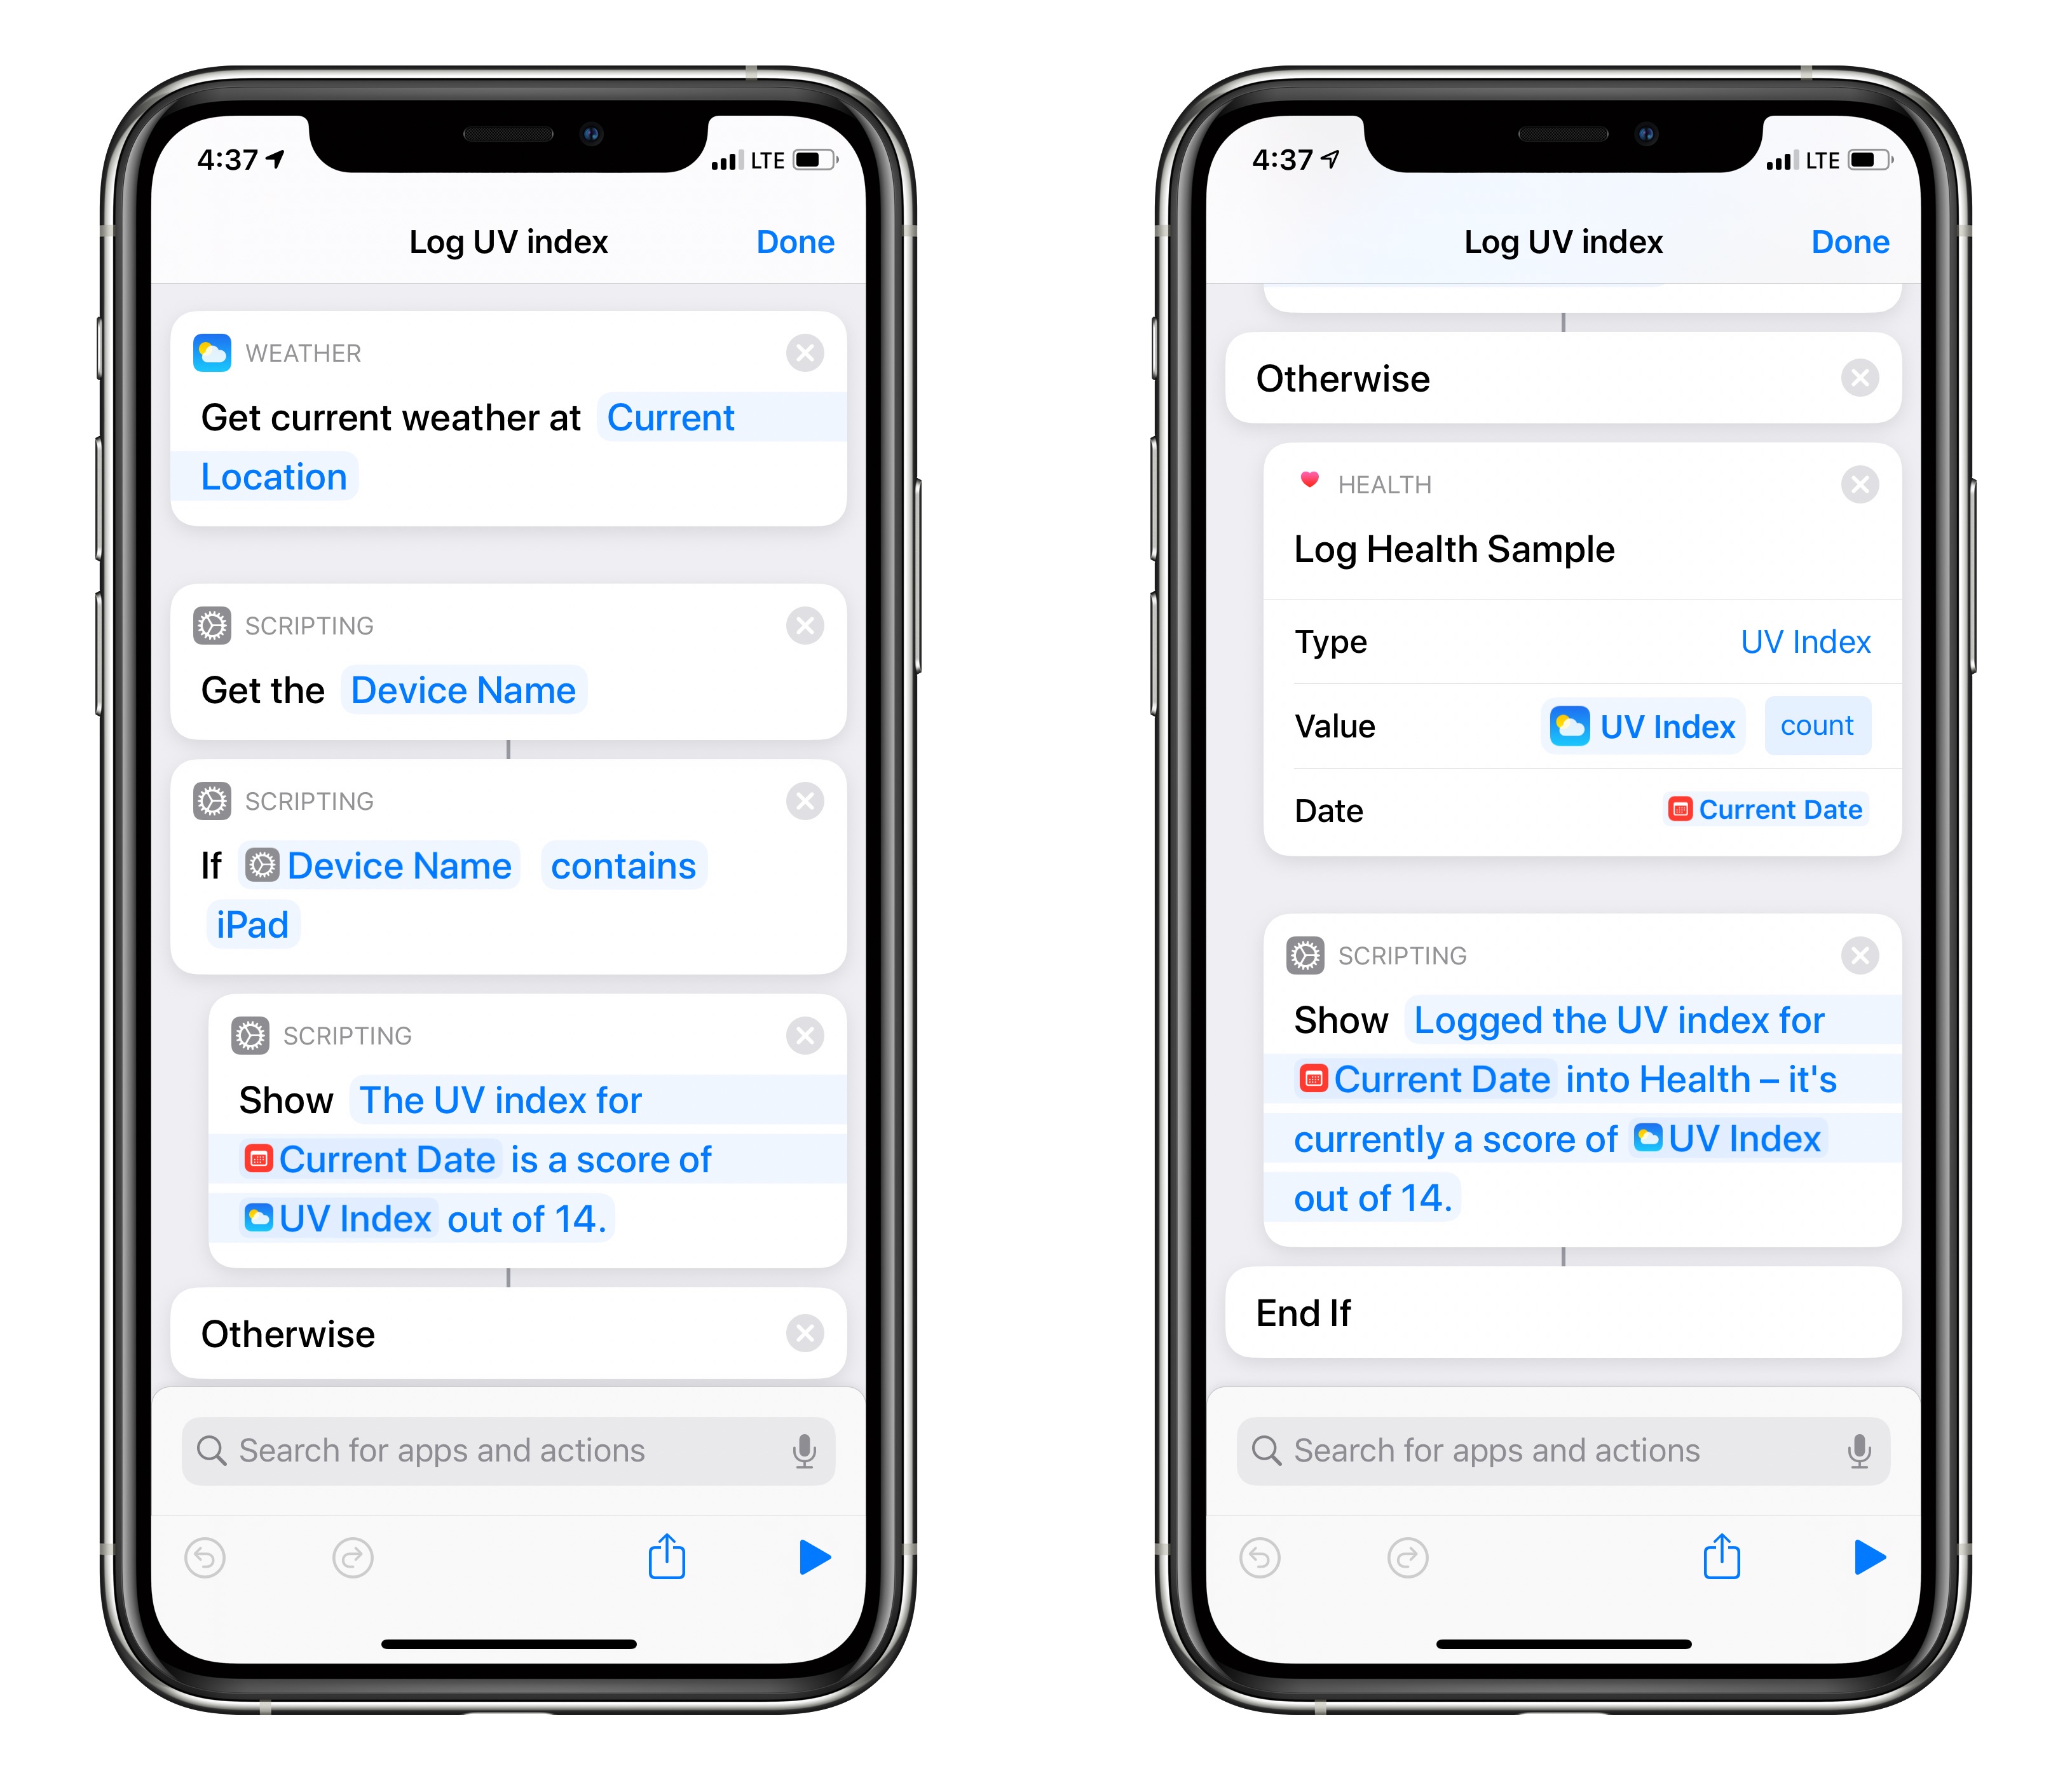
Here’s a Personal Automation for Apple Watch that I’m running automatically at the start of my Walking workouts – Log UV index:
Gets the current weather at the current location and logs the UV index for the hour into the Health app, then displays it or speaks it back when run via Siri.
Includes “Get Device Name” and an “If” action to account for being run on the iPad, which does not have the Health app and would otherwise fail.

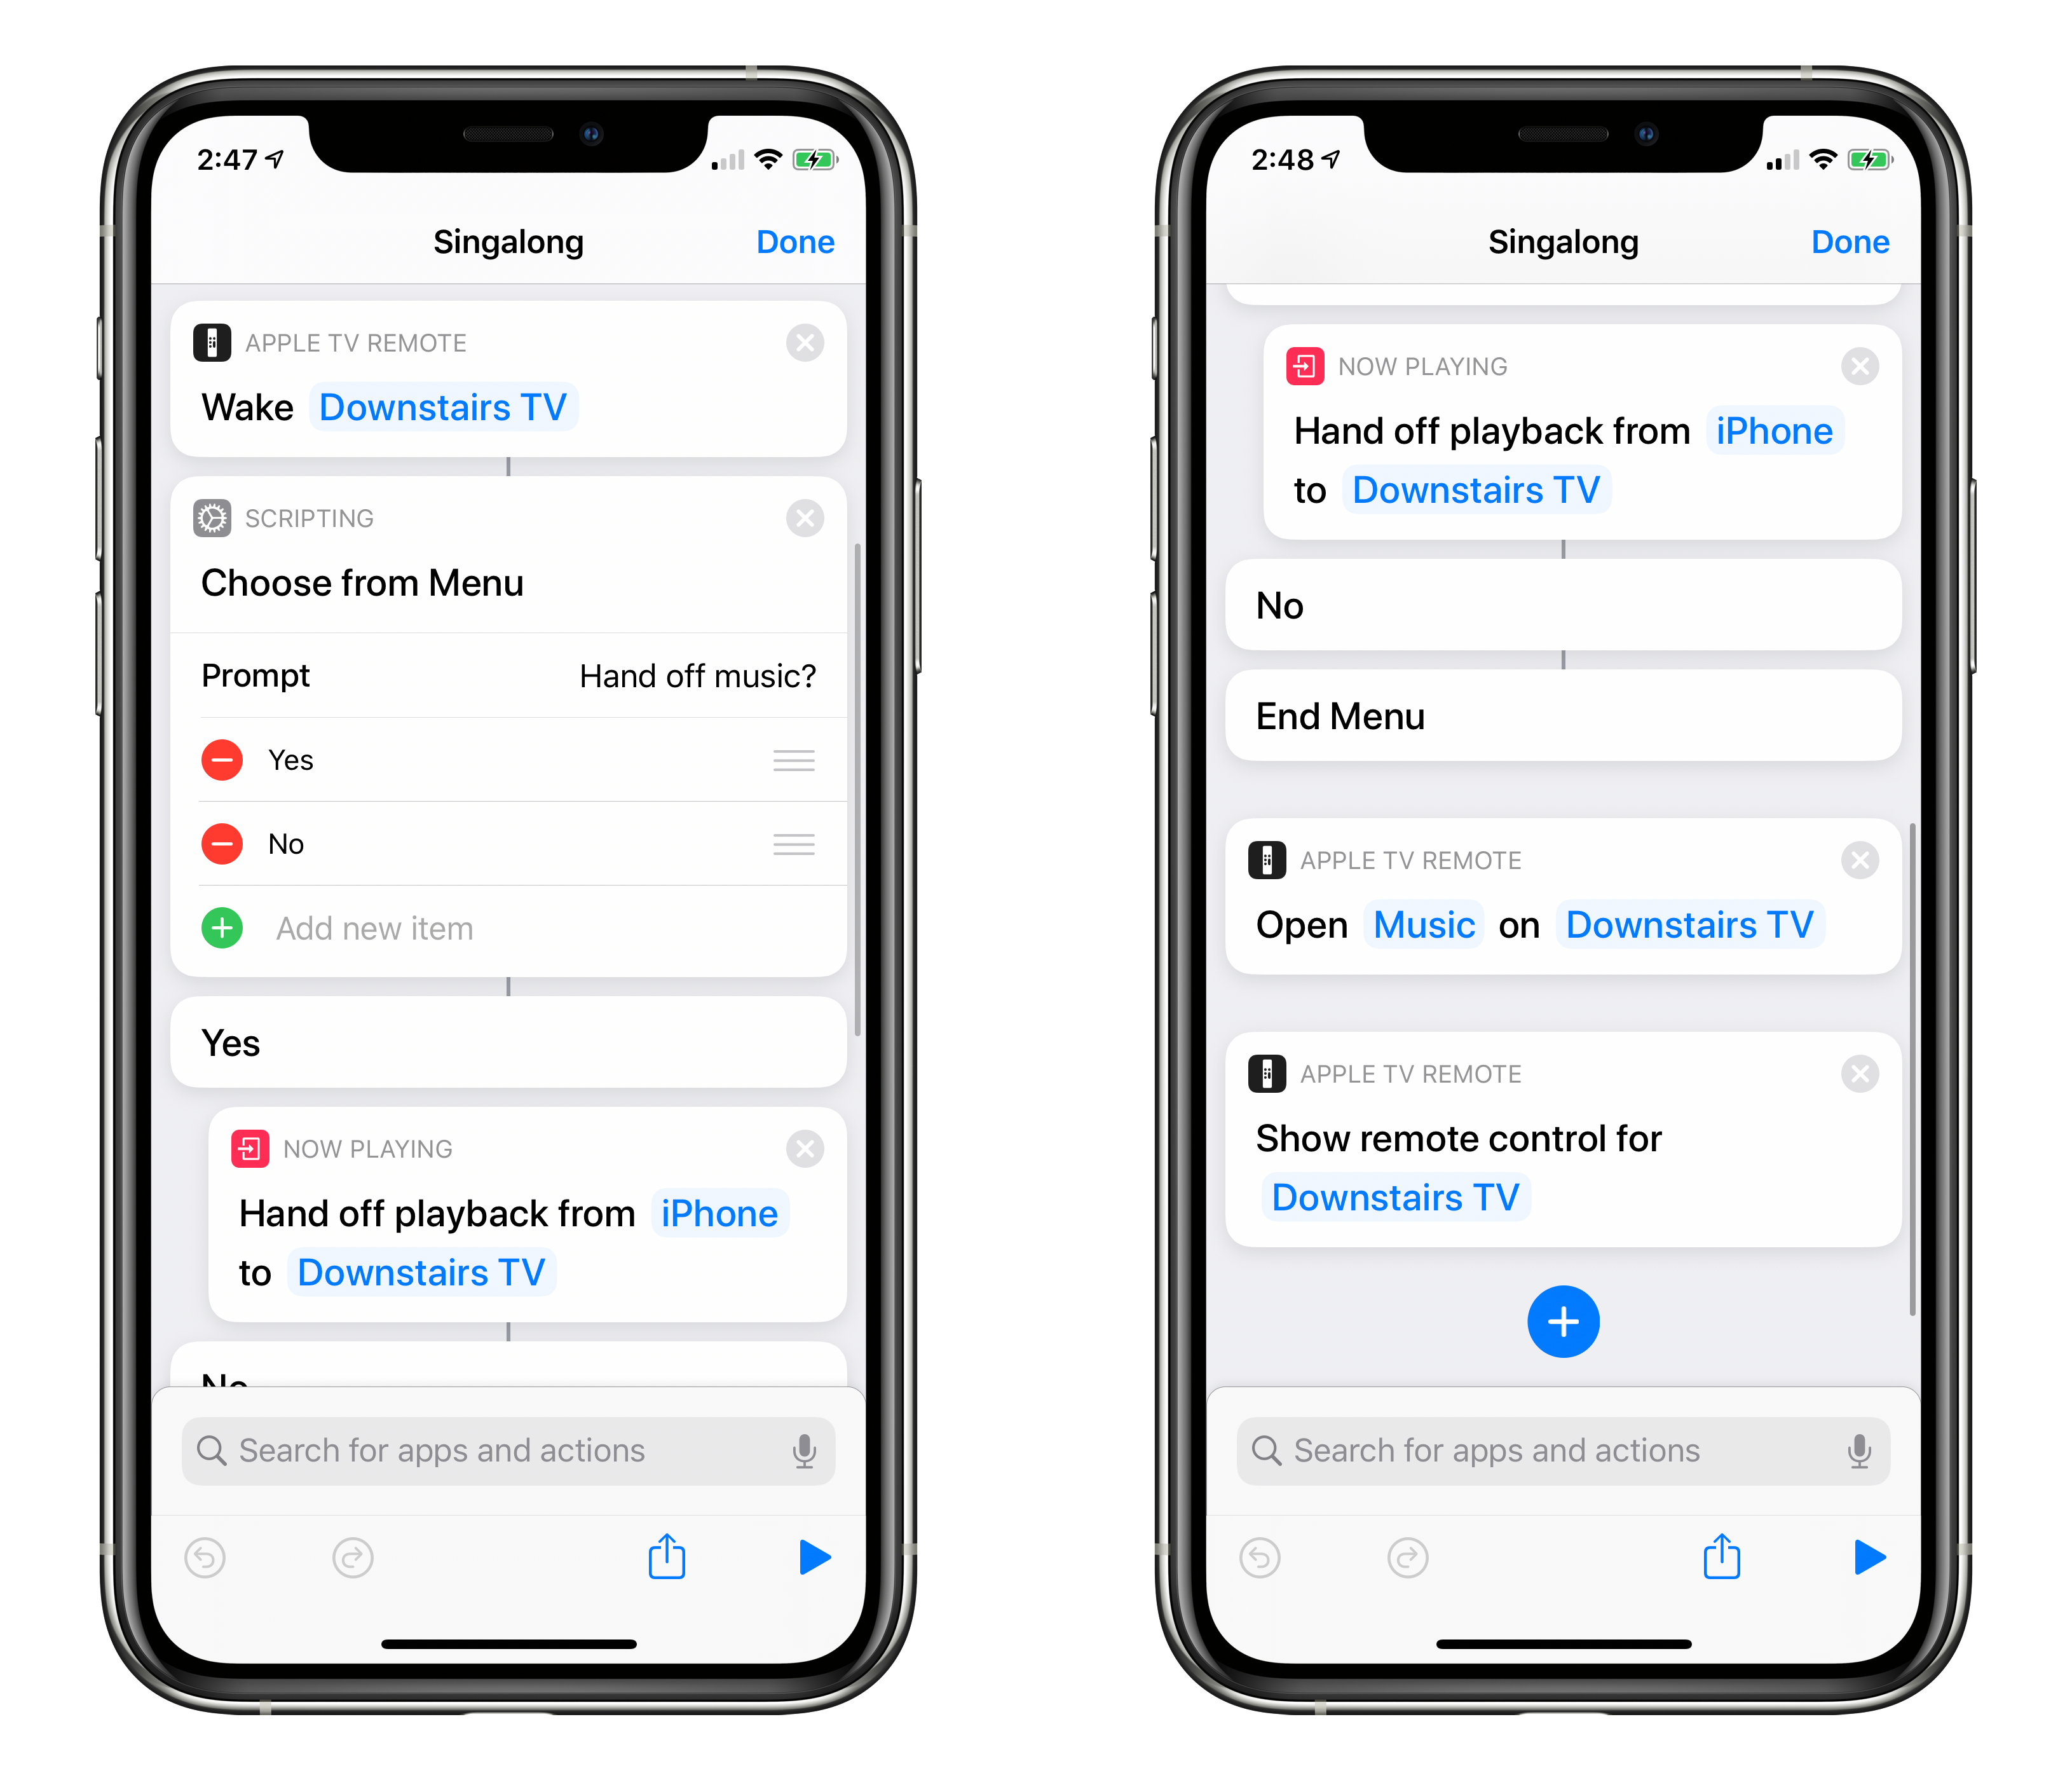
New shortcut Singalong for Apple Music users:
Turns on the Apple TV, asks if you want to Hand Off music to the TV from the current device, then opens the Music app and shows the Remote on the current device.
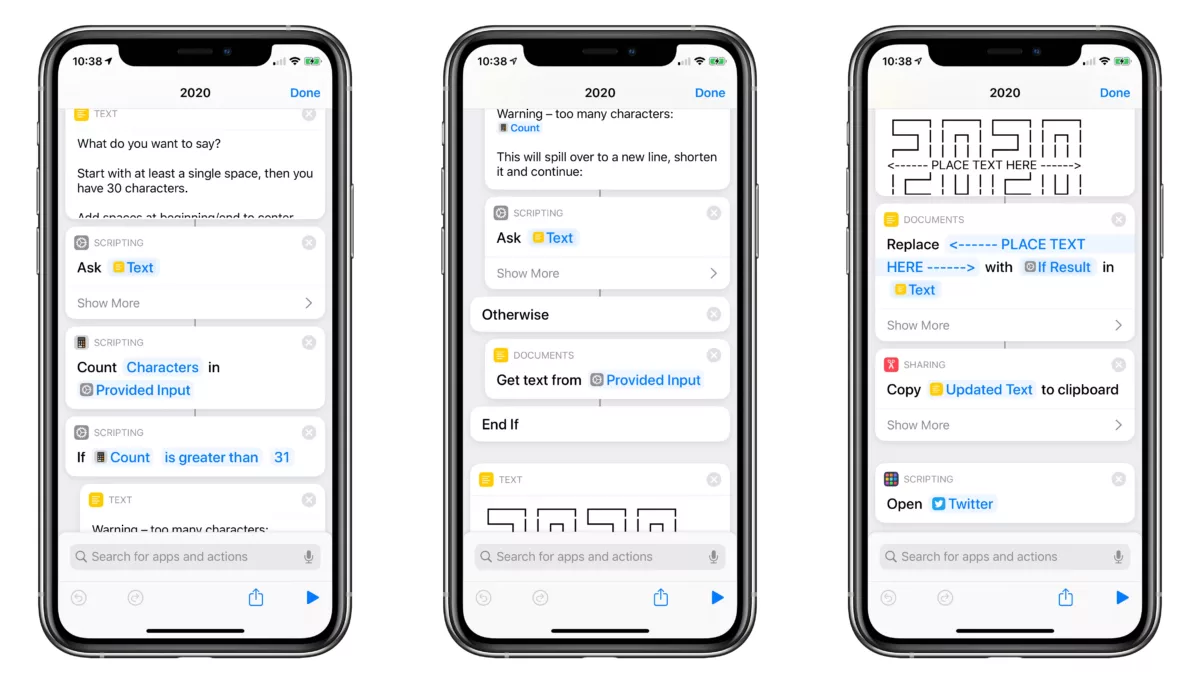
Sometimes you just have to make a meme into a shortcut:
Takes the “2020” meme with a line of text in the middle and uses a find & replace to swap out your own text, then copies it and opens Twitter. Your new input must be less than 30 characters to fit.

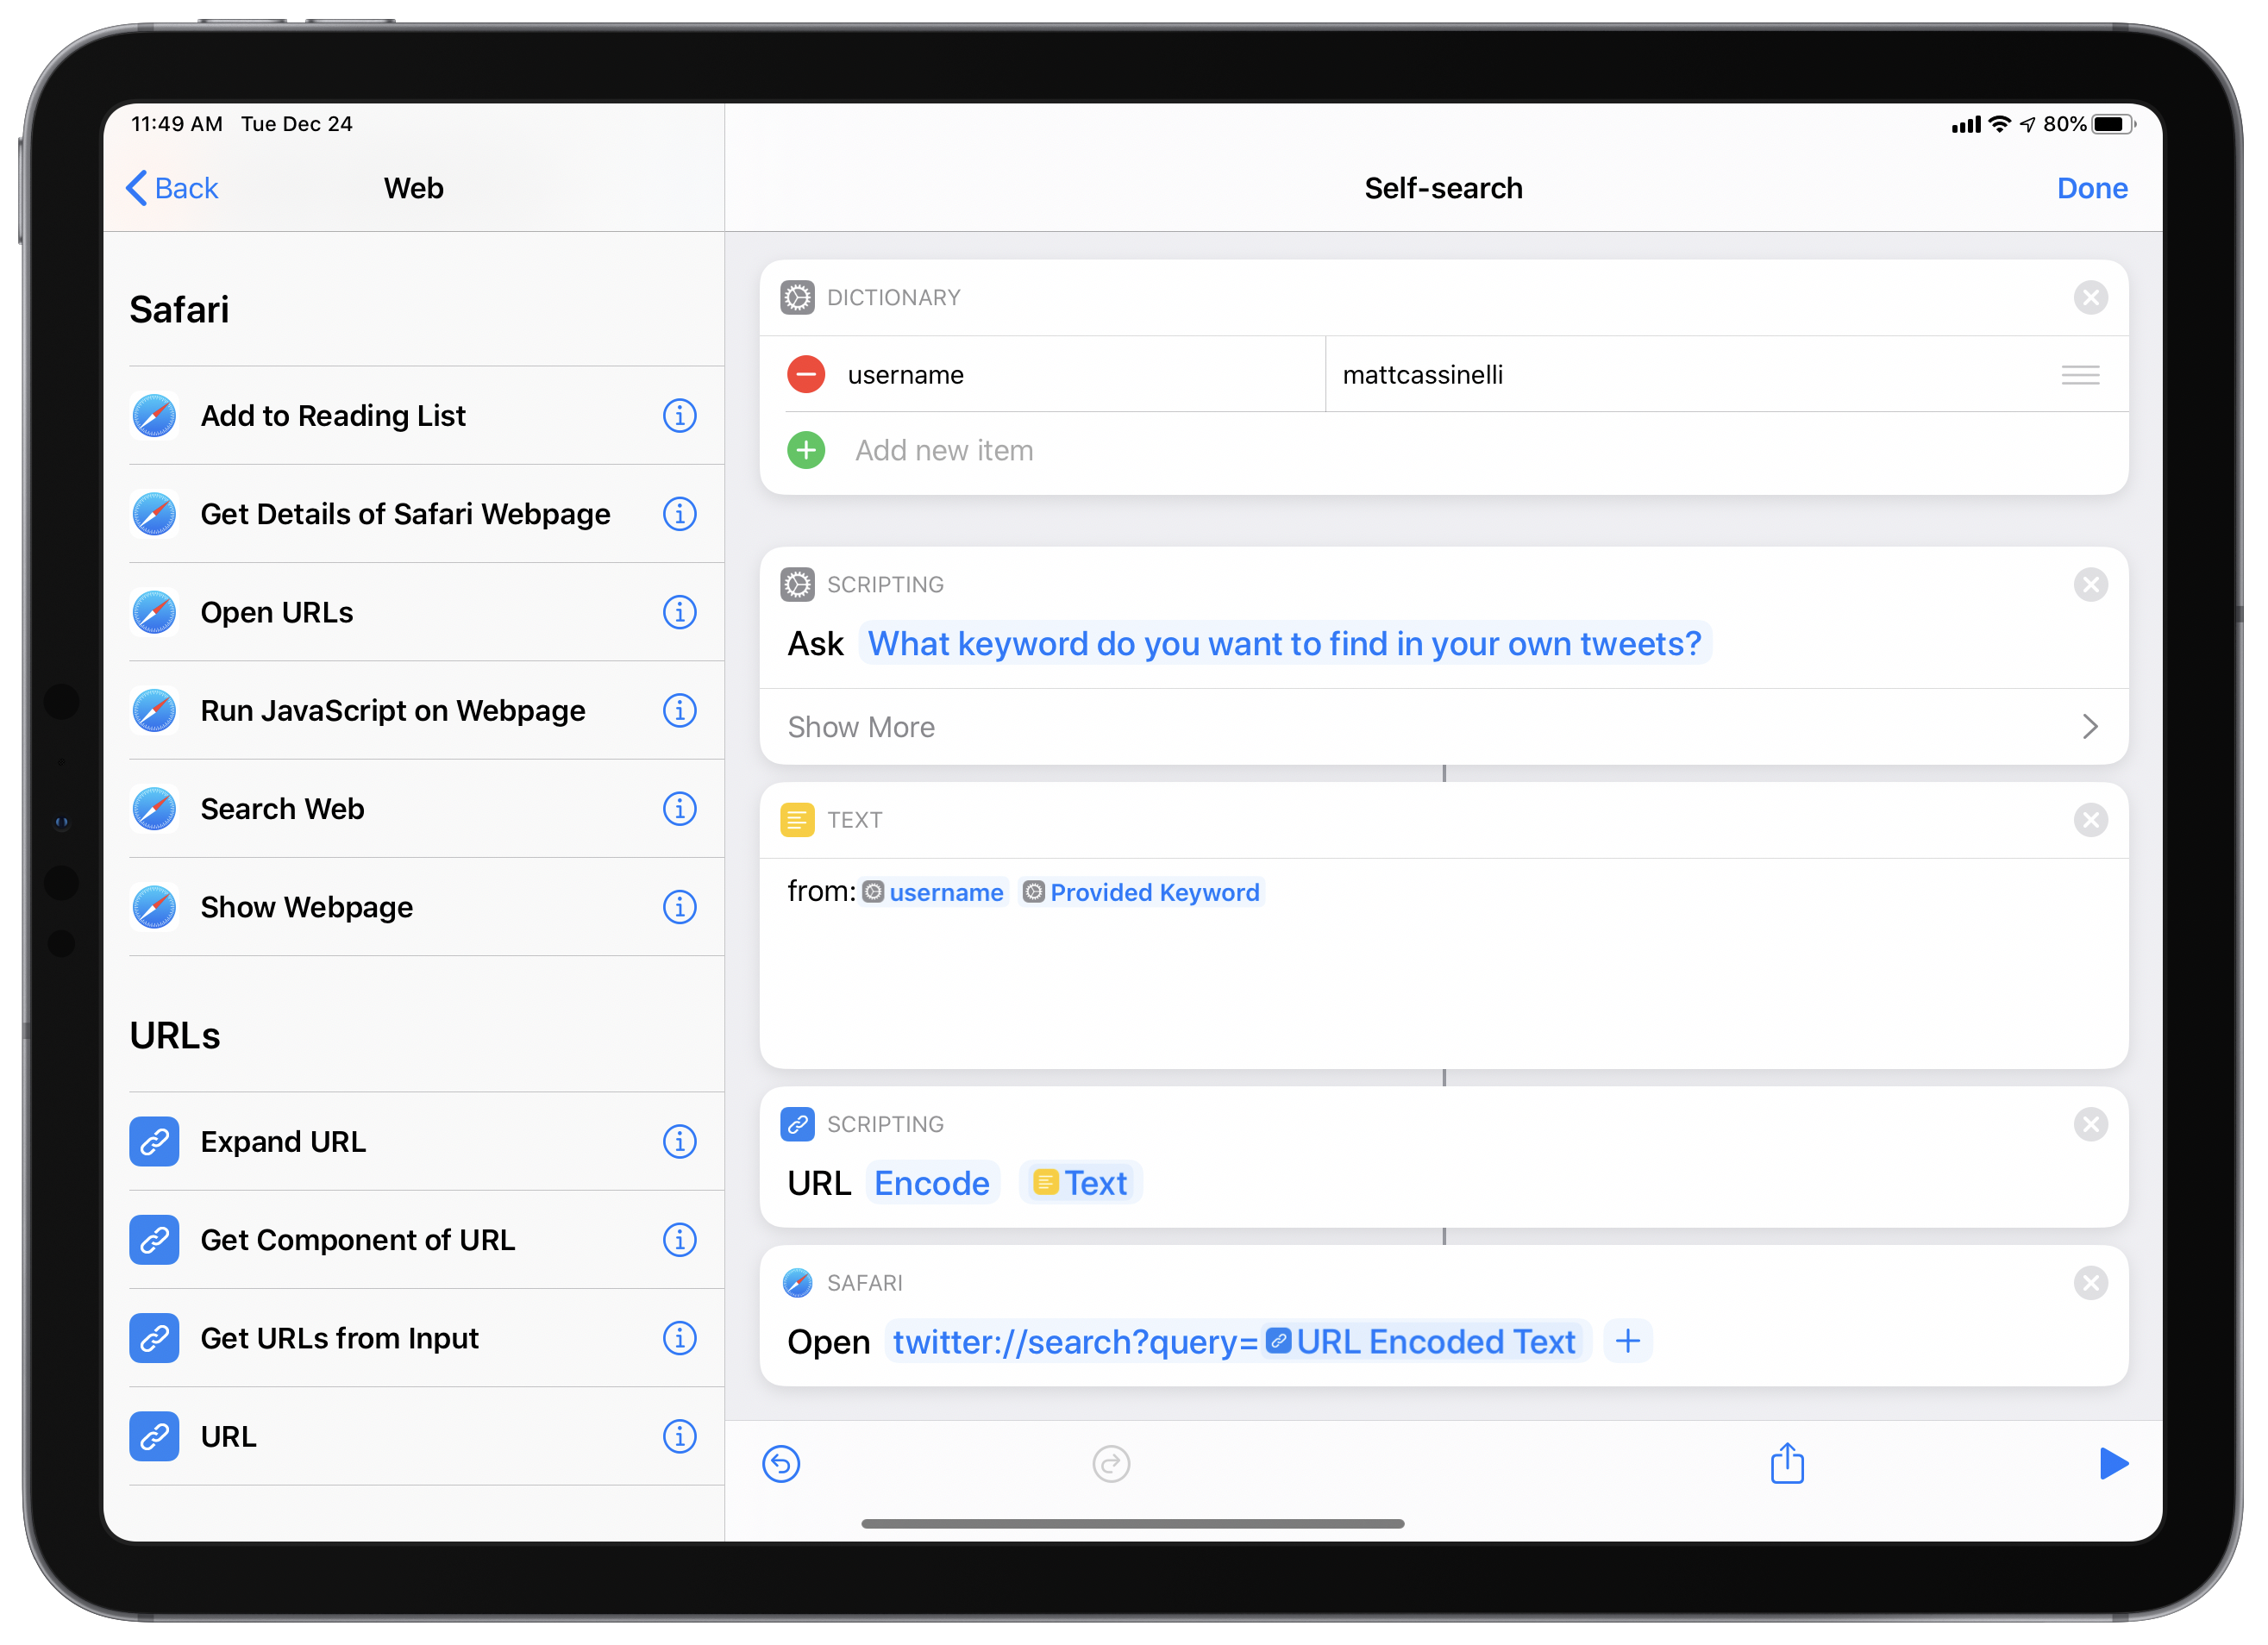
Self-search is a handy shortcut I built for Twitter users:
Using a Twitter username inputted on import and a keyword entered when the shortcut is run, this shortcut takes the info, URL-encodes it into a Twitter link, and opens into the app to show the results.

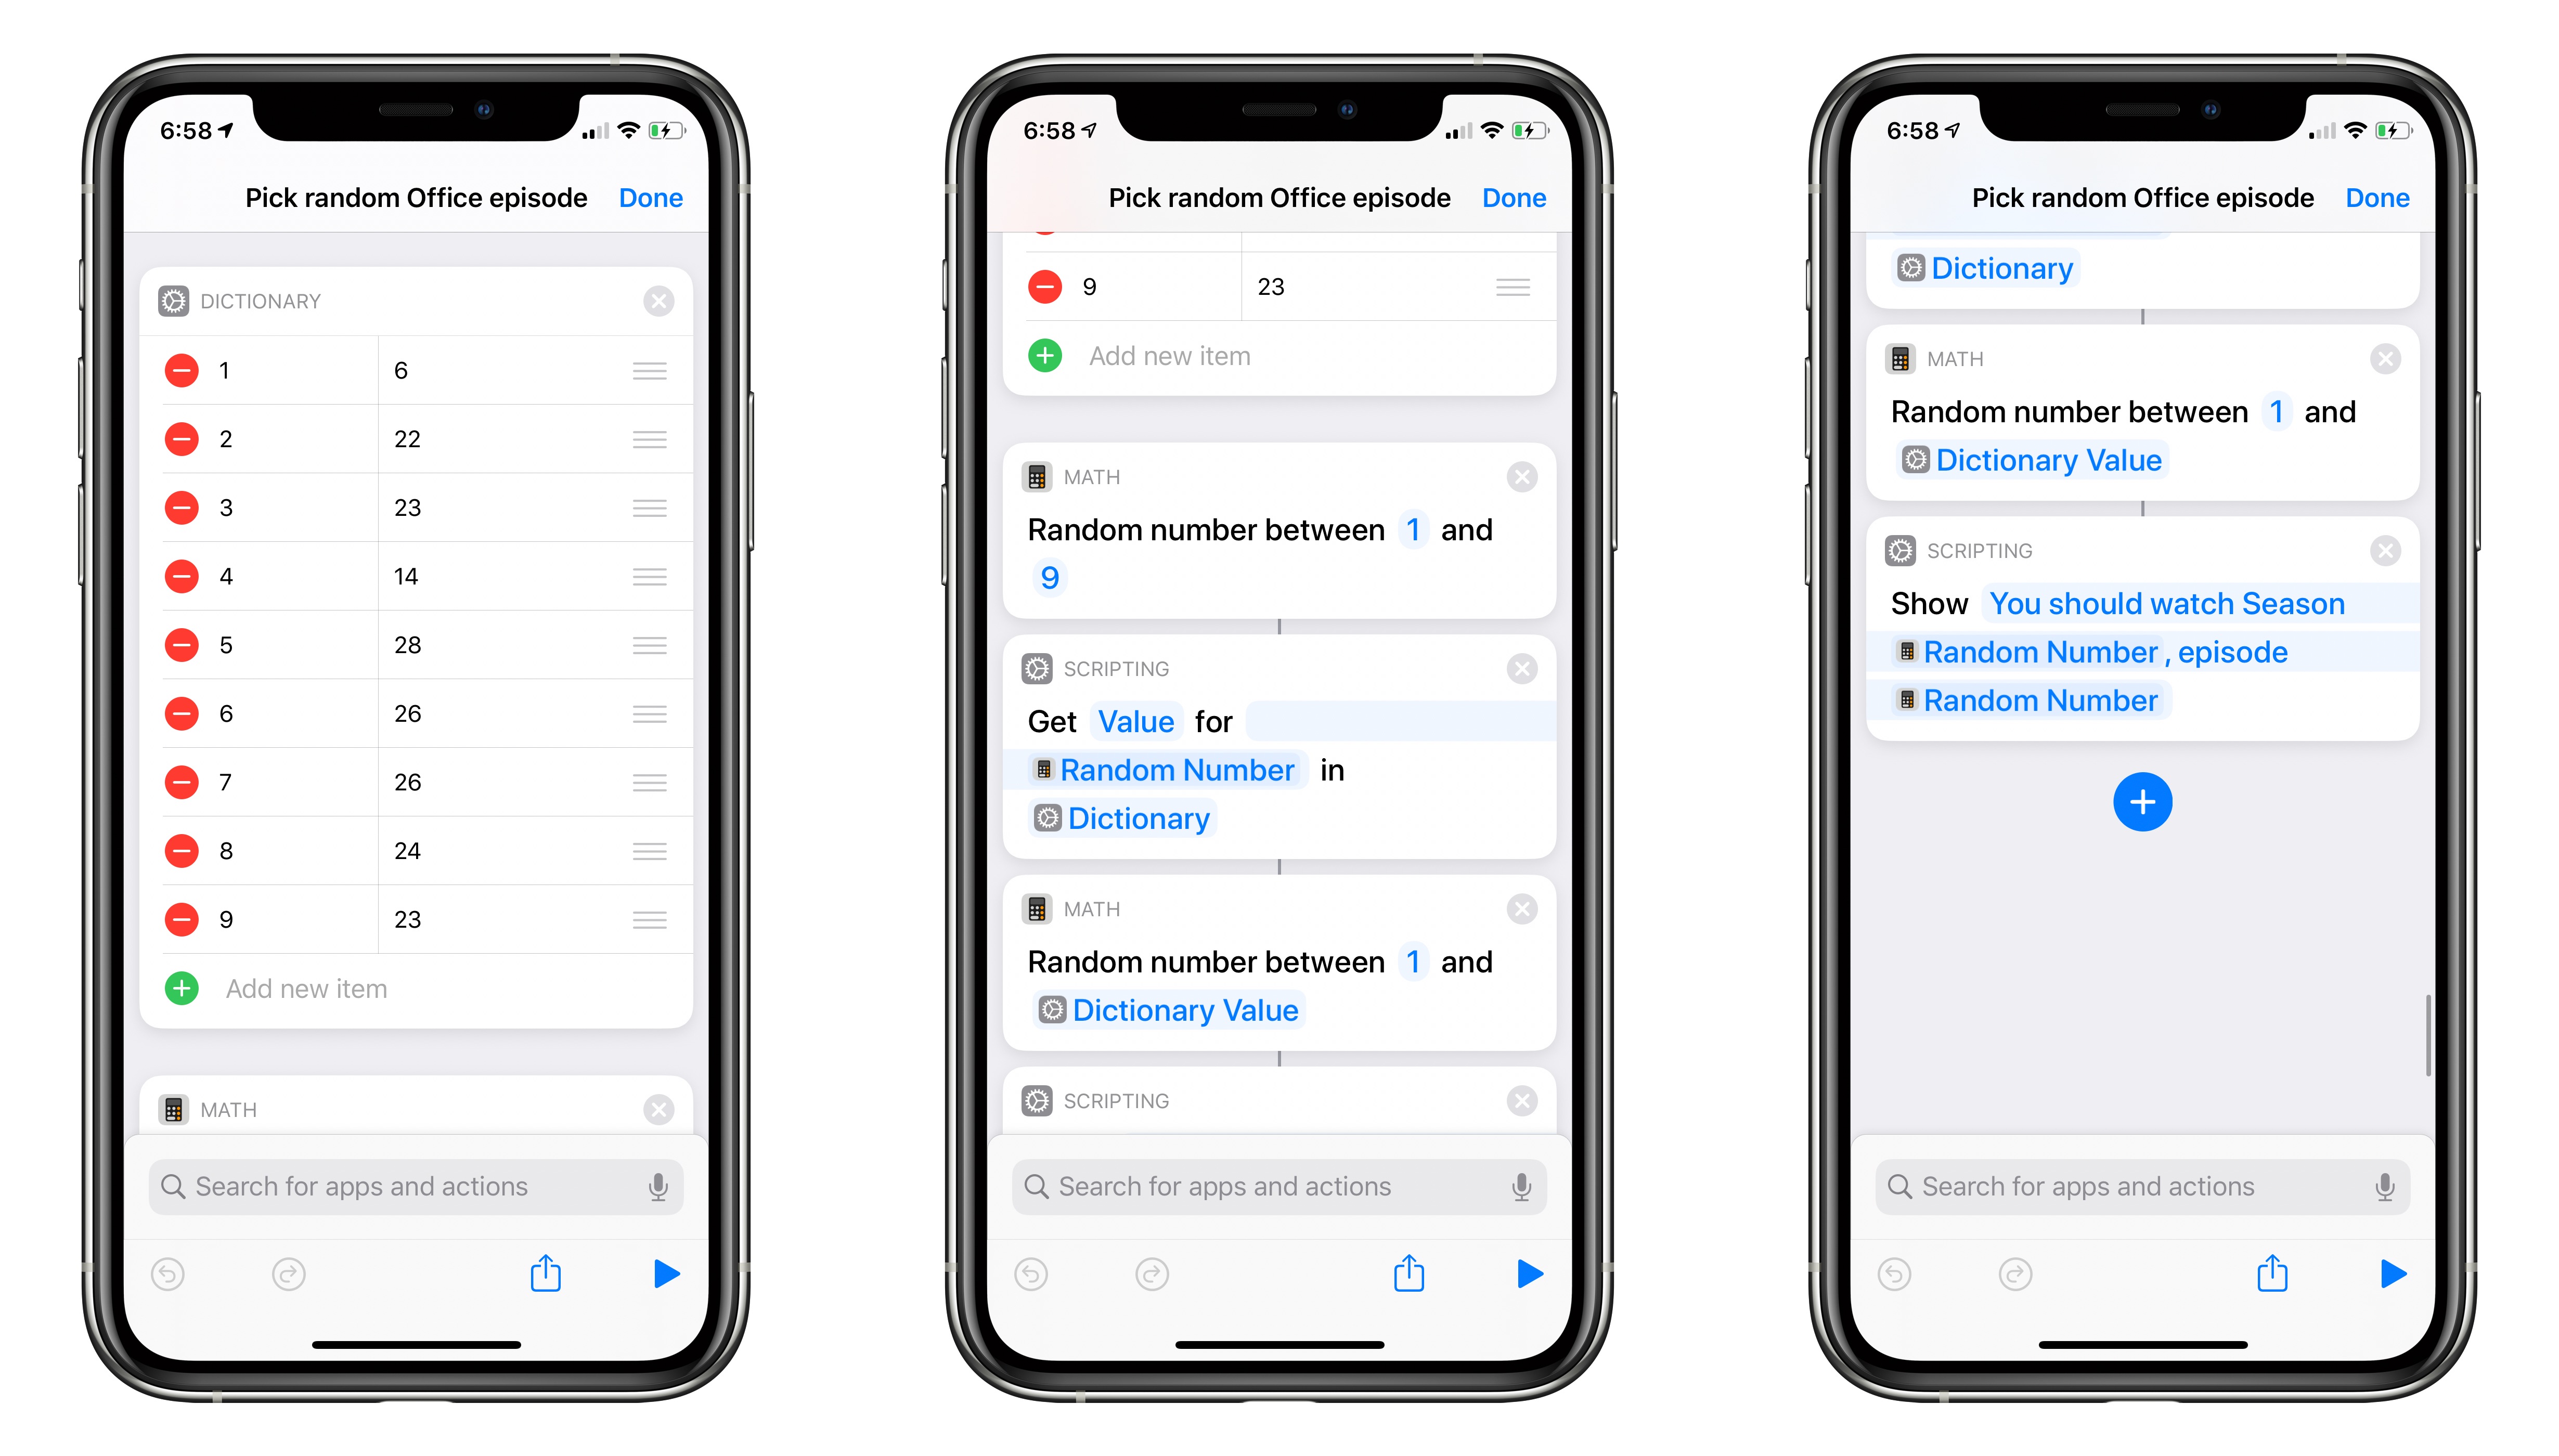
If you love The Office and want to have a random episode picked for you, this shortcut is for you:
Using a dictionary filled out with the season numbers and corresponding episode counts for each, this picks a random season, then episode, then displays it in an alert as Netflix opens on the Apple TV.
Works aloud when run from Siri; good for HomePod.
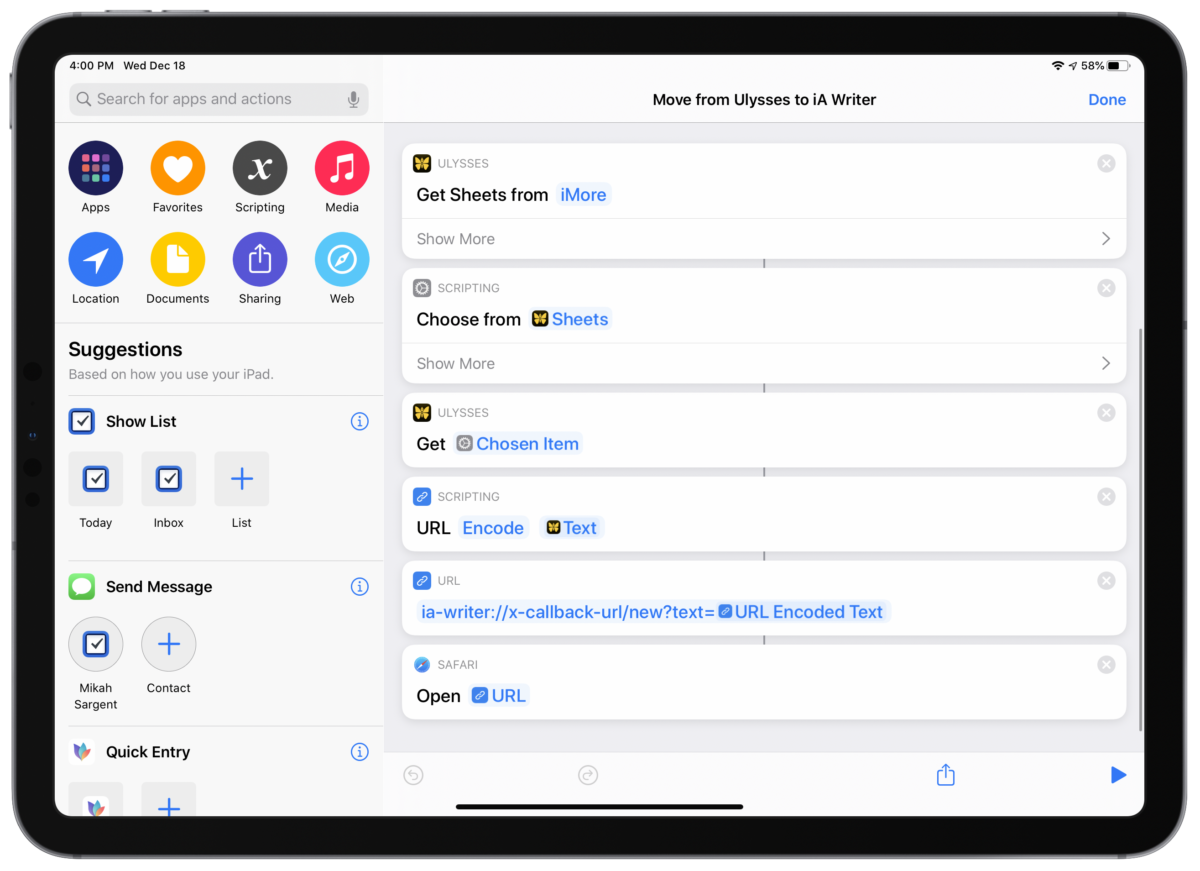

Just created this new shortcut Move from Ulysses to iA Writer:
Gets sheets from a group in Ulysses, asks which one to use, then adds it into iA Writer via their URL scheme. Only accepts text, so you’ll have to move over any images.
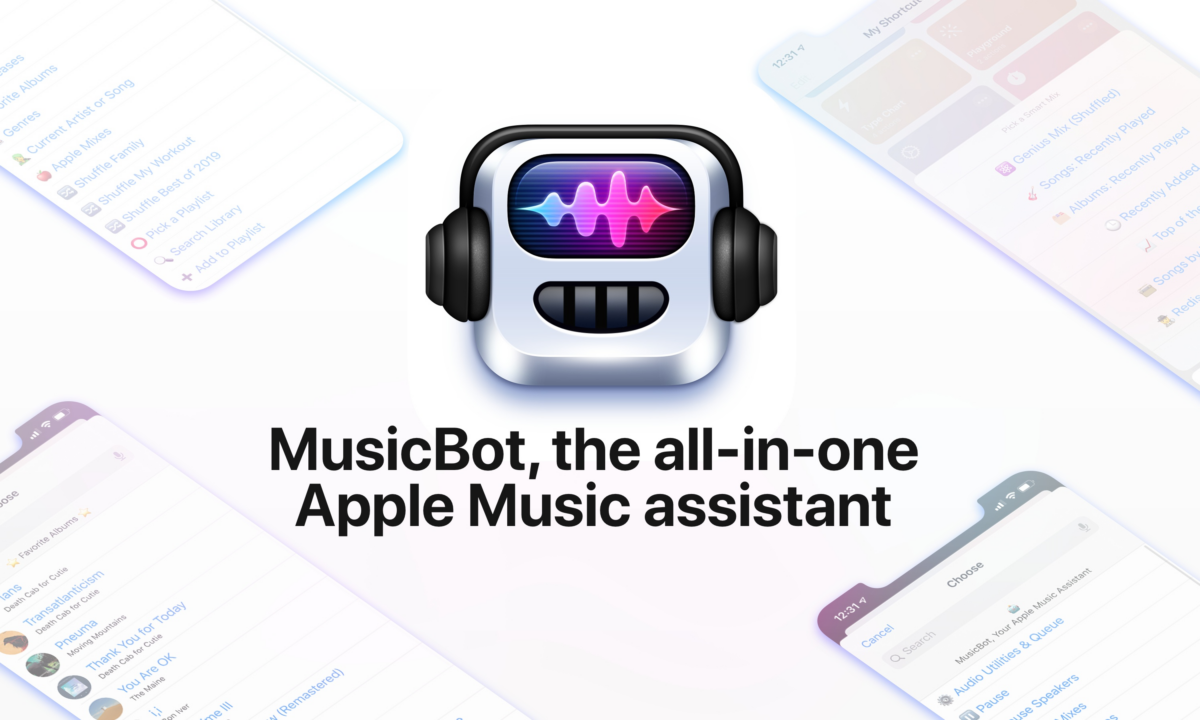

Federico Viticci, doing his usual excellent work on MacStories:
For the past several months, I’ve been working on a shortcut designed to be the ultimate assistant for Apple Music.
Called MusicBot, the shortcut encompasses dozens of different features and aims to be an all-in-one assistant that helps you listen to music more quickly, generate intelligent mixes based on your tastes, rediscover music from your library, control playback on AirPlay 2 speakers, and much more.
I poured hundreds of hours of work into MusicBot, which has gained a permanent spot on my Home screen. Best of all, MusicBot is available to everyone for free.
MusicBot is yet another one of Federico’s shortcuts that turns a vast number of functions into a single Siri Shortcut for you to use. Plus, look at that custom icon!
I quite literally have over 50 music-based shortcuts that this will be replacing.

On episode 11 of Smart Tech Today, Mikah and I covered a K-Pop rapper’s AirPods problem, Samuel L. Jackson on your Echo, and Sling TV on your Google Nest Hub:
Jon Fingas, writing for Endgaget about Transit for iOS releasing a new version of their Apple Watch app:
The popular public transportation tool is now a native app, of course, but it also gives you considerably more detail than just arrival times, including future arrivals and a map indicating where to go.
I’m glad to see more apps slowly returning to the Apple Watch (or adopting it for the first time). Will be trying this out over the weekend ?.
On our tenth episode of Smart Tech Today, Mikah and I talk about these stories:
On episode 9 of Smart Tech Today, Mikah and I talked about:
On episode 8 of Smart Tech Today, Mikah and I talked about:

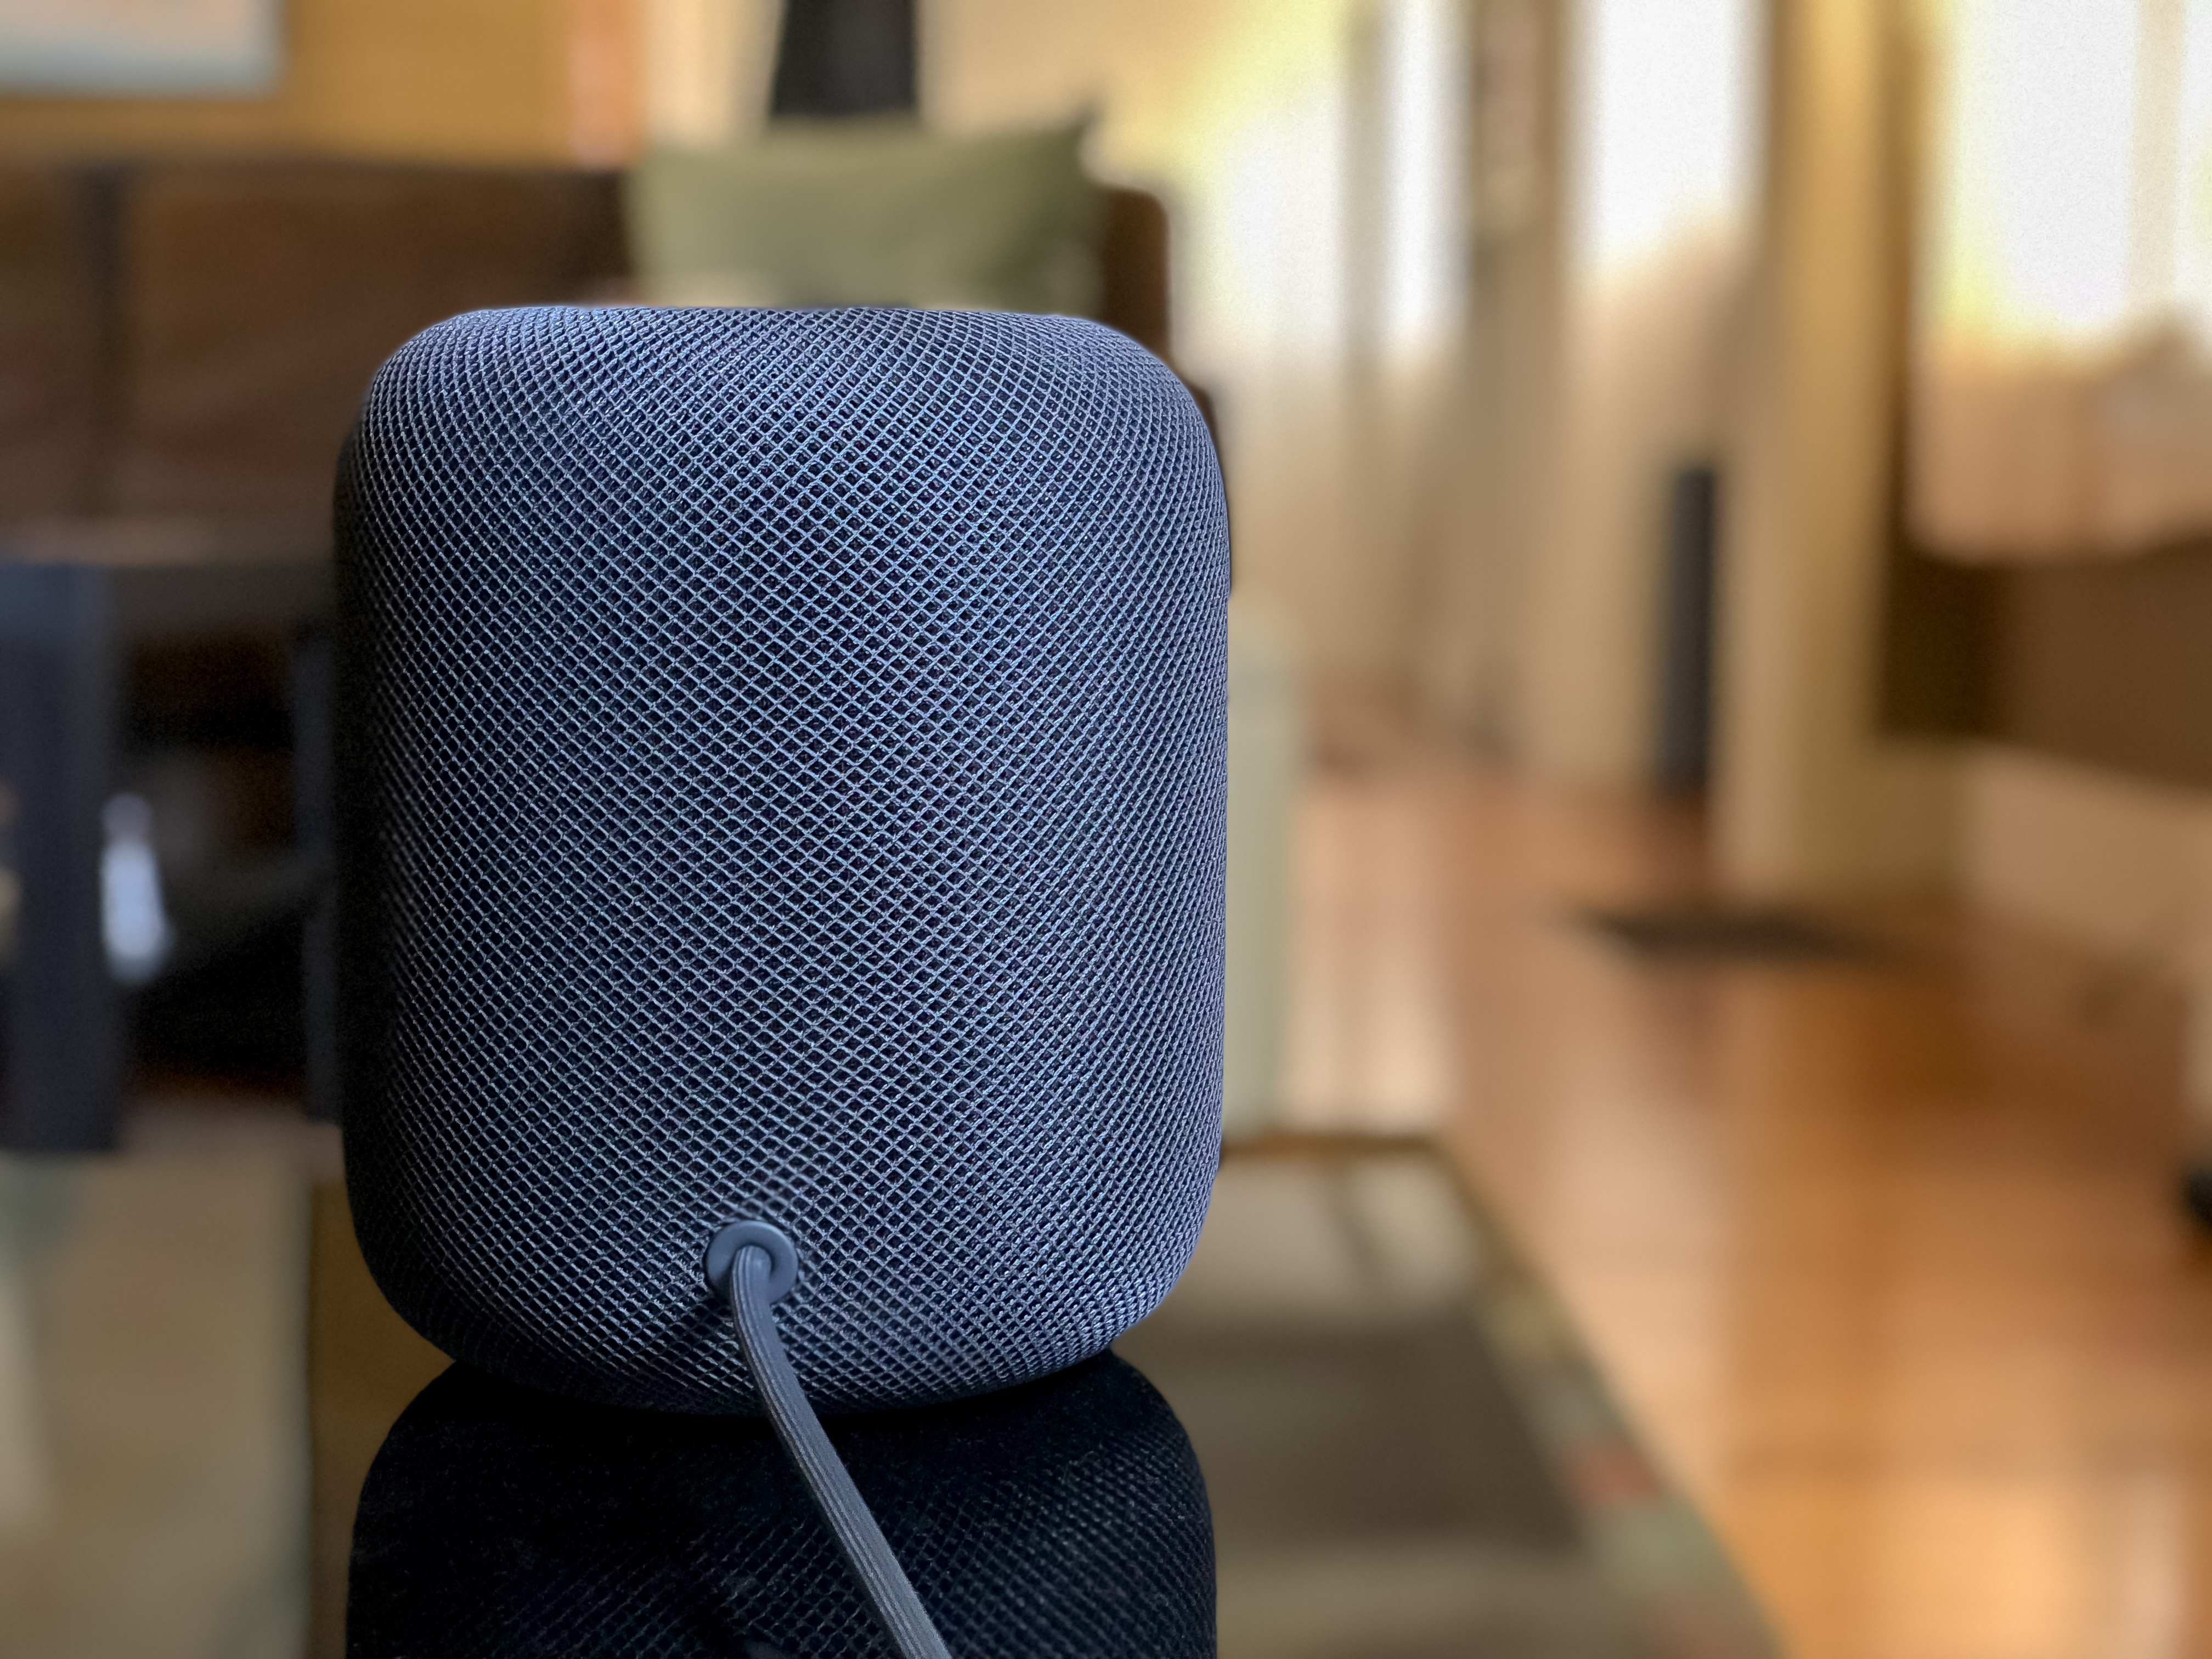
I’m a huge fan of the HomePod – after bearing the investment cost, it’s improved my daily interactions with music and opened access to controlling my smart home gear, plus provides a new medium for everything I’ve built in the Shortcuts app.
But one of the nagging problems with HomePod is the way Siri, regardless of the current time of day, will respond loudly at whatever volume you’ve previously set.
Whether it’s the middle of the night or super early in the morning, it’s all too common to ask Siri something and the answer shouted backed at you, only because you listened to music loudly sometime yesterday. Hopefully nobody wakes up, you curse at how dumb your supposedly “smart” speaker can be, and frantically try to turn it down.
Thankfully, iOS 13.2 provides a route to a solution by adding HomePods and AppleTV to scenes and automations – the HomePod didn’t fix this on its own, but, with a Home Automation, you can make it “smart” enough yourself.1
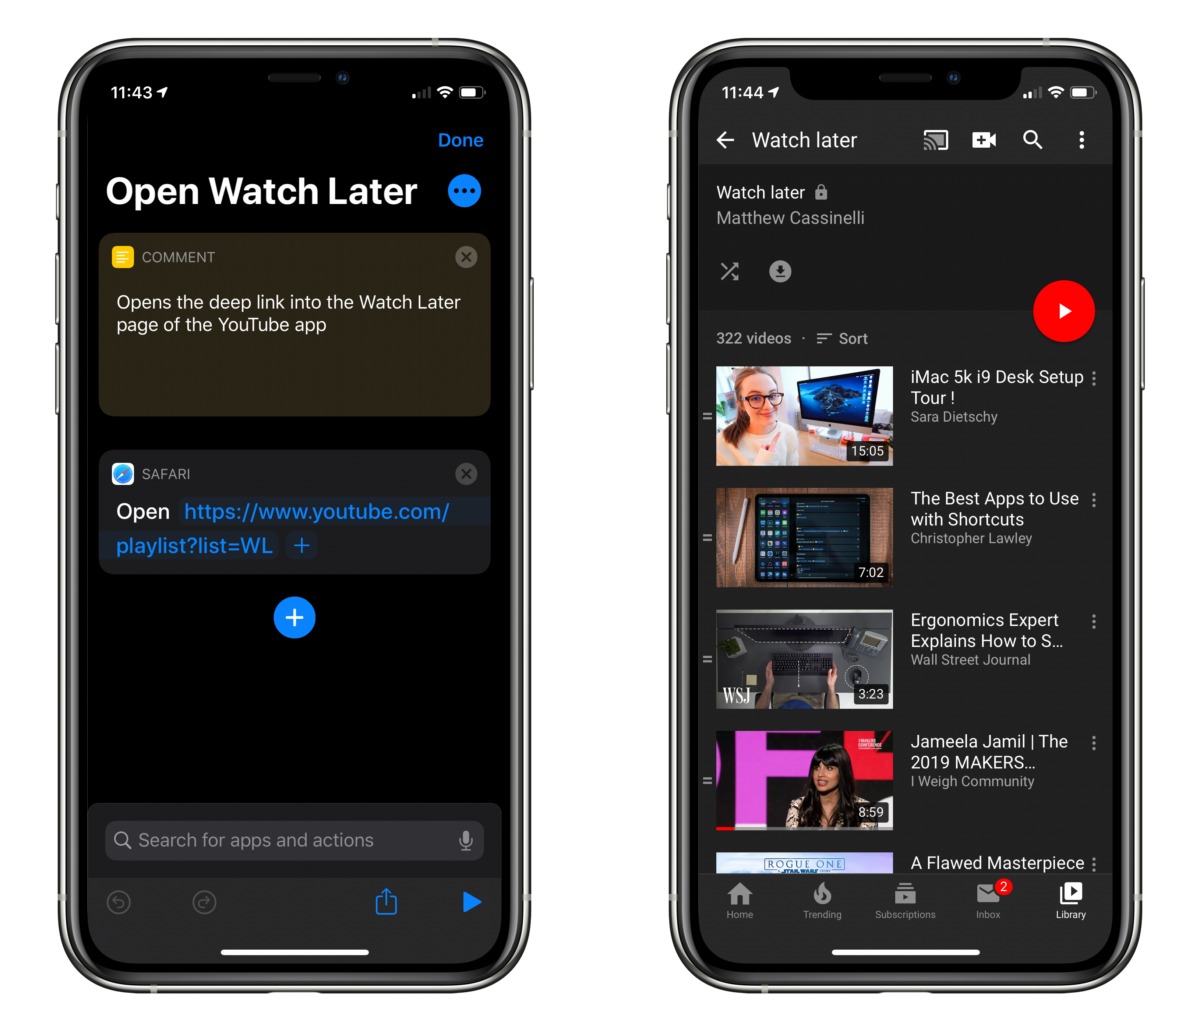
After adding a few videos from YouTube to my Watch Later playlist this afternoon, I looked in the Apps section of the Shortcuts app for some Siri Shortcuts from the YouTube app.
I’ve found actions that open the Search and Subscriptions section of the app before, but I wanted to quickly jump into the Watch Later bit which is buried in the Library tab – alas, there was no shortcut.
However, I then realized that YouTube.com links often redirect into the app, and I might be able to use that deep link instead.

On episode 7 of Smart Tech Today, Mikah and I talked about the following:

On this episode of Smart Tech Today, Mikah and I talk about:

On this episode of Smart Tech Today, Mikah and I talk about:

Mikah Sargent and I have recorded episode 2 of Smart Tech Today, this time over Skype and on the Twitch livestream. Here’s the description from the TWiT page:
Plus, here’s a set of Siri Shortcuts I created last week for subscribing and listening to the show:
We’ll be live next Monday at our usual 4pm PST – thanks for listening along so far!
Links for the show:

On Monday, Mikah Sargent and I recorded episode 1 of Smart Tech Today in person at the TWiT studio. In the show, we:

Here’s Mikah and I after recording – had a blast! We’re off to a great start, but any help sharing the show to new people still goes a long way.
Once we hit 30,000 subscribers, we’ll have a full video feed of each episode too, available on our YouTube channel:
Plus, here’s a set of Siri Shortcuts for subscribing and listening to the show:
We’ll be live every Monday at 4pm PST, with the episode dropping later each evening. Thanks for listening!
Links for the show: